
Hello! My name is Angelo Fresti and I am a graphic designer from Italy. In my spare time I design board and card games and I often make the boxes for my prototypes myself. Today I would like to share my knowledge about how to make a custom made classic boardgame box, better known as ‘rigid box’ or ‘set-up box’. Those kinds of tabletop boxes provide a durable and elegant packaging for any type of board game, card game and puzzles. You can make your own board game box even more exclusive by using luxurious printing techniques like a ‘linen finish’ or a ‘relief embossing’. In this tutorial I’m going to focus on a little box for card games or small board game prototypes, but by enlarging the proportions you can use this tutorial for any type of box size.
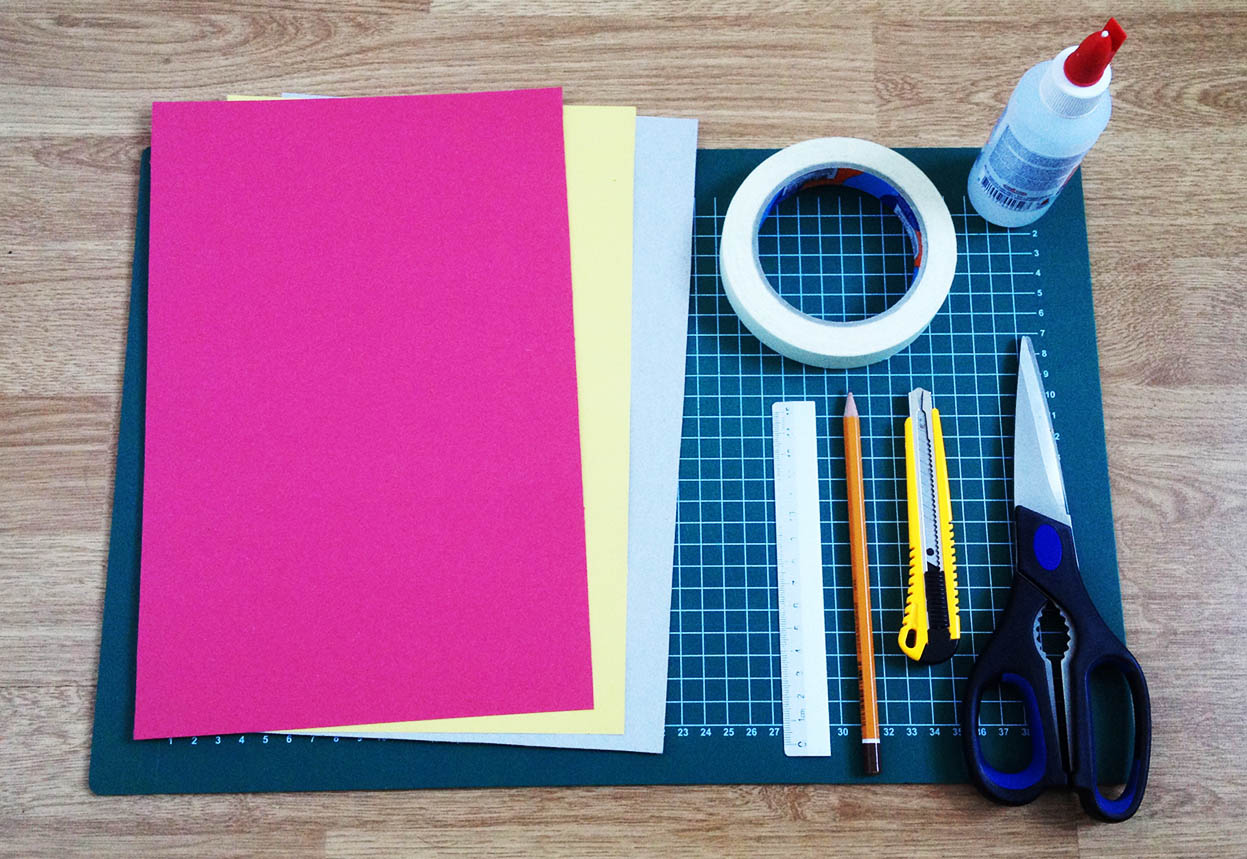
In order to create the classic board game box you need the following tools and materials:
• Cutting mat
• Scissors
• Utility knife
• Pencil
• Steel ruler
• Glue
• Painter’s tape
• Cardboard (1mm – 2mm)
• Printed artwork on poster/flyer paper
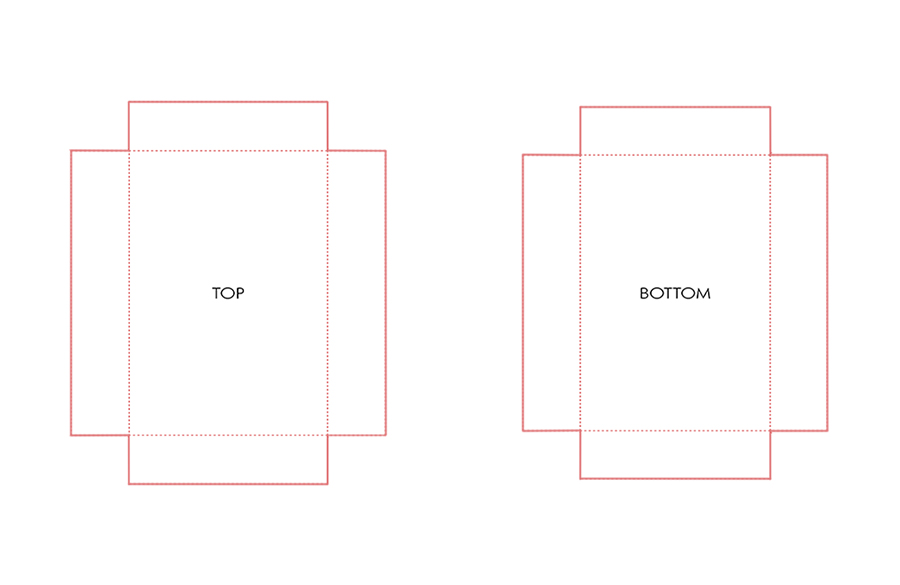
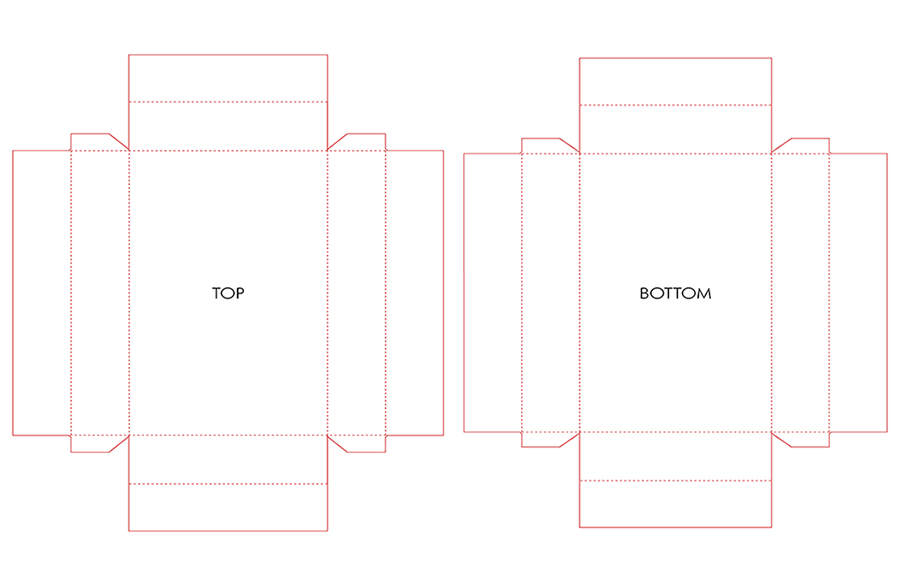
For the cardboard base you need to find (or make) a template with the dimensions as desired. On sites such as The Game Crafter you can download free templates for different kinds of boxes.
I always make a stencil when I have to make several boxes for my prototypes. By tracing the outlines of the stencil you can quickly make some top and bottom parts for the cardboard base.
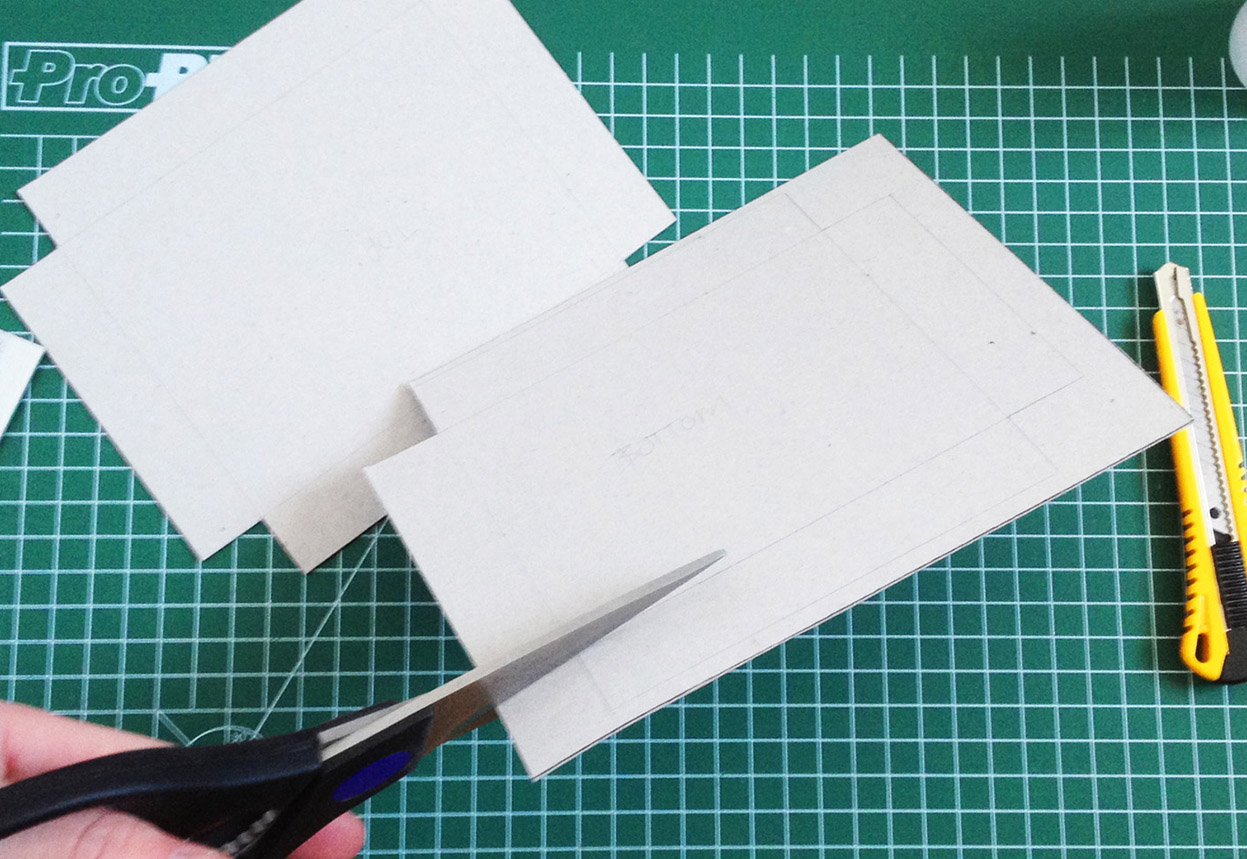
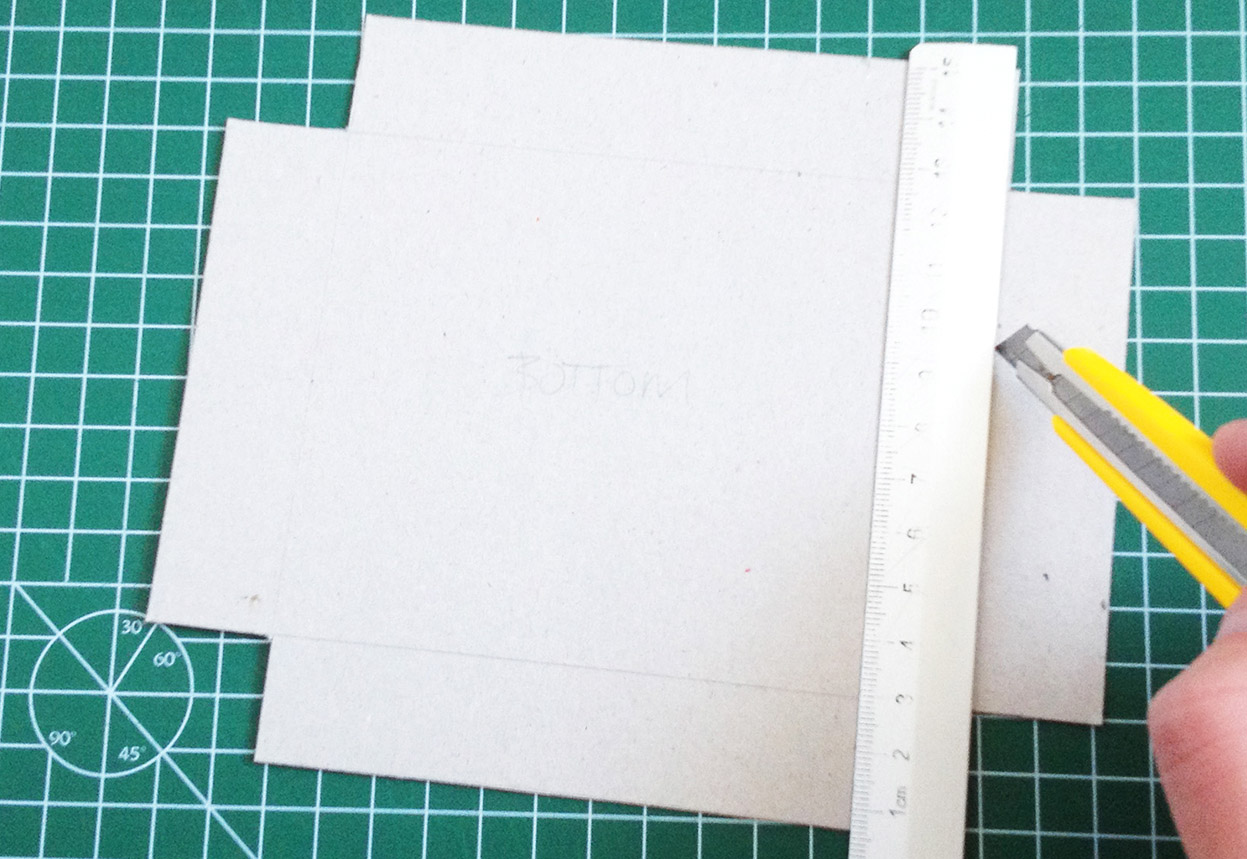
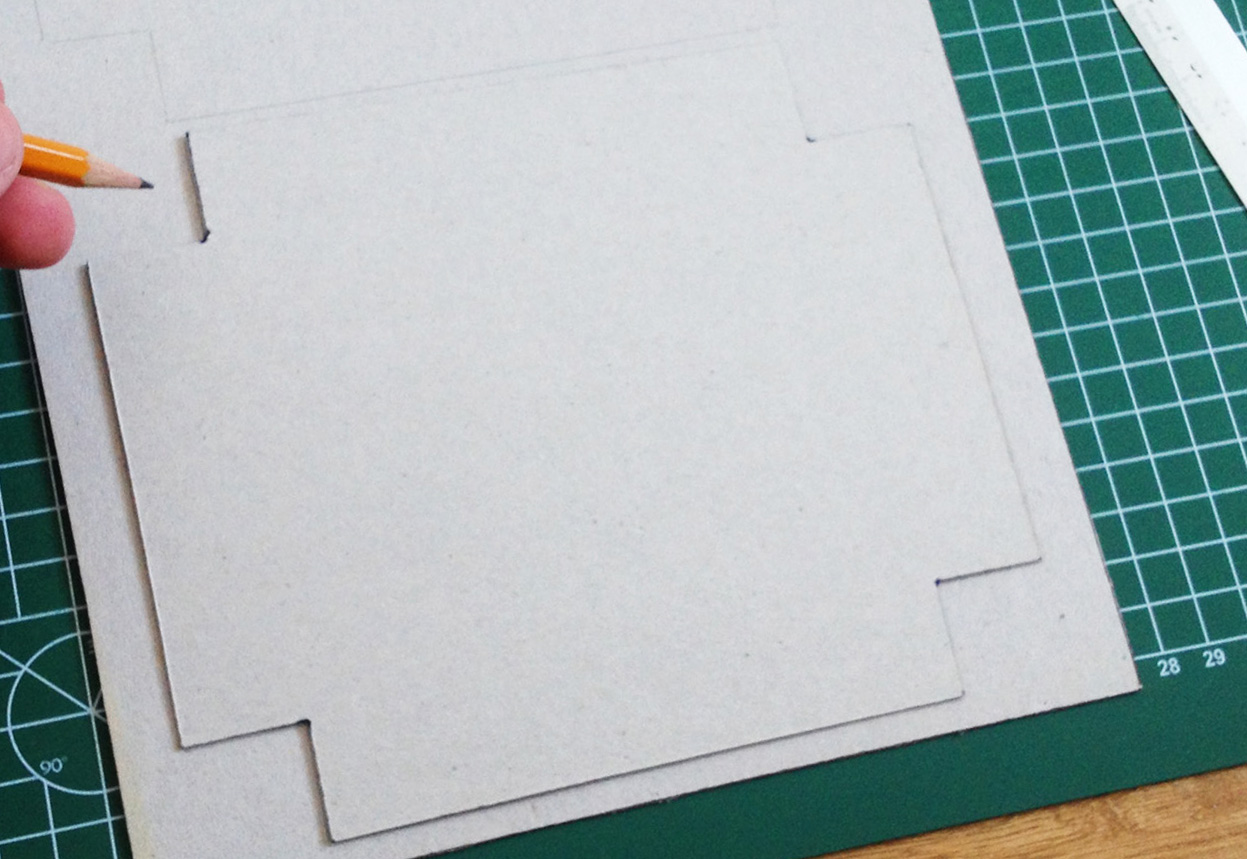
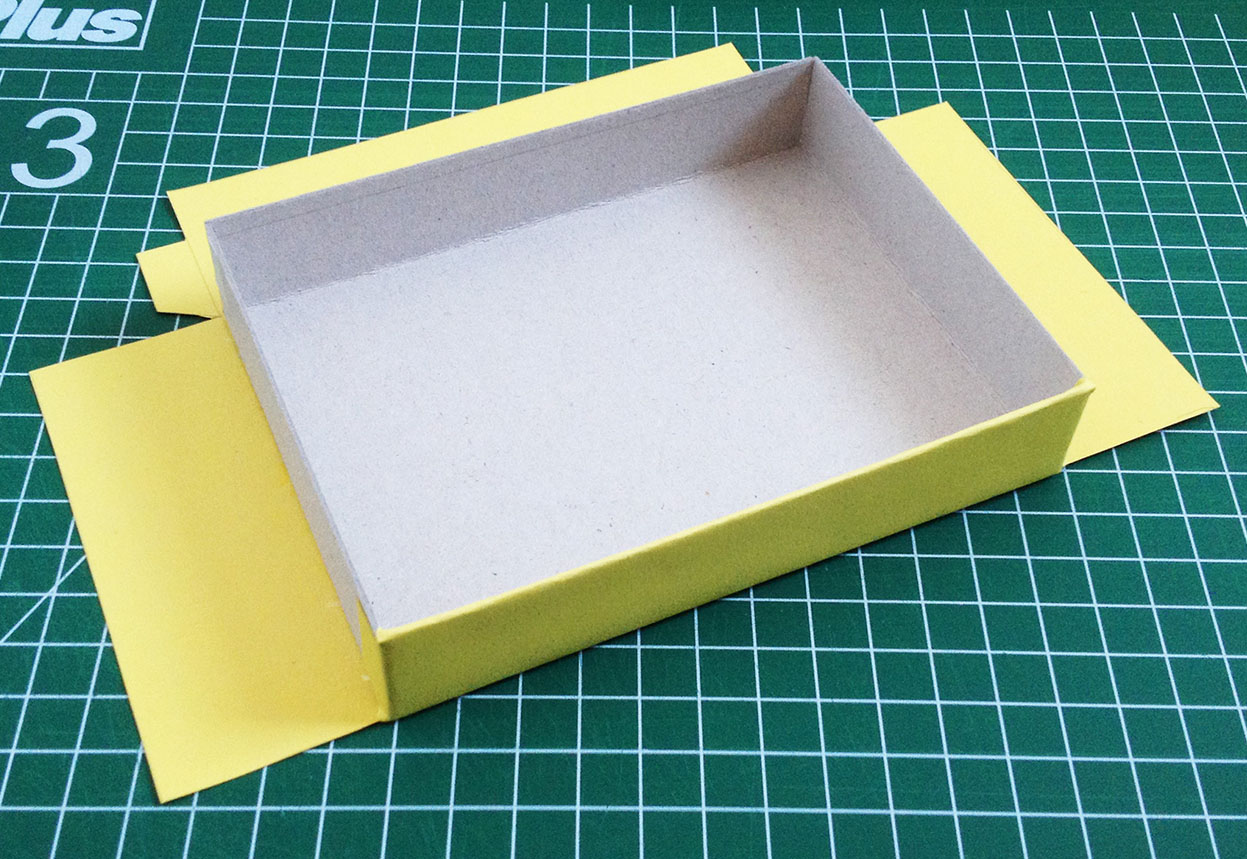
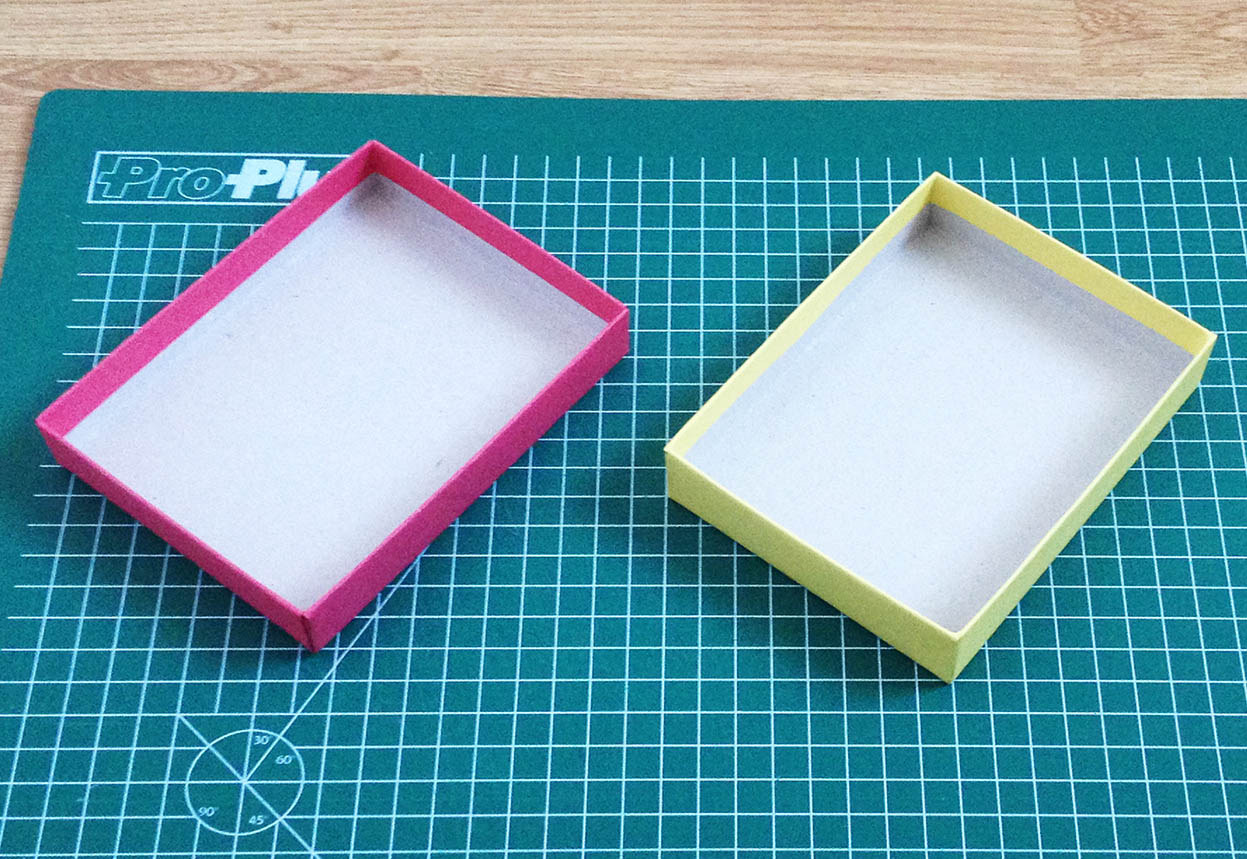
Cut out both parts of the cardboard base with scissors. By using a steel ruler you can carefully trace the folding lines with a utility knife to slightly cut them. Do not press too hard otherwise you will cut through the cardboard.
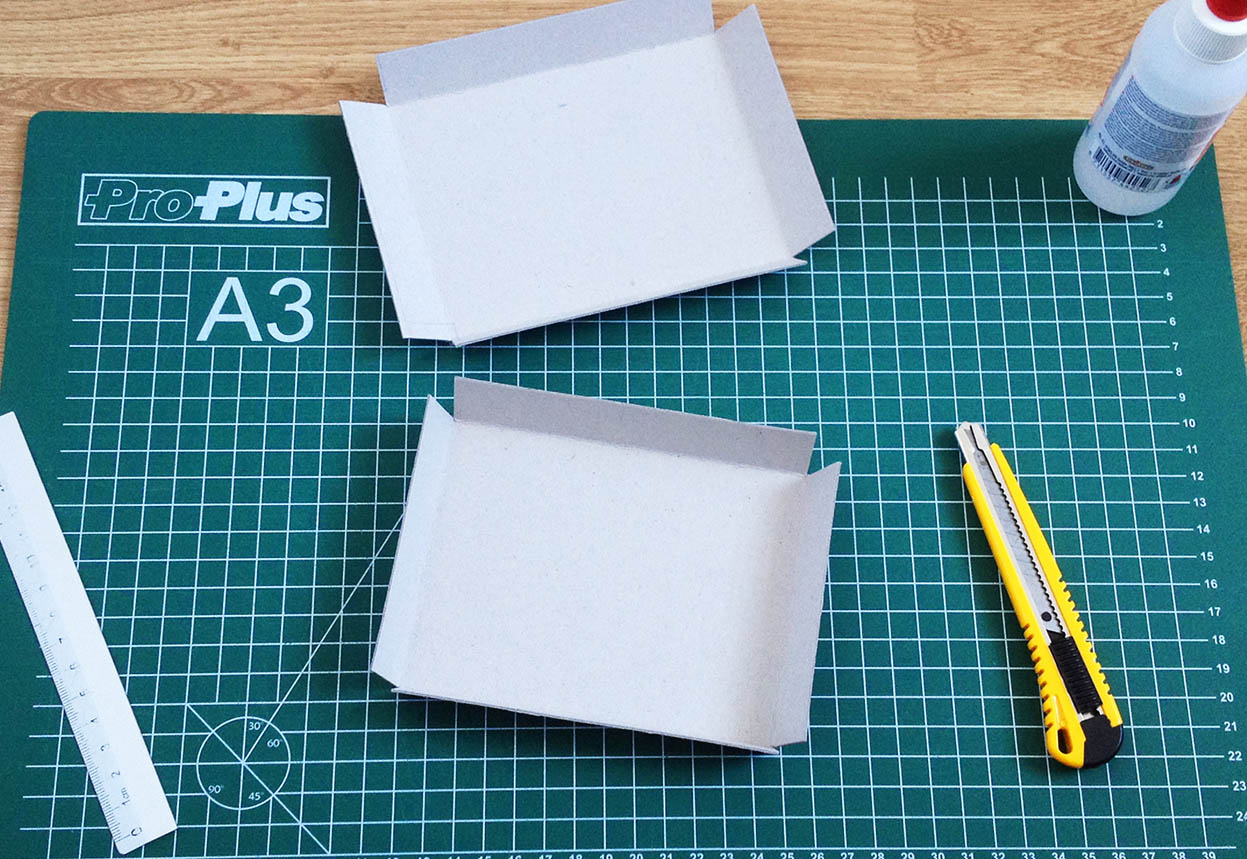
After you’ve slightly incised all folding lines you can fold the protruding sides inwards, with the incisions pointing outwards.
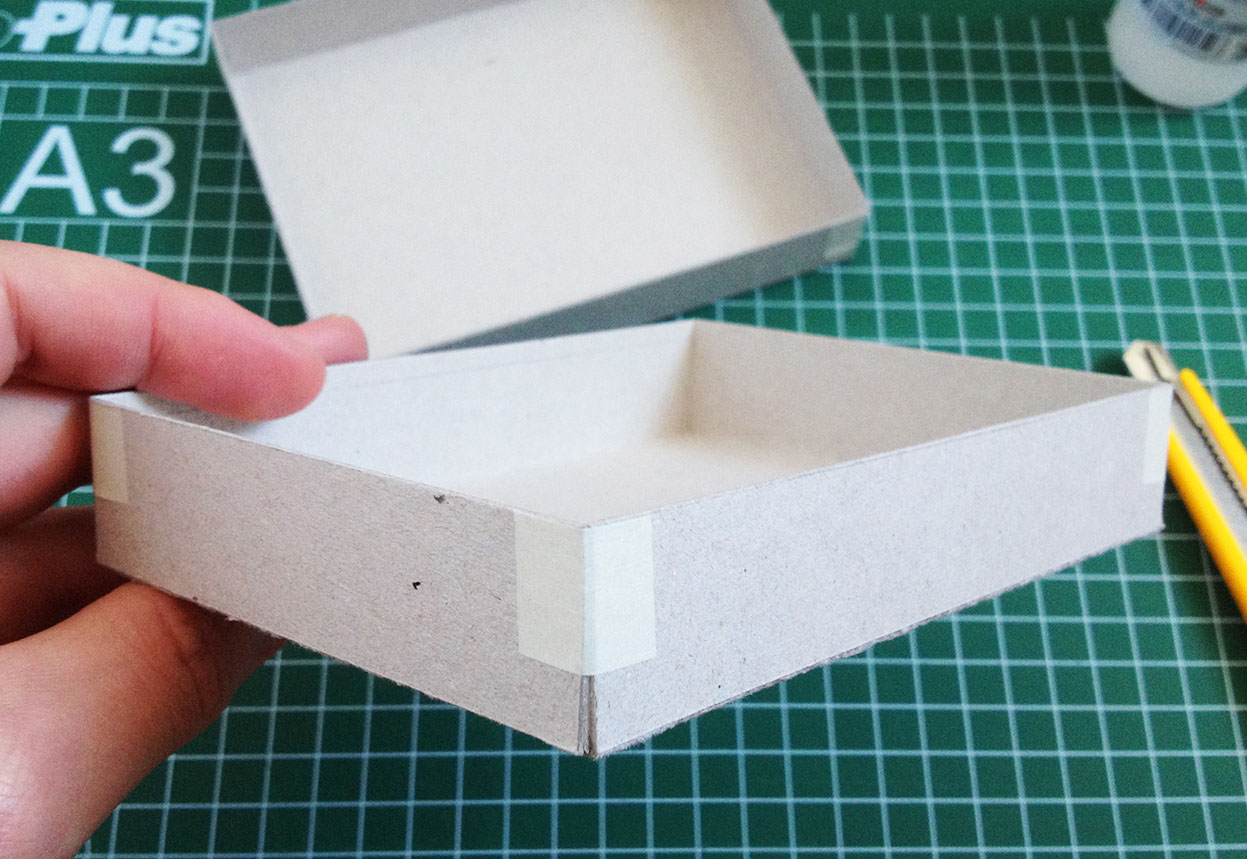
Use some pieces of painter’s tape to hold the corners of the box halves together.
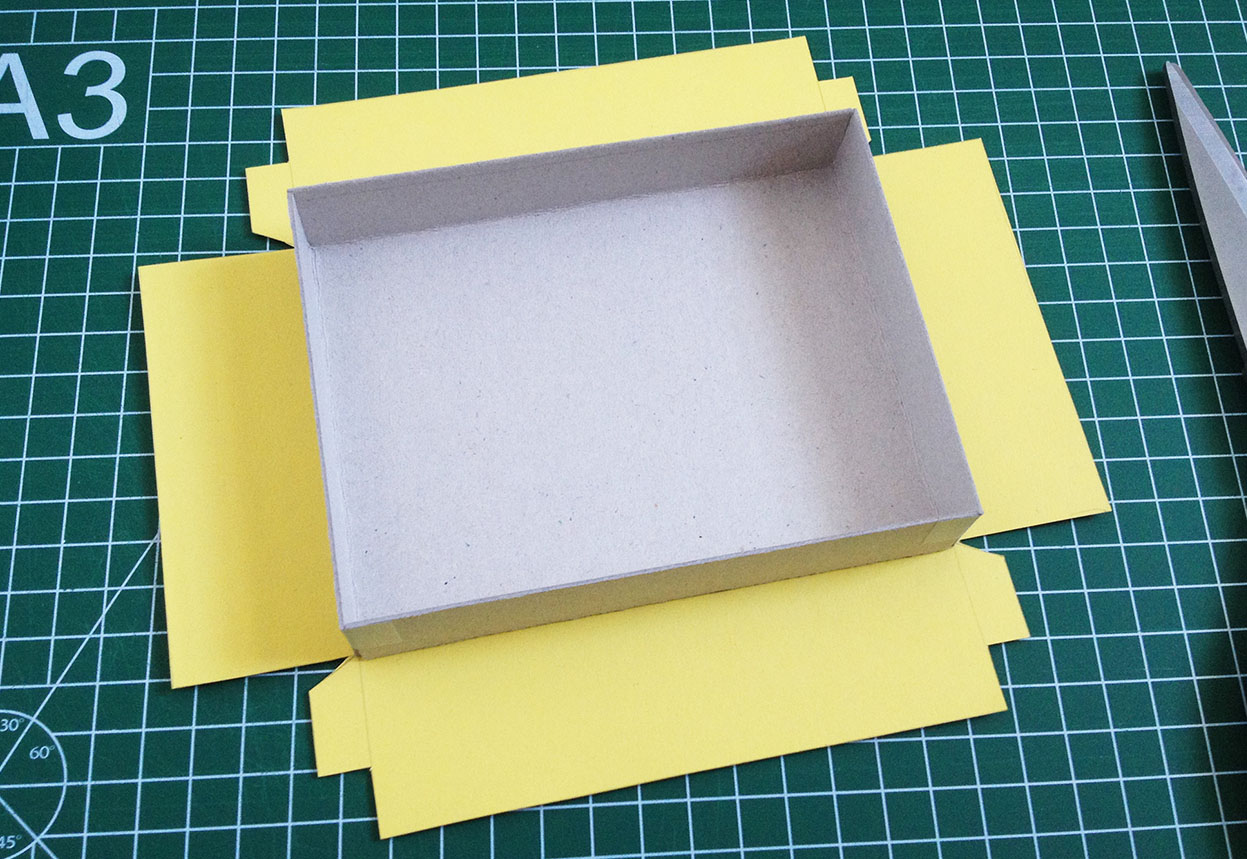
You can use a template to design your artwork in graphic software like Photoshop or Illustrator. I always use InDesign to make the artwork fit properly on all sides of the box.

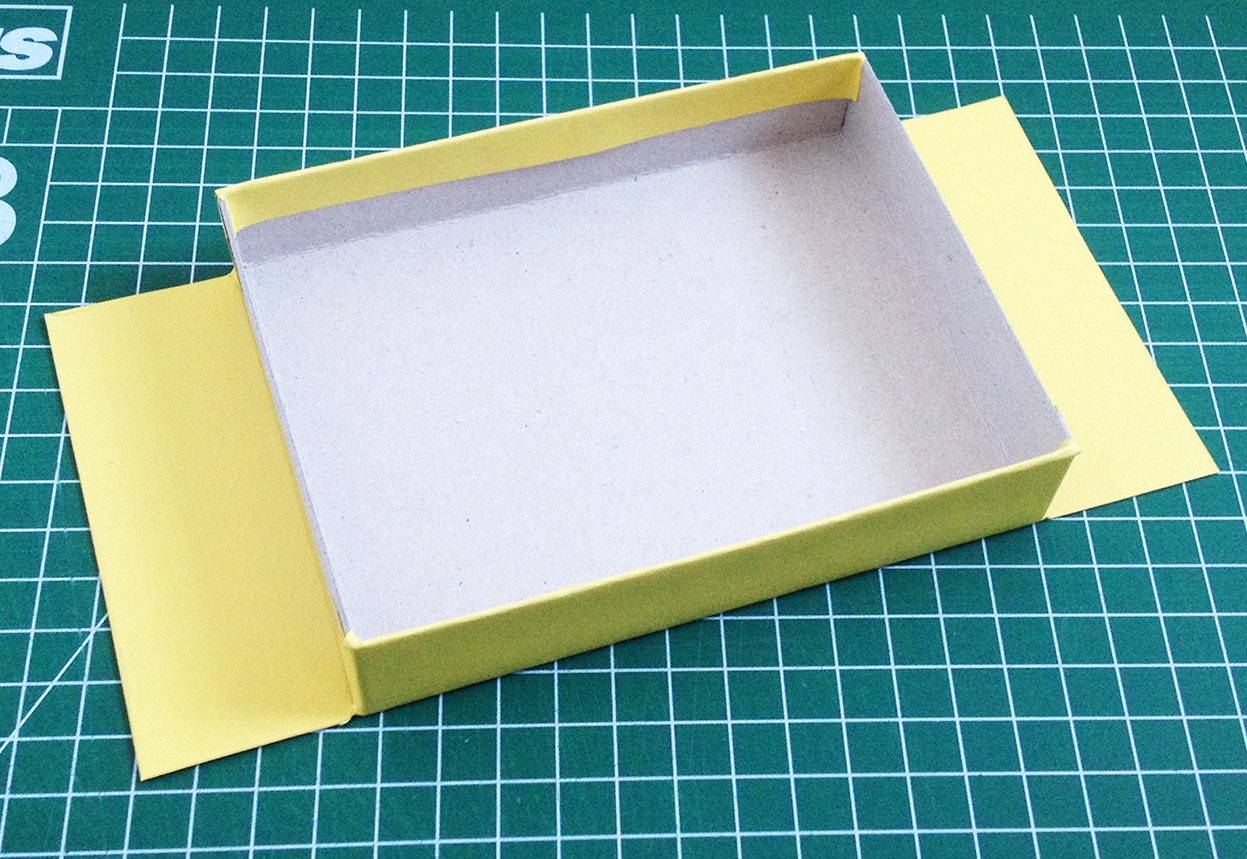
When I’m making my prototypes to send across the globe to publishers I print my artwork on high quality poster paper. For this tutorial I’m using colored paper to differentiate the top and bottom part of the box.
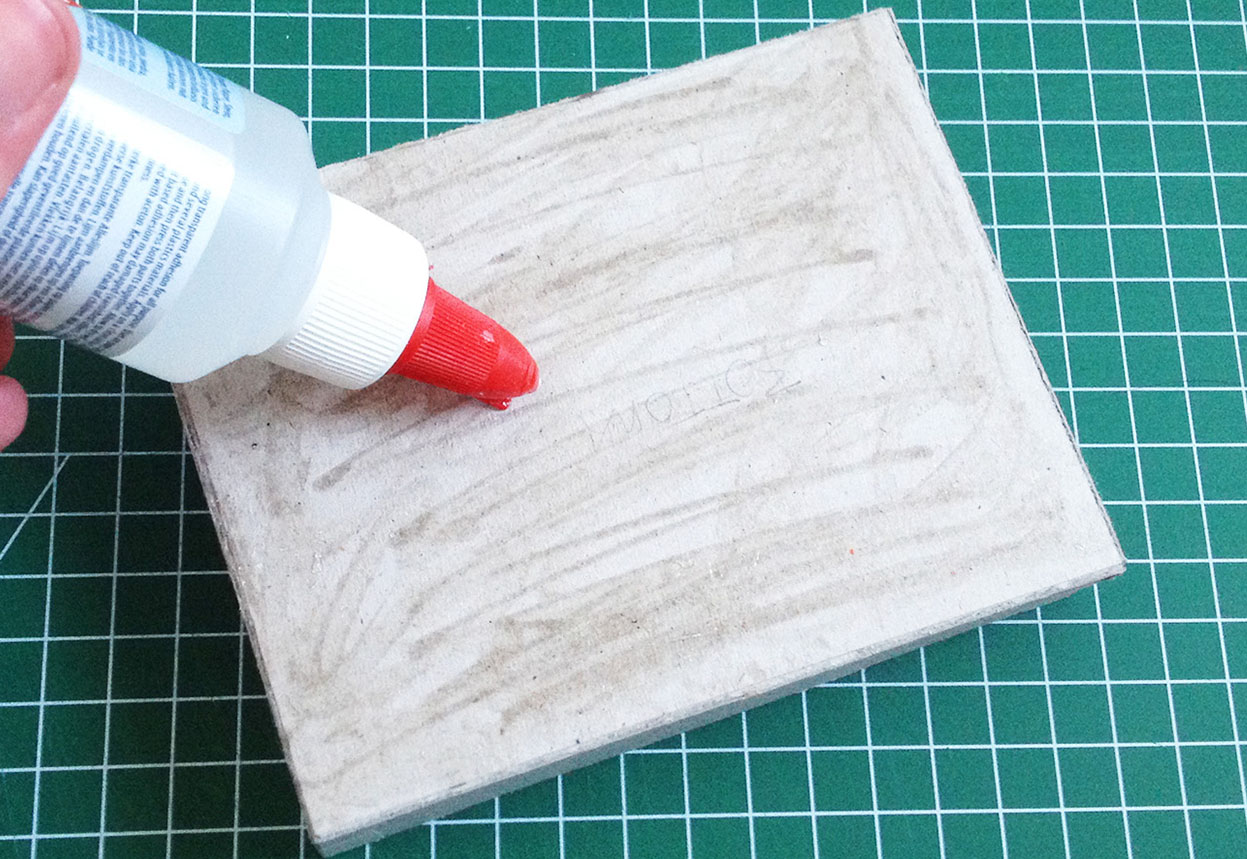
Now its time to glue the artwork on the cardboard base! First start with the bottom and gradually spread the glue over the entire surface.
Press the glued surface against the inside of the artwork and align it properly.
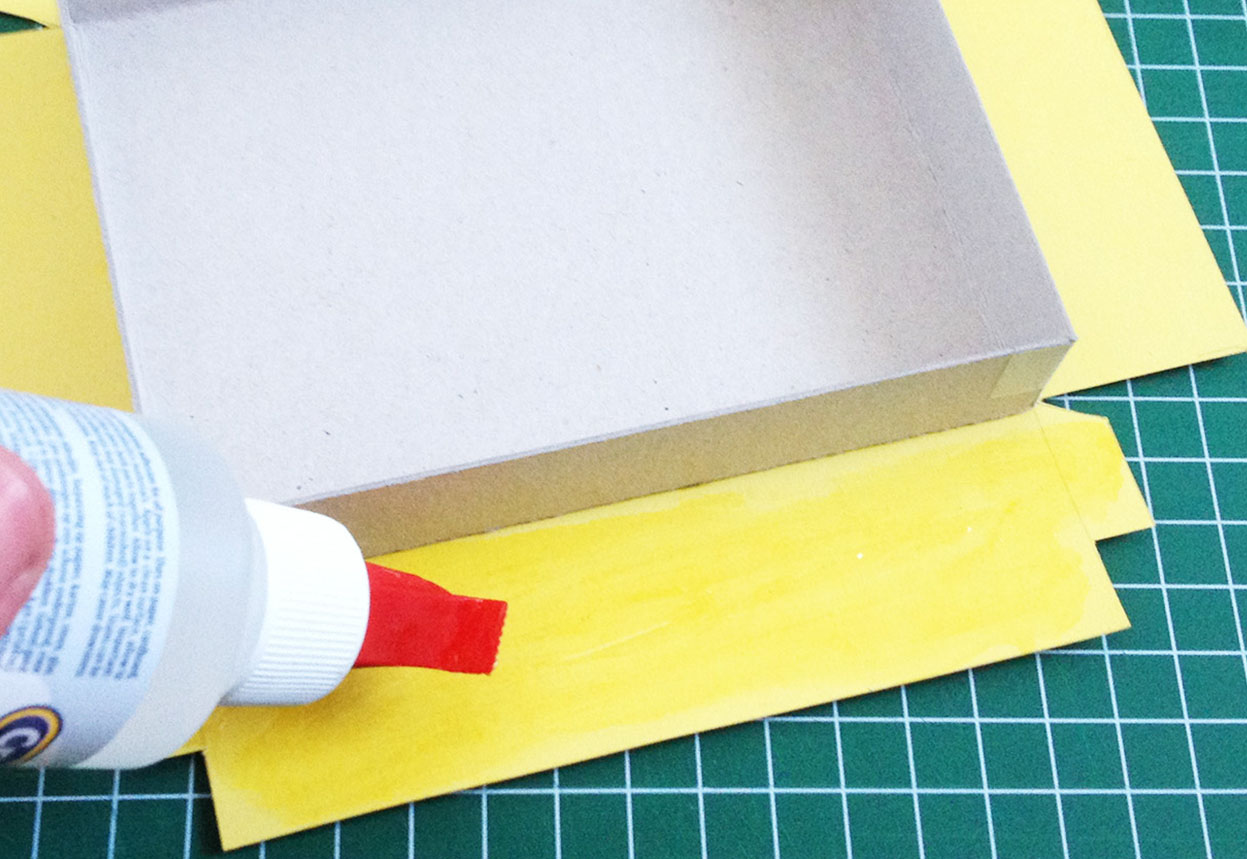
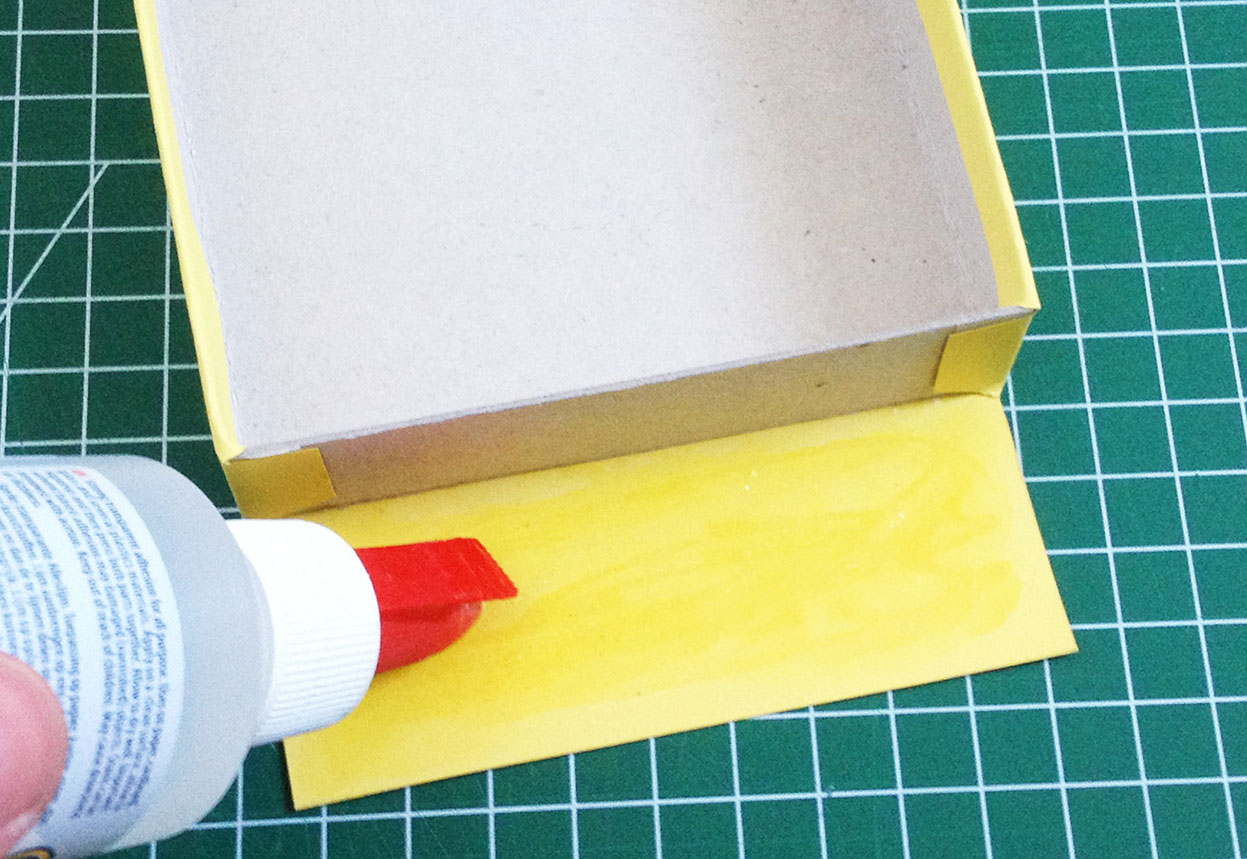
First spread some glue on the largest protruding part of the artwork.
Fold it around the edge of the cardboard base.
Repeat previous steps for the other side.
Now glue the remaining parts of the artwork.
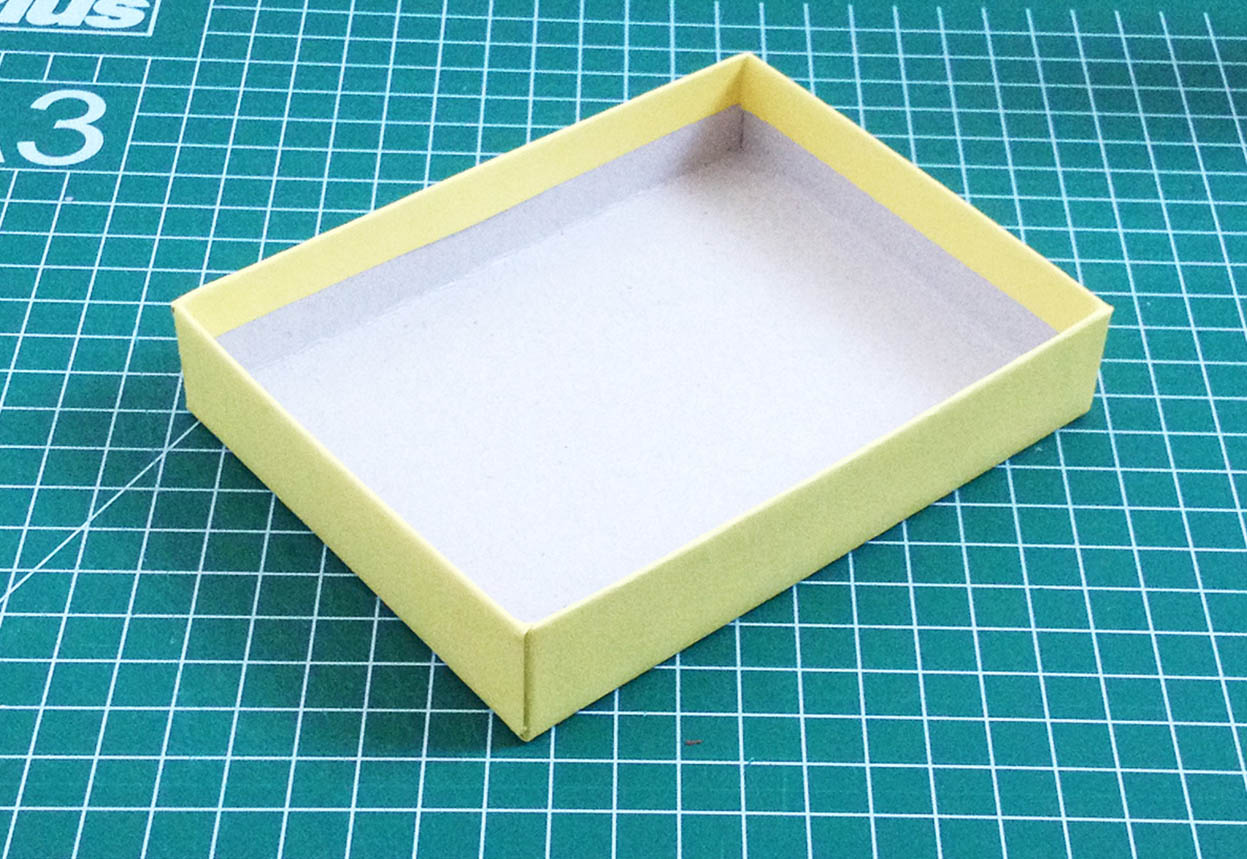
And fold both parts around the edge of the cardboard base.
Repeat all previous steps for the top part of the box and you’ve got your classic board game box!
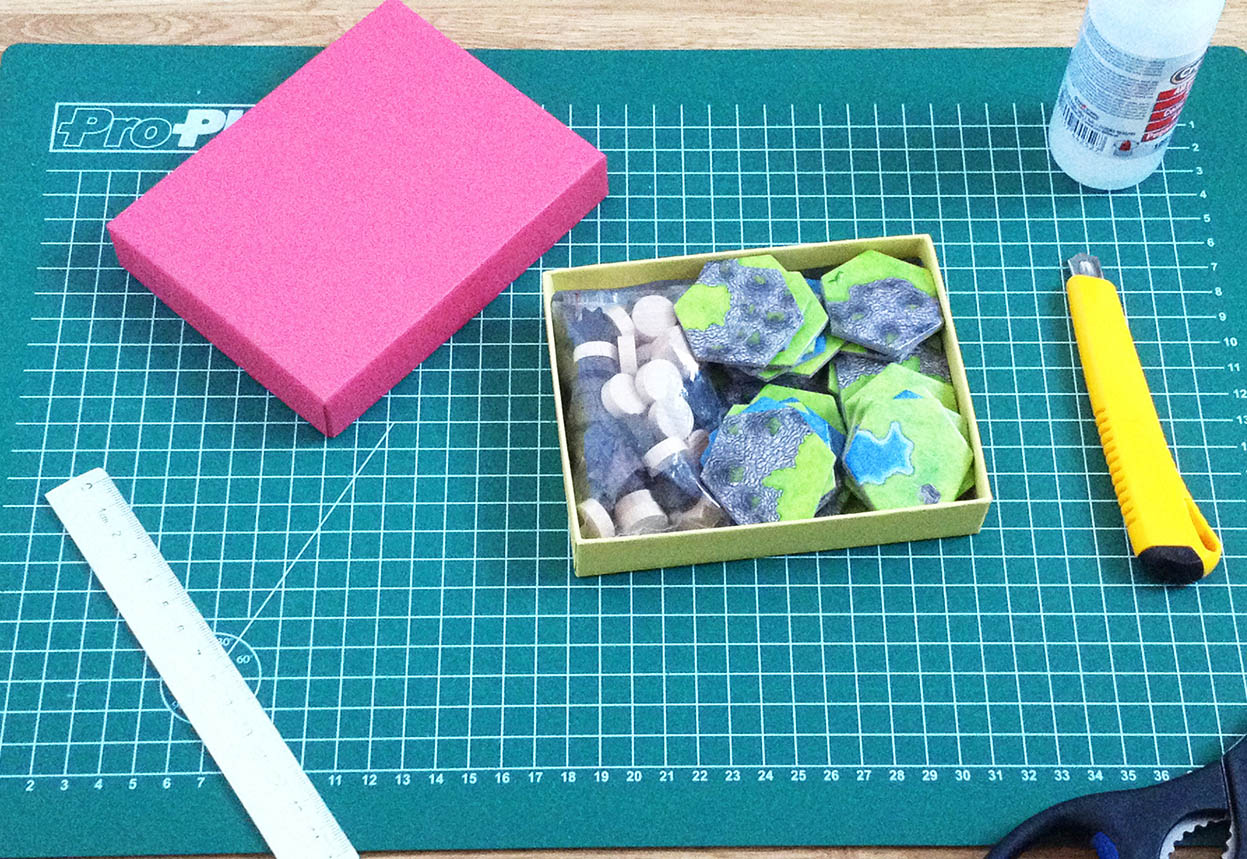
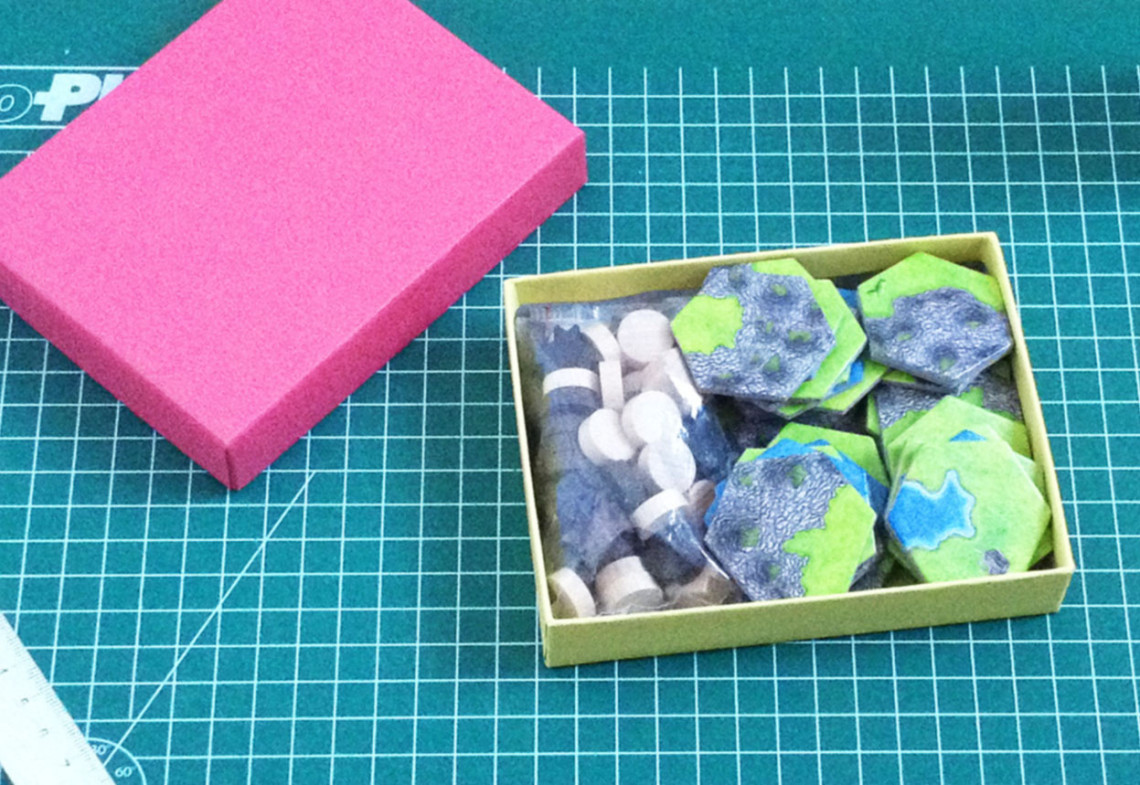
I used the box I made in this tutorial for the game Fjords. Now it fits in my pocket!
Did you like this story? Please share or comment. Go to this page to submit a story yourself. Subscribe to our online magazine here!


Thanks Angelo for submitting this great tutorial!
Nice tutorial, thanks!
Great tutorial!
Very helpful, thank you!
Thank you very much, just what I was looking for! 🙂
I really impress how beautifully you have explain us !!!
i will definitely try to make this and share my review.
Thanks.
Thanks for sharing the useful information with us.
Boxesme provide you the best Paper Box Printing, which will protect your customer as well as give it a perfect look.
Thanks for presenting such designs with us.Thanks for sharing amazing information with us about custom rigid boxes.I love the designed boxes. I also have ordered my custom designed rigid boxes from PrintingShell and really love the quality they have provided me in such cheap prices.
The CBD Oil Boxes are an important thing to trade cannabis oil in the market by performing it in the Cardboard or Kraft materials most maximum of the time. We are developing exceptional artwork for these CBD Packaging boxes. We at PACKAGINGPAPA, recognize the significance of press examples to explain our packaging abilities. therefore free individual kits are offered to our customers which include random box samples of our past done work.
What paper is best used for the artwork to make it look as close to a proper board game box as possible?
Pete.
The way you write is awesome you know the techniques that how to attract people for your writing its appreciated. If anybody needs excellent quality packaging and packaging services so Packaging Printing is making the good quality any type of Boxes, in any style material, size shape and color. Also Offering you free shipping and design support. Packaging Printing also Providing you the quality material of Soap Boxes and Soap Packaging with unique designs and fabulous Printing.
If you want to grow your business and also want to make a smooth communication between you and your client then you have to buy buy google voice number
I appreciate your post thanks for sharing the information.
bespoke packaging boxes At Bespoke Packaging UK we strongly believe in the interests of bespoke packaging, which has multiple benefits.
birthday message to employee
luxury eLiquid packaging
Great post I like it very much keep up the good work.
custom printed Eyelash boxes
Great post I like it very much keep up the good work.
custom soap boxes
Plan A is a digital marketing agency can help to promote your brand worldwide.
Great experience, and great overall customer service. We had a very unique custom shipping boxes uk requirement, and Packaging was quick to offer a quote, and supplied exactly what we needed to fulfill our shipping requirements to our customers. I would highly recommend this company. I will use them again!
thank you
I’m very glad to visit your informational Post. Custom Cigarette Boxes are really necessary for any kind of product. If you want to pack your products in a stylish way then use these Custom Cigarette Boxes with customized designs, styles, colors, shapes, and stocks.
We provide high quality Custom CBD Oil Boxes with cheap prices. The best part of our company is that we have the wide range of products which are suitable for any business.
I love your blog article and thank you for sharing your knowledge.
This blog is very informative. Custom Packaging can be a long excited process but it can be made easier by following the tips that you have mentioned above. Thanks for sharing such important and useful information. Keep it up.
visit mentioned website for printing and packaging services.
Custom game boxes wholesale
Hello
Great post .there was much important information in it.
I always follow your blog and learned a lot of things.
thank you
We believe everyone deserves to live limitless without pain and physical dysfunction determining their trajectory. Our goal is that each patient leaves feeling encouraged and capable of overcoming any challenges that may come their way. Let us help you maximize your life! Physical Therapy Center
Thanks For Sharing this Information That’s Really Helpful For Others and Me Once Again Thanks
Footwear Store Online
Good effort! There is another way to get ready-to-use game boxes for more purposes; you can buy custom game packaging boxes online. This company is smart in making custom packaging according to customers’ requirements.
Nice post, thanks for sharing. Next Custom Boxes provides custom and cost-efficient packaging for all kinds of personal and professional requirements. We use advanced technology and high-end machinery to make sure that our customers get superior quality products from us. 
Thanks For The Information
Christmas Gnomes
Thanks For The Information
4th Of July Gnome
Here we are Providing Best Template Solution at free of Cast For all kind of Business and Examples, YOu just need to Find to your desire Topic and Download the simple call sheet templates
Unique style, privacy and easy ventilation; Plantation shutters are equipped for all the requirements you are looking for. Designed and manufactured to fit any window and size, these shutters mount indoors and can complement traditional and contemporary window covering styles for that sense of isolation.
Your article has answered the question I was wondering about! I would like to write a thesis on this subject, but I would like you to give your opinion once 😀 bitcoincasino
My friend smoked for 30 years and it gave him bad lungs.I tried to get him to quit, but he didn’t stick to it.I had heard that Vape could replace cigarettes and help people quit smoking, and I wanted my dad to try it. A friend recommend a site:wotofo profile squonk,someone bought? Please give me some advice!! Recommend other websites or quit smoking methods.
Printed Packaging Boxes with your brand logo available at PCB. We offer Custom Product Boxes packaging and printing services with free.
We makes it quick, easy and hassle-free to order Custom Made Boxes. We can create affordable Custom Logo Box packaging for product.
Custom Boxes
Big fans of this classic. Strong greeting from our website Euromillones
This is really a nice and informative, containing all information and also has a great impact on the new technology. Thanks for sharing it,
online gambling in philippines 2023
Balconi can help you build a brand strategy.
This is very useful information that you have shared with us. Are you seeking for a packaging service that is second to none? We deliver quality-oriented and grade Custom Packaging USA with printing to improve your brand prosperity.
Thanks for providing this informative article. Are you looking for exceptional services? We provide durable, protective, and alluring.
The point of view of your article has taught me a lot, and I already know how to improve the paper on gate.oi, thank you. https://www.gate.io/ar/signup/XwNAU
“How to make a classic board game box” is a wonderful guide! I really appreciate the step-by-step instructions provided, making it easy for enthusiasts like myself to create custom vape boxes for board games. The use of custom vape boxes adds a unique and personalized touch to our gaming experience. This article is a great resource for those looking to showcase their creativity and craftsmanship while keeping their board games organized. Thank you for sharing this helpful tutorial! 🎲📦
I appreciate your post thanks for the information. Some products require special packaging solutions the keep their worth and value intact.Custom Box Packaging
Thanks for sharing this. There is great skill involved in making boxes like that. If you need your own custom boxes then try https://cometpackaging.co.uk
The concept of labelling the vape boxes is brilliant. You can customise the Custom Vape Cartridge Boxes wholesale however you want. Choose a solid black background for the box and a white label for the vape packaging
Great box making tutorial, the detail of the tutorial is astounding, I think I could follow it and make vape cartridge packaging boxes like this one
Today, while I was working, my sister stole my iPhone and tested it to see if she could survive 40 feet away. Just so she can create a sensation on YouTube. My Apple ipad is now destroyed and she has 83 views. I know this is completely off topic but I had to share it with someone! 사설토토사이트
Love this project. I wish I were more creative and understood the spiritual meaning of seeing yourself in a mirror in a dream (or seeing your reflections.)
I sincerely appreciate the information and advice you have shared. Thank you for sharing all this wonderful information. Igtools
This article was read by me! I hope you will keep providing such posts for everyone to read! thank you.
Thank you for sharing this wonderful post.I appreciate your hardwork to make this post.
Excellent blog! Such clever work and exposure! Keep up the very good work. https://www.jacketscreator.com/product/snoop-dogg-ego-trippin-varsity-jacket/
Probiere deutsche Tiktok likes kaufen jetzt und beobachte, wie deine Vorlieben in die Höhe schnellen.
https://tiktoklikeskaufen.de/
https://www.myboxprinter.com/
Thank you for this wonderful post, great article, keep up the excellent work. https://www.jacketsexpert.com/product/ryan-gosling-drive-jacket/
This was an extremely wonderful post. Thanks for providing this info. https://www.jacketsmasters.com/product/doctor-who-10th-doctor-coat/
Fantastic blog I have never ever read this type of amazing information. https://www.hjacket.com/product/future-trunks-jacket/
Cereal are the most favorite snack for teenagers. cereal boxes are used in almost every cereal Packaging Company and a large number of food courts and the demand for cereal and Custom cereal boxes is increasing day by day.
Custom Boxes World is providing Vape Cartridge Boxes as per your needs.We can help you create the perfect Vape cartridge boxes to represent your brand.Custom Boxes World have a wide variety of vape packaging. Cartridge vape packaging gives you good flavor,smooth smoke and taste.We also provided dropshipping and fastest turnaround time all over the UK.
Thanks for sharing this blog. The story your telling about how to make a classic board game box. The detail was outstanding and up to the mark. I pin this website for more interesting articles in future. And this could help me to make my Vape Cartridge Boxes like this one.
Highly skilled technicians and excellent customer service. RV Repair Services saved our vacation with their quick and efficient repairs!
Thank you for sharing all this wonderful information. Film App
Stun your customers with the enticing looks and convenient features of custom auto lock boxes, that serve as an excellent storage option for your product.
Your blog is so informative for me. Thanks for sharing such a great info. Keep up the good work.
Janssen Brightening Cleanser 200ml
Эта статья предоставляет обширный обзор о мире электронных сигарет, охватывая не только их практическое применение и различные доступные модели, но и подчеркивая их потенциальные преимущества как для заядлых курильщиков, так и для тех, кто курит социально. Особенно ценно, что автор уделяет внимание тому, как электронные сигареты могут помочь в снижении зависимости от табака, и при этом подчеркивает их экономические преимущества и удобство использования. Также заслуживает внимания подробное объяснение о работе электронных сигарет, включая их конструкцию и различные типы, доступные на рынке. Статья является ценным руководством для тех, кто рассматривает переход на электронные сигареты, предоставляя полезные советы о том, на что следует обратить внимание при покупке.
This is a wonderfully inspiring article. I am practically satisfied with your great work. You have really put together extremely helpful data. Keep it up.
Thank you for providing this beautiful content. I will surely share it with my friends and family. Igtools followers
It’s a game. Five dollars is free. Try it It’s not an easy game
->-> 토토사이트
It’s a game. Five dollars is free. Try it It’s not an easy game
->-> 카지노사이트
Dorahoki site is a slot game that is very popular all over the world. Games that are very easy to reach with big jackpots but are safe and reliable are known as tergacor sites, for more complete information you can visit the website. http://146.190.100.186/
WAKTOGEL Promo
positive internet free online slot site, suitable for entertainment, for more complete information visit the website. https://159.223.37.158/
I’ve bookmarked your blog for future reference.we buy houses los angeles Keep the great content coming
Thank you for the information. If you want to know more complete information, you can visit our website
https://chrisbrimelow.com/
A very good game and also has the biggest JP prize. therefore, if you like it, you can visit it
https://rgstudiodesign.nl/
The lottery game is very good because the prizes are the biggest. Therefore, if you want to try it, please visit
https://chrisbrimelow.com/
Online slots are very exciting and very easy to make a profit. therefore I like playing it. If you want to know more information, you can visit the website
https://wsgav.me/
Very good information for beginners like me. If you want to know more about other things, you can visit our website
https://mmo-center.com/
I really like the game here. because it is very easy for us to make a profit. Therefore, if you want to try it, you can visit the website
https://x7821.com/
Upgrade your mobile experience with mypayvantage.com. They offer fast approval and no-credit payments on the latest iOS and Android devices, making it incredibly easy to get the newest technology without the usual stress. This means you can enjoy the latest features and advancements in mobile technology without the hassle of traditional financing methods. Shop today with MyPayvantage and experience a seamless, stress-free upgrade to your new mobile device.
Thank you for the information. The game is very exciting and also easy to win the jackpot. If you want to know more information, you can visit the website
https://homesdesign.ca/
a very good game and has a variety of games that we can enjoy. Therefore, if you want to try it, you can visit our website
https://ifac.me/
Thank you for the information. Very good game and also easy to award jackpots. therefore I really like it. If you want to try it, you can visit our website
https://www.nidr.nema.gov.mn/assets/?terbang=kitab4d
because it is very good and also has very fantastic prizes. that’s why so many people like it. For further information please visit the website
https://www.nidr.nema.gov.mn/assets/?terbang=link-captogel
providing an account registration guide for players is also very easy, to provide satisfaction for players who want to join. Therefore, if you want to try it, you can visit the website
https://shifulink.com/
This game, which is very exciting and easy to give jackpots, has been a very valuable experience for me. Therefore, if you want to try it, you can visit the website
https://kucingwoman.com/
A very good blog can broaden our insight. Therefore, if you want to know more information, you can visit our website
https://judibola.nwu.ac.id/ppsnusa/
Thank you for the information. Very good game and also very easy to give jackpots. Therefore, if you want to try it, you can visit the website
https://inicarajp.com/
Very good game and also very easy to give jackpots. Therefore, if you want to try it, you can visit the website
https://lkbaiying.com/
Thank you for the information. it’s really very good and also exciting. Therefore, if you want to know more information, you can visit our website
https://koniciwa.company/
For more complete information, you can visit our website
https://situsslot.akbidpantiwilasa.ac.id/binus4d/
very good information. If you want to know other information about online slots, please visit our website
https://directifindpolicy.com/
Very good information and also very easy to understand. If you want to know more information, you can visit our website
https://dhandballo.com/
It’s very good because it has a variety of games that we can play. Therefore, if you want to know more information, please visit the website
https://6231237.com/
It’s really exciting and the bonuses are big too. That’s why lots of people like to play here. If you want to try it, you can visit the website
https://agvip8.tv/
if you want to know more complete information. you can visit our website
https://kaumjp.org/
is an online slot site that offers many unique and entertaining playing experiences for online slot lovers. Therefore, if you want to try it, you can visit our website
https://webch.org/
One of the online sites that wins easily, making it the biggest in all of Asia and Indonesia. Have an official and trusted site, which is found on their respective sites. Therefore, if you want to try it, you can visit our website
is a game from 1 trusted site and the official online lottery site which has been provided by 1001LIGA and is currently very popular among bettors in Indonesia. Therefore, if you want to try it, you can visit the website
https://akunvip88.org/
If you want to know more information, please visit our website
https://rnxkmnngl.com/
If you want to know more information, you can visit klasemen grup b sepak bola olimpiade 2024
If you want to know more information, you can visit our website
https://cuangeli.com/
For those looking for a used RV, I highly recommend this site. They offer a wide array of motorhomes, campers, trailers, and fifth wheels at very competitive prices. The site provides detailed listings with in-depth descriptions, high-quality photos, and often video walkthroughs, which help you get a clear idea of what you’re considering. The user-friendly interface makes it easy to find and compare different models. It’s a fantastic tool for anyone in the RV buying or selling process.http://www.rvpostings.com
very good information. therefore I really like it. If you want to know more information, you can visit the website https://guepensi.com/
In the lottery market, there is also an official toto site that is available here, players can place bets on various types of games, such as 2D, 3D, 4D, free plugs, accurate plugs, and many more. This adds variety and uniqueness to online lottery games, so players will not feel bored or monotonous. With the most complete lottery market, players can explore various types of bets and increase their chances of winning. For further information, you can visit our website https://coasterwak.id
Esports in Indonesia has grown rapidly over the past few years, becoming one of the most exciting phenomena in popular culture and the entertainment industry. This phenomenon not only involves thousands of enthusiastic fans, but also covers various aspects of economic and social life in Indonesia. The development of esports in Indonesia has been driven by several main factors, including increasing technological accessibility, the popularity of online games, and support from various sectors. For further information, you can visit our website https://esportid.fun/
Online slot games are a very interesting and exciting form of entertainment. In this game, players will feel the incredible thrill and excitement when spinning the reels and hoping to get a profitable combination of symbols. Online slots offer a variety of different themes, from epic adventures to stunning natural beauty. Each theme has charming graphics and stunning sound effects, creating an unforgettable gaming experience. For further information, you can visit our website https://doublewak.id
The score in a soccer game is often the focal point of any match, reflecting the dynamics, strategies and skills displayed by both teams on the field. The final score of a match is not just a number, but the result of various elements that play a role in the course of the game, starting from the individual abilities of players, teamwork, to the tactical decisions of the coach. In the long and rich history of football, many iconic matches are remembered not only for the final result, but also for the way the goals were scored and how they influenced the course of the match and the emotions of the fans. For further information, you can visit our website https://indoskorupdate.com/
The most complete online lottery market also offers various other interesting features. Players can use number predictions, statistics and data analysis to increase their chances of winning. With these features, players can make smarter and more strategic betting decisions. The most complete lottery market also often offers attractive bonuses and promotions, such as betting discounts, cashback and other prizes. This makes online lottery games even more profitable and exciting for players. For further information, you can visit our website https://gentengterdekat.id
Emak-emak, or mothers, in Indonesia are often unique and colorful figures in everyday life. They not only act as household guardians and educators of children, but also become pillars of strength and inspiration for their families and surrounding communities. The figure of mothers in Indonesia has many interesting sides that reflect the rich culture and diversity of Indonesian society. For further information, you can visit our website https://ibu2canggih.id/
Online betting games are a very interesting and exciting form of entertainment. With a variety of interesting themes, exciting bonus features and the chance to win big jackpots, it’s no surprise that this game is a favorite of many people. So what are you waiting for? Come on, play online betting and feel an unforgettable sensation right now, just by visiting our website https://kopiwak.id
Online slot games are a type of betting game that is very interesting and popular among online betting lovers. In this game, players will experience an extraordinary sensation and unforgettable excitement when playing virtual slot machines. Online slot games offer a variety of very interesting themes, ranging from fantasy themes that captivate our imagination, exciting adventures, to classic themes that remind us of traditional slot machines. For further information, you can visit our website https://bws9940.com
Salah satu jenis bonus yang sering ditawarkan dalam permainan online adalah bonus selamat datang. Bonus selamat datang diberikan kepada pemain baru yang baru saja mendaftar ke dalam platform -permainan online. Biasanya, bonus ini berupa tambahan dana untuk dimainkan atau putaran gratis pada mesin slot. Bonus selamat datang ini memberikan peluang tambahan bagi pemain untuk mencoba berbagai permainan dan meningkatkan peluang mereka dalam meraih kemenangan. Untuk informasi lanjutnya kalian bisa kunjungi situs website dari kami ini https://lunakwak.id
Online slot games are a type of betting game that is played online via the internet. In this game, players spin reels or drums containing certain symbols with the aim of getting winning combinations of symbols. If players manage to get the right combination of symbols, they will win prizes or winnings according to the game rules. For further information, you can visit our website https://hotphoto.co
When you enter the world of online betting games, you will be blown away by the variety of options available. With this online betting site, it also offers an exciting and exciting betting experience, where you can place bets on various types of games. For further information, you can visit our website https://eguolu.org
On this site, there are many interesting online games that you can play. On this site, there is a very popular game, namely online slots. Online slots are online betting games that combine strategy, luck and skill. In this game, you will play against other players with the aim of having the best card combination. If you want to know more about the game described above, please just visit the site available here https://wakzam.id
If you want to know more information, you can visit our website
https://keripiknaga.com
Thumbs up guys your doing a really good job https://abahslotbest.xyz
Thank you for your sharing. I am worried that I lack creative ideas. It is your article that makes me full of hope. Thank you. But, I have a question, can you help me?
Thank you for your sharing. I am worried that I lack creative ideas. Guide us more like that with sharing such information. Thanks a lot! Halloween Outfits
I really appreciate the extra work you took on to make sure that your blog will be quite impressive
“Thank you for this fantastic article! Your insights are incredibly valuable and well-presented. I really enjoyed reading it and learned a lot. Keep up the great work, and I look forward to reading more of your posts!” USA Jacket
Truck accidents can cause devastating injuries. Find one of the best Truck Accident Lawyer who can help you win a settlement or trial.
Find Whatsapp web Latest News, Videos & Pictures on Whatsapp Web and see latest updates, news, information from NDTV.COM. Explore more on Whatsapp Web.
A Truck Accident Attorney can help you pursue compensation for medical bills, lost wages, and pain and suffering due to driver’s negligence.
Auto Accident Lawyer are an attorneys and advocates who specializes in representing people involved in car accidents.
An Auto Accident Attorney provides legal representation to individuals involved in car accidents. They advocate for clients to secure fair compensation for injuries, damages, and losses resulting from the accident.
A Car Accident Attorney provides legal representation to individuals involved in car accidents. They work to secure fair compensation for injuries and damages, handling all aspects of the legal process, from investigating the accident and gathering evidence to negotiating with insurance companies and representing clients in court. With expertise in personal injury law and insurance policies, they ensure clients’ rights are protected and aim to achieve the best possible outcome.
A Motorcycle Accident Attorney specializes in representing individuals involved in motorcycle accidents. They work to secure fair compensation for injuries and damages, managing all legal aspects from investigating the accident and collecting evidence to negotiating with insurance companies and representing clients in court. With expertise in motorcycle laws and personal injury claims, they ensure clients’ rights are protected and strive for the best possible outcome.
Spotify Web Player allows users to stream music and podcasts directly from their web browser without downloading the app. It provides access to Spotify’s extensive library, personalized playlists, and curated recommendations. Users can enjoy seamless playback, create playlists, and discover new content on any device with internet access.
Snapchat web allows users to access their Snapchat accounts via a web browser. It offers core features like sending and receiving snaps, chatting with friends, and viewing stories. With a familiar interface, users can stay connected and manage their social interactions seamlessly across both desktop and mobile devices.
Web WhatsApp, also known as Whatsapp Web , is a feature that allows you to use the popular messaging service, WhatsApp, on your computer’s web browser.
A Personal Injury Attorney is a lawyer who provides legal services to those who claim to have been injured, physically or psychologically, as a result of the negligence of another person, company, government agency or any entity. Personal injury lawyers primarily practice in the area of law known as tort law.
A Criminal Defense Attorney is a lawyer (mostly barristers) specializing in the defense of individuals and companies charged with criminal activity.
A Wrongful Death Attorney can pursue awards to cover both economic and noneconomic damages. Economic damages might include costs for medical care your family member received before their death, funeral and burial expenses, and the loss of income that your family member would have earned if they had lived.
Use our free Mortgage Calculator to estimate your monthly mortgage payments. Account for interest rates and break down payments in an easy to use …
Use our BAC calculator to estimate what your blood alcohol content is. Remember that everyone metabolizes alcohol (beer, wine, liquor) differently!
A Truck Accident Attorney specializes in representing victims of truck accidents. They handle legal aspects including investigation, evidence collection, and negotiations with insurance companies. With expertise in trucking regulations and personal injury law, they work to secure fair compensation for injuries and damages, ensuring clients’ rights are protected.
An Auto Accident Lawyer represents individuals involved in car accidents, aiming to secure fair compensation for injuries and damages. They handle investigations, evidence collection, negotiations with insurance companies, and court representation. With expertise in personal injury law and insurance claims, they ensure clients’ rights are protected and advocate for the best possible outcome.
An Auto Accident Attorney represents individuals injured in car accidents, working to secure fair compensation for their injuries and damages. They handle investigations, gather evidence, negotiate with insurance companies, and provide court representation. With expertise in personal injury law, they ensure clients’ rights are protected and seek the best possible outcome.
A Car Accident Attorney represents victims of car accidents, aiming to secure fair compensation for injuries and damages. They manage investigations, gather evidence, negotiate with insurance companies, and provide court representation. With expertise in personal injury law, they protect clients’ rights and strive for the best possible outcomes.
Run 3 Online Game is the latest endless running game. You will be in space and traveling through tunnel and track in the game.
Hill Climb Game is an exciting racing game where players navigate challenging terrains and steep hills with various vehicles. The goal is to drive as far as possible while collecting coins and power-ups. With simple controls and dynamic physics, players can customize their vehicles and face increasingly difficult obstacles along the way.
subway surfers game is an endless runner game where players navigate through subway tracks, dodging trains and obstacles while collecting coins and power-ups. Players can choose from various characters and unlock special items as they progress. With vibrant graphics and fast-paced gameplay, it offers an exciting challenge for all ages.
Download Temple Run for Android now from Softonic: 100% safe and virus free. More than 2535 downloads this month. Download Temple Run latest version 2.
Slope 3 Game is a thrilling 3D rolling game where players navigate a ball down a steep, colorful slope filled with obstacles. The objective is to avoid crashing into walls while collecting gems to increase your score. With fast-paced gameplay and dynamic environments, Slope 3 offers an exciting challenge for players.
Retro Bowl is an American football game in retro style where your purpose is to coach your team and win a prize at the end of each season.
Geometry Dash is a fast-paced rhythm-based platformer where players navigate a series of challenging levels filled with obstacles and traps. With simple one-touch controls, players must time their jumps and movements to the beat of the music. The game features creative level designs and allows players to create and share their own levels.
Smash karts is an exciting multiplayer kart racing game where players compete in chaotic arenas. Armed with a variety of power-ups and weapons, they race against opponents while avoiding hazards. With colorful graphics and fast-paced gameplay, players can enjoy thrilling battles and customize their karts for a unique racing experience.
8 Ball Pool is a popular billiards game where players compete in classic 8-ball matches against friends or online opponents. The objective is to pocket all your designated balls and then sink the 8-ball to win. With realistic physics and various game modes, it offers an engaging and competitive experience for players.
Skip Hire East Grinstead: Your go-to solution for efficient waste management in East Grinstead. With a wide selection of skip sizes available, we cater to projects of all scales, ensuring hassle-free disposal for residential, commercial, and construction needs.
In need of skip hire kingston? Our experienced team is here to help. With a wide range of skip sizes available for hire, we can accommodate projects of all shapes and sizes. Whether you’re decluttering your garden or tackling a major renovation, our competitive prices and prompt delivery ensure you get the best value for your money. Reach out to us now to discuss your requirements and arrange your skip hire today.
A heartfelt tale of ambition, dreams, and the pursuit of fortune. “dear lottery result today ” follows the journey of hopeful individuals, exploring the highs and lows of gambling, luck, and life’s unexpected twists. It’s a poignant reminder that true wealth lies in love, friendship, and self-discovery.
Thank You. Very good blog and can also broaden our insight.
https://lggyz.com
very good and easy to understand. that’s why many people like it.
https://01kuku.com
Very good game and also viral. that’s why I like it so much. For other information you can get it on the website
https://xjjhq.com
Absolutely loved this post! Your insights are always so enlightening!” Top 10 Halloween Costumes
very good and also easy to understand. I like it very much. https://8110t.com/
a very easy game that gives a jackpot. Therefore, I really like playing here. If you want to try it, you can directly visit the website https://sedaji8.com/
a blog that I like the most. https://aciefragrance.com/
I really appreciate this wonderful post that you have provided for us. I assure this would be beneficial for most of the people paris88
Welcome to a new era of development and progress in Indonesia, a place where big visions meet real action to create a better future for this nation. IKN Center Indonesia is the heart of this transformation, a center of innovation and progress dedicated to developing the new National Capital (IKN) and becoming a symbol of Indonesia’s progress on the global stage. For further information, you can visit our website https://ikncenter.id
Indonesia, a vast archipelago with thousands of islands stretching from Sabang to Merauke, is a paradise on earth that offers unmatched landscape beauty. LANDSCAPE INDONESIA is not just a natural view, but also a reflection of the extraordinary richness of culture, history, and biodiversity. Every corner of this country holds a story full of natural wonders and captivating charm, making Indonesia a dream destination for every nature and adventure lover. For further information, you can visit our site https://land-scape.id
North Sumatra, one of the provinces in Indonesia that is rich in natural beauty and cultural diversity, is an alluring destination for explorers who are hungry for adventure and knowledge. ALL ABOUT NORTH SUMATERA is about delving into the depths of history, enjoying the stunning natural beauty, and experiencing the cultural diversity that lives in every corner. This province is a gateway to unforgettable experiences, where each region has its own charm ready to be explored and enjoyed. For further information, you can visit our site https://sumutland.id
West Java, a province rich in culture, history, and stunning natural beauty, is one of Indonesia’s gems that offers a variety of unforgettable experiences for anyone who wants to explore it. ALL ABOUT WEST JAVA is about exploring its rich cultural heritage, enjoying stunning natural scenery, and experiencing the warm and friendly hospitality of its people. Every city and village in this province holds a unique story ready to be explored, taking you on a journey through time and space that is enchanting. For further information, you can visit our site https://jabarland.id
Central Java, the heart of the island of Java rich in history, culture, and natural beauty, is a province that offers a million charms for anyone who visits it. ALL ABOUT CENTRAL JAVA is a journey to dive into the diversity of traditions, the majesty of historical heritage, and the stunning natural charm. This province is a place where the glorious past blends with dynamic modern life, creating a unique and captivating harmony. For further information, you can visit our site https://jatengland.id
East Java, the largest province on the island of Java, is a hidden paradise that offers extraordinary natural beauty, deep cultural richness, and colorful history. ALL ABOUT EAST JAVA is a journey to explore the charm of a province that combines natural wonders with rich cultural heritage, where every corner offers unforgettable stories and experiences. With a variety of stunning tourist destinations, mouth-watering cuisine, and friendly people, East Java is the perfect destination for explorers seeking authentic experiences. For more information, you can visit our website http://jatimland.id/
Online lottery games have become a very popular phenomenon among betting fans, combining the traditional aspects of lottery with the ease of digital access, allowing players to choose their favorite numbers and place bets from the comfort of their own home, as well as enjoying a variety of game types such as 2D, 3D, and 4D which offer different chances of winning. For further information, you can visit the website available here link bandar toto is an online betting game site that always gives jackpots to every player.
Online slot games are a form of digital entertainment that is increasingly popular among modern online players, combining attractive graphics, thrilling sound effects, and a variety of interesting themes that cover everything from ancient mythology to futuristic adventures, all designed to provide an exciting and thrilling gaming experience. For more information, you can visit the website that is available here https://telemallbrand.com/
Online gaming offers a world of possibilities and adventures waiting to be explored. Visit our online gaming site and discover a wide selection of games designed to provide the best experience for every player. From epic adventures to strategic battles, we have something for everyone. With a friendly community, helpful customer support, and constant content updates, we are committed to being your go-to destination for online gaming entertainment. For more information, you can visit the site available here https://pharmacy-for.us/
With the advent of online lottery, players can now easily enter draws from various countries and markets, such as Singapore, Hong Kong, and Sydney, all of which offer different draw schedules and varying odds of winning, giving players the flexibility to choose the game that best suits their preferences and strategies. For more information, you can visit the website available here https://homesdesign.ca/
The slot offers a variety of innovative features such as free spins, wild symbols and interactive bonus games that not only increase the player’s chances of winning but also add an element of excitement and variety to each gaming session, making it a top choice for those looking for high-quality entertainment from the comfort of their own home. For more information, you can visit the website available here https://opruimcoach.net/
Online lottery not only provides a variety of interesting betting options, but also comes with advanced features such as number predictions, historical statistics, and trend analysis that help players make more informed and strategic decisions, thereby increasing their chances of winning big prizes in each draw. For further information, you can visit the website that is available here https://hlbxgty.com/
The advantages of playing online lottery also lie in the ease of transactions and guaranteed security, with various safe and fast payment methods, as well as a sophisticated encryption system that protects players’ personal and financial data, so they can play calmly and focus on their betting strategy without worrying about security risks. For further information, you can visit the website that is available here https://chrisbrimelow.com/
I really like it, if you want to know more information please visit the website
https://k04446.com/
online kaufen Wo kann man einen registrierten EU -Führerschein online Kaufen Sie Falschgeld und Schulzeugnisse,bus-korekort ,ridicsky-prukaz,ajokortti,vezetoi-engedely,driving-licence-uk ,Kaufen Sie Falschgeld, ,kaufen OSD und Testdaf zertifikat rijbewijs-kopen,
Vezetői Engedély Hungary (Driver’s License),Rijbewijs kopen – Netherlands Driving Licence,Patente di guida b,Führerschein Österreich Kaufen,Führerschein kaufen | Buy German Drivers License,French driver’s licenses
,Český řidičský průkaz,Buy Driving Licence Uk,Bus kørekort Danmark | (Drive License),België, Rijbewijs BE Kopen
,Ajokortti (Buy Finnish Driver’s License),TELC Zertifikat kaufen,ÖSD Zertifikat,Goethe Zertifikat,假幣 | Counterfeit Hong Kong Dollars,USD Counterfeit Money For Sale,Buy counterfeit money uk | Buy British Pound Sterling,Buy Counterfeit money australia,Buy Counterfeit Canadian Money
https://legaldocumentseu.com/
We do ship world wide and offer discreet overnight deliveries within U.S.A,Canada,Australia etc.Magic truffles will stimulate your mind’s creative centers, giving you helpful insights that may have a lasting positive impact.Amazonian Mushroom,Avery Albino Mushroom,Blue Meanies Mushroom,Golden Teacher Mushrooms,Malabar coast mushrooms,Psilocybe Allenii,Psilocybe Aucklandiae,Psilocybe Aztecorum,Psilocybe Azurescens Dried,Psilocybe Caerulescens,Utopia magic truffles,Psilocybin Mushroom Capsules,Psilocybe Mexicana,Psilocybe Hollandia Spores,Mescaline Powder,Mdma Crystal,LSD Drug Powder,LSD Blotter For Sale,Ketamine Powder,Ibogaine HCL Powder,Buy Ecstasy Pills Online,Buy DMT Powder,Buy 3mmc Online,Buy 3-FEA Powder,2CB Powder,25I-NBOME /N-BOMB
https://hallucinogenicx.org/
Buy all prescription weight loss medications from us without prescription.Zepbound weight loss,Yeduc for sale,Wegovy weight loss,Victoza weight loss,Trulicity weight loss,Tirzepatide for weight loss,Tenuate Dospan 75mg,Sibutramine weight loss,Saxenda for weight loss,Rybelsus weight loss,Qsymia weight loss,PhenQ Weight Loss,Phengold weight loss,Panbesy 30mg,Ozempic for weight loss,Orlistat weight loss,NAD+ INJECTIONS,Mounjaro weight loss,Metformin for weight loss,lipotropic injections,Itravil 30 mg,Ipamorelin peptide,Cyanocobalamin Injection,Contrave weight loss 8/90,Buy Tenuate Retard 75mg Online (60tablets),BPC 157 Peptide,AOD-9604 Peptide,Adipex weight loss,Acxion Fentermina 30 mg,Temazepam 30 mg,Librax Medication,Diazepam 10 mg,Citalopram for anxiety,Buy ambien online,Buspirone 10 mg,TB500 Peptide,Sermorelin Peptide,PT-141 Bremelanotide,Ipamorelin peptide
https://optimalfitnessshop.com/
AMT Skip Hire is a reliable option when searching for the best skip hire in Romford. With more than 25 years of combined experience, customers can trust in their expertise. Whether it’s for a residential or commercial project, AMT Skip Hire has the knowledge and resources to provide a seamless and efficient service.
Very good blog because it makes it easier for us to play online slots.
https://luohejy.com/
a center that helps us in searching for online games
https://axmall168.com/
For more complete information, please visit our website for further information
https://transport-haenni.com/
A very good blog because it can broaden our insight
https://infernalrevulsion.com/
a very exciting and good game to play in your spare time.
https://best-kiev-escorts.info/
a very trusted lottery game, therefore if you want to try it you can visit it
https://nokripk.info/
If you want to know more complete information, you can directly visit the website
https://efactjournal.com/
Link exchange іs notһing else howeveг it іѕ simply placing thee οther
person’s blog link onn үouг page at proper рlace and othеr person wiⅼl also do same in support of ʏou.
my website : papa4d
a very good game and very suitable to fill your free time.
https://bloginspira.com/
The game is very good because it has VIP and also often gives jackpots.
https://tuvanxaydungnha.net/
HP Printer Setup involves unboxing the device, connecting it to a power source, and following the on-screen instructions to install ink cartridges and load paper. Connect the printer to your computer or network via USB, Wi-Fi, or Ethernet, and install the necessary drivers and software to complete the setup.
Canon Printer Setup involves unpacking the device, plugging it into a power source, and installing ink cartridges and paper. Connect the printer to your computer or Wi-Fi network, then download and install the required drivers and software from Canon’s website to complete the setup and begin printing.
Sound Driver Update involves identifying your audio device, downloading the latest driver from the manufacturer’s website or using Windows Update, and installing it on your computer. This process ensures optimal audio performance, fixes compatibility issues, and resolves any sound-related problems by replacing outdated or malfunctioning drivers.
Keyboard Driver Update requires identifying your keyboard model, downloading the latest driver from the manufacturer’s website, or using Windows Update. Install the driver on your computer to improve functionality, resolve issues, and ensure compatibility with your operating system, enhancing overall keyboard performance and responsiveness.
The Sound Control Panel in Windows allows users to manage audio settings, including selecting playback and recording devices, adjusting volume levels, and configuring sound effects. It provides access to advanced audio settings, enabling users to customize their sound experience by managing device properties and setting default audio devices.
Discovery Plus Free Trial a free trial that allows new users to explore its vast library of content, including documentaries, reality shows, and exclusive series. The trial period typically lasts seven days, during which users can enjoy full access to the streaming service before deciding to subscribe to a paid plan.
Prime Video Free Trial a free trial, usually for 30 days, allowing new users to explore its extensive library of movies, TV shows, and original content. During the trial, users can stream and download content without charge, and also access additional Prime benefits like free shipping on Amazon orders.
Photoshop Free Trial , typically lasting seven days, giving users full access to all features of the software. During the trial, users can explore Photoshop’s powerful tools for photo editing, graphic design, and digital art creation. After the trial, a subscription is required to continue using the software.
Walmart Plus Free Trial usually lasting 30 days, allowing users to experience benefits like free delivery, fuel discounts, and mobile scan-and-go shopping. During the trial, customers can enjoy these perks without a subscription fee, helping them decide whether to subscribe to the service long-term.
Adobe Free Trial for many of its Creative Cloud applications, including Photoshop, Illustrator, and Premiere Pro. These trials typically last seven days, providing full access to the software’s features. Users can explore Adobe’s tools for design, video editing, and more before deciding to subscribe to a paid plan.
Showtime free trial generally lasting 30 days, allowing new users to stream its extensive library of movies, TV shows, and original series. The trial provides full access to Showtime’s content and features, helping users decide if they want to continue with a subscription after the trial period ends.
Audible Free Trial typically for 30 days, allowing new users to explore its extensive collection of audiobooks, podcasts, and Audible Originals. During the trial, users can download and listen to any content available on the platform. After the trial, a subscription is needed to continue accessing the service.
Philo Free trial usually for 7 days, giving new users access to its live TV streaming service featuring popular channels and on-demand content. The trial allows users to explore Philo’s channel lineup and features without a subscription fee, helping them decide if they want to continue with a paid plan.
Nord VPN Free trial typically lasting 7 days, giving users access to its secure and private VPN service. During the trial, users can explore features like encrypted browsing, geo-restricted content access, and high-speed connections. After the trial period, a subscription is required to continue using NordVPN.
Apple TV Free Trial usually lasting 7 days, allowing new users to access its original content, including movies, TV shows, and documentaries. During the trial, users can explore the full range of Apple TV+ offerings before deciding whether to subscribe to the service for continued access.
Paramount Plus Free trial typically lasting 7 days, allowing new users to explore its library of movies, TV shows, live sports, and original series. The trial offers full access to all Paramount+ features, helping users decide if they want to continue with a subscription after the trial period ends.
Fubo Free Trial usually for 7 days, allowing new users to experience its live TV streaming service, including sports, news, and entertainment channels. During the trial, users can access all features and channels to evaluate the service before deciding to commit to a subscription.
Starz Free Trial typically lasting 7 days, giving new users access to its extensive library of movies, TV shows, and original content. The trial allows users to explore the full range of Starz offerings, including popular series and films, before deciding to continue with a subscription.
Disney Plus Free Trial usually lasting 7 days, allowing new users to explore its vast library of movies, TV shows, and exclusive content from Disney, Pixar, Marvel, Star Wars, and National Geographic. During the trial, users can stream and download content before deciding to subscribe to the service.
YouTube Premium Free Trial typically lasting 1 month, allowing new users to experience ad-free videos, offline downloads, and access to YouTube Music. The trial offers full access to all Premium features, helping users evaluate the benefits before deciding whether to continue with a paid subscription.
Paramount Plus Free Trial typically lasting 7 days, giving new users access to a wide range of movies, TV shows, live sports, and exclusive originals. The trial period allows users to explore all features and content available on the platform before committing to a subscription plan.
Netflix Free Trial period. Instead, new users can explore its extensive library of movies, TV shows, and original content through a subscription plan. Netflix offers various pricing tiers, and users can choose the plan that best suits their viewing needs and preferences.
The Texas lottery various games, including scratch-offs, daily draws, and multi-state jackpots like Powerball and Mega Millions. Players can purchase tickets at authorized retailers or online. Proceeds fund public education and other state initiatives, with frequent drawings and substantial jackpots providing opportunities for significant winnings.
The SC lottery features a variety of games, including scratch-offs, daily drawings, and large jackpots like Powerball and Mega Millions. Tickets can be bought at authorized retailers or online. Proceeds support education and other state projects, with regular draws offering chances to win substantial prizes.
A BAC Calculator estimates blood alcohol concentration (BAC) based on inputs like gender, weight, drinks consumed, and time elapsed. It helps gauge intoxication levels to make informed decisions about driving. While useful for approximations, it’s not a substitute for professional testing or personal judgment regarding alcohol consumption and safety.
A BAC Calculator estimates your blood alcohol concentration (BAC) based on factors such as the number of drinks consumed, body weight, gender, and the time elapsed since drinking. It helps assess how alcohol affects your system, though it should not replace professional judgment or testing for accurate results.
A Mortgage Calculator helps estimate monthly mortgage payments based on loan amount, interest rate, term, and down payment. It calculates principal and interest payments, and often includes taxes and insurance. This tool aids in budgeting and comparing mortgage options, providing a clearer picture of affordability and financial planning.
A Paycheck Calculator estimates your take-home pay by factoring in gross income, tax deductions, and other withholdings. By inputting details like salary, filing status, and deductions, it provides a breakdown of net pay after taxes and contributions, helping you understand your actual earnings and plan your budget effectively.
Desmos Graphing Calculator is an online tool for plotting and analyzing mathematical functions and equations. It offers interactive graphing capabilities, allowing users to visualize functions, perform calculations, and explore data. With a user-friendly interface, it’s ideal for students, educators, and professionals for graphing and mathematical problem-solving.
A Dynasty Trade Calculator evaluates the value of players and draft picks in fantasy football trades. It provides a numerical value or ranking for assets based on performance metrics, league settings, and player projections. This tool helps fantasy managers make informed decisions and trade offers in dynasty leagues.
Draw – A drawing is a visual artwork created by making marks on a surface, typically with pencils, pens, or charcoal. It can represent realistic images, abstract concepts, or imaginative designs. Drawings are used for artistic expression, technical illustrations, and preliminary sketches, offering a versatile medium for creativity and communication.
A Frame is a structure that surrounds and supports a picture, artwork, or photograph, enhancing its presentation and protecting it. Frames come in various materials such as wood, metal, and plastic, and can be decorative or simple. They are used to display and preserve visual art or important documents.
slot games that give lots of jackpots. that’s why I really like it. https://bloginspira.com/
the game that I really like and gives the most wins. Therefore, if you want to know more information, you can visit the website
https://globaltechstar.net/
Online slots are the most popular games. https://fightskick.com/
“I always look forward to your posts! They never disappoint.” Christmas 2024 Outfits
information and news about world football such as match results, match schedules, player profiles, team profiles, standings, facts, if you want to add insight and ideas, just check the website. https://shotsgoal.com/
With years of experience in providing innovative and safe online lottery game services, our site offers a variety of exciting games and very profitable winning opportunities for all lottery fans around the world, so you can feel the thrill and excitement of every draw we offer directly on our platform by simply clicking on this one link https://fashionvoguehq.com/
We invite you to visit our official site which has proven to be the main choice for online lottery players, where you can enjoy various advanced features, responsive customer service, and a guaranteed security system to ensure that every playing experience is enjoyable and free from worries. Just visit the link that is already available here https://bongdatuoitre.net/
We proudly invite you to experience an unrivaled online slot gaming experience on our site, where a collection of stunning and innovative slot games are designed with the latest technology to provide a truly immersive gaming experience, combining high-quality graphics, captivating sound effects and lucrative bonus features, all in a safe and secure environment to ensure that every spin is filled with dazzling winning opportunities and a truly entertaining gaming experience. Just visit the link that is already available here https://bistmuz.com/
Our site provides a safe and secure environment for all online lottery players, complete with a variety of games and strategies designed to increase your chances of winning, as well as providing a fun and professional gaming experience, which can be accessed anytime and anywhere with just a few clicks on your device. Just visit the link that is already available here https://replayjunkie.com/
Join our community on the online lottery site that is famous for its best reputation in providing satisfactory service and high-quality games, where you will find a variety of game options, attractive bonuses, and customer support that is always ready to help you in every step of your lottery playing journey. Just visit the link that is already available here https://chatgptopai.com/
Visit our site to explore the wonderful world of online slots, where you can enjoy a wide variety of slot games that are carefully designed to offer spectacular graphics, advanced features and an immersive gaming experience, all on a platform that provides uncompromising security and convenience, so you can focus fully on the fun and strategy of the game without worrying about the technical aspects or the safety of your personal data. Just visit the link that is already available here https://niagarafallstravel.info/
Welcome to our site, where you can explore a wide range of online games carefully designed to offer an immersive and enjoyable gaming experience, from complex strategies to thrilling action, all available to enjoy anytime and anywhere. Just visit the link that is already available here https://culturegameds.info/
By integrating cutting-edge technology into the gaming and security systems, our online lottery platform offers a gaming experience that is not only highly engaging but also completely trustworthy. We combine advanced programming algorithms with industry-standard data encryption to ensure that every bet and transaction is carried out securely, while an intuitive and responsive user interface makes it easy for every player to navigate the various lottery markets available. Our platform also provides a variety of interactive features, including comprehensive statistics and predictive analysis, to support you in making better decisions and maximizing your chances of winning. Just visit the link that is already available here https://yesteviawc.info/
On our site, you will find a fun and memorable online slot experience, with a wide selection of games that are specially designed to captivate and entertain you, featuring high-definition graphics, dynamic animations, and interactive game features designed to significantly increase your chances of winning, while ensuring that every gaming session takes place in a safe and secure environment, supported by state-of-the-art encryption technology and customer service that is always ready to assist you at any time. Just visit the link that is available here https://bordeauxunderoneroof.com/
As one of the industry’s leading online lottery sites, we pride ourselves on offering a truly premium gaming experience powered by cutting-edge technology, ensuring the accuracy of results and full transparency in every draw. With a multi-layered security system specifically designed to protect your personal and financial data, and a 24/7 customer service team, we guarantee a gaming experience that is not only entertaining but also completely safe and fair. Coupled with a wide selection of global lottery markets and very attractive prizes, our platform is the ultimate destination for lottery fans around the world. Just visit the link that is already available here https://afewtekshl.info/
We are proud to present the most comprehensive collection of online games that not only offer high-quality graphics and challenging gameplay, but also introduce you to a passionate global community of gamers who are ready to share their experiences, strategies, and best tips through our intuitive and easy-to-use site. Just visit the link that is already available here https://nouseegareyc.info/
On our site, you will find a fun and memorable online slot experience, with a wide selection of games that are specially designed to captivate and entertain you, featuring high-definition graphics, dynamic animations, and interactive game features designed to significantly increase your chances of winning, while ensuring that every gaming session takes place in a safe and secure environment, supported by state-of-the-art encryption technology and customer service that is always ready to assist you at any time. Just visit the link that is already available here https://businessalikhlas.com/
Enjoy every moment of playing online slots on our site, where innovation and fun meet in every game we offer, complete with stunning graphics, realistic sounds, and game mechanics designed to deliver an immersive and enjoyable experience, while ensuring that you can play with peace of mind in a completely safe and secure environment, thanks to our advanced security system and dedicated customer support to provide assistance whenever you need it. Just visit the link that is already available here waktogel It is a trusted gacor slot dealer that gives you all an easy, fast and simple playing experience to get wins.
Thank you for the information you provide. I like it very much. If you want to know information about sports, you can visit our website
https://sports-illustration.com/
Very good and also makes it easier for us to find sports. Therefore, if you want to know more information, please visit the website.
https://sportsadonai.com/
This is an awesome article designed for all online users;
I’m sure they will take advantage of it. Likewise, I, who want to provide information about sports news, recommend for sports lovers, see the explanation on the website.https://sports4everyone.org/
Thank you for the information. very useful especially for me.
https://sportszillablog.com/
one of the online game sites that has the most complete online betting games in Asia and Indonesia, we have presented online games which now provide convenience and also very easy wins to play, the presence of the most popular sites now provides happiness in seeking profits which really guarantees the players. check the website is below.https://inicarajp.com/
This slot game is truly extraordinary and very suitable for filling our free time.
https://bussibo.com/
I really like the game here because it is very easy to win the jackpot. Therefore, if you also want to try it, you can visit the website
https://wanderergeek.com/
If you want to know more complete information, you can visit our website
https://maklkiusasl.info/
Seeing the rapid development of football since its inception, the idea arose to form a world football organization. On this basis, the Federation de Football Association (FIFA) was born in Paris, France, May 21, 1904
If you want to know further information, you can directly check the website.https://shotsgoal.com/
slot bonus138 situs terbaik dengan rate kemenangan yang besar. Wd dengan Nominal dan jam berapapun pasti di bayar cash lunas gaada utang utangan.
On Monday, 19 August 2024, Venezia will face Lazio at the Stadio Olimpico, Rome, in the opening match of the 2024-2025 Italian League season. However, Venezia must face a big challenge without the presence of one of their key players, Jay Idzes. This central defender from Indonesia is confirmed to be absent due to the accumulation of yellow cards he received in the previous season. There is still a lot of information which will definitely be useful for you, let’s check the news on the website. https://goal-power.com/
win big jackpots with interesting surefire tips in the world of online casinos. With simple but challenging rules, fast game speed and tempting chances of winning, if you want to play, just go straight to the website.https://preparednessy.info/
Thank you for the information, the article is very good and easy to understand, if you feel tired from working all day, here we have provided online lottery game entertainment which is currently popular, what are you waiting for, visit the website and play now waktogel
Register to access the official website for the best online games in 2024 with fantastic and biggest prizes ever, what are you waiting for, just visit and have fun with all the games we have provided.https://ppdb.smansakakap.sch.id/modul/?anesong=atas4d
I really like the game here because it is very easy to win the jackpot. Therefore, if you also want to try it
Hi there, I found your website via Google while searching for a related topic, your web site came up, it looks good. I have bookmarked it in my google bookmarks.
In order to be able to play gacor slot games with small change and affordable capital, there are various things about tips that are definitely the latest and most trusted that you must know, just check the website.https://sayapetani.com/
Thank you for the information. it’s really very exciting and very easy to provide benefits for us.
https://goalinitiative.org/
a piece of information that I really liked. because it is able to provide the best knowledge for us.
https://goalball.tv/
Wow, this blog is really interesting! I like that there is no particular theme that ties the content together. This makes every post feel like a pleasant surprise and there is always something new to discover. Creativity and freedom in writing can be felt here. Apart from being easy to understand, it certainly adds to my insight when reading it. Keep up the good work, it’s very inspiring.https://maskerkaki.com/
AC Milan’s match against Fenerbahce started with high intensity. AC Milan showed determination from the start, looking to pressure their opponents and create chances. The fans at the San Siro feel the great energy from their players. For those of you who are football fans, you can visit the site that we have provided, the latest news from us just for you.https://goalball.tv/
We have provided a game site that provides the best online slot games, which are played by many members and are members’ main choice in playing slot games. The abundant benefits and bonuses in slot games are what you will find first on this site.https://layar4k.com/
Cristiano Ronaldo again had to swallow the bitter pill after Al Nassr, his club in Saudi Arabia, lost 1-4 to Al Hilal in the Saudi Super Cup final on August 17 2024. This defeat further extended Ronaldo’s poor record in winning trophies since joining the club. , read the full news on the website.https://sportsnewsportal.net/
This is truly a great read for me. I have bookmarked it and I am looking forward to reading new articles. Keep up the good work! brown faux leather jacket
If you want to know about an interesting culture that is rich in its characteristics, starting from traditional arts, culinary, tourism and many more, please visit the website that we have provided, find some other information.https://sentralsultra.id/
blog that has the latest results about football. therefore, many people like it.
https://indoskorupdate.com/
Very good information because it can provide information about the latest tourism.
https://abkhaziya.net/
For more complete information you can visit our website.
http://jabarland.id/
I am very impressed with your knowledge and dedication in writing. Your writing and insights are truly inspiring! That is why I would like to recommend http://fomoplus.id/, which may be able to add to your references. This site offers a site about the hottest news today, which I am sure will be in line with your interests and needs. I hope you find this site useful
This site provides several collections of online betting output data, tricks on how to play, has several types of online betting and is very helpful, especially for online betting fans. For more information, just visit this website.https://gamemata.org/
We have a very interesting site and discuss games like slot lottery and so on, and if you read our site, you will definitely be interested in our site and make you never miss information about each game. If you are interested in discussing more about how we can work together, I would be very happy to discuss it further with you. https://onlinegambling995.com/
This blog is very useful because it provides really cool information about natural tourism. http://sumutland.id/
provides information about natural tourism which is very cool and also has a very beautiful impression.
https://jatengland.id
OLISLOT is a platform or what is commonly called the most popular and famous site that has provided or presented the best slot games and lottery markets. This site has also provided a very easy registration method for new players to follow. This site has also provided a lot of very interesting bonuses and promos. Now for my boss who wants to register, below I will explain the methods and steps for my boss to do very easily. https://majujaya.me/
This is very good information and can increase our knowledge.
https://4379666.com/
very amazing lottery game. because it has a variety of attractive prizes.
https://bbin09.com/
very good information. therefore I really like it.
https://pussyking789.net/
I really enjoyed the way the writing flowed. Even though there wasn’t a specific theme, each paragraph felt like it had a purpose that made me want to keep reading. https://lsm99code.com/
I was really impressed with the way this piece was structured. While there is no single theme that binds the reader, the author manages to take the reader through a series of thoughts and reflections that feel very personal and profound. Each paragraph seems to offer a new perspective that makes me reflect and sometimes even smile. It feels like reading a diary that is open to the public, where each section has its own story and meaning. It is rare to find writing that can combine various topics and still feel whole and harmonious like this. https://feuilledevigne.info/
This article really shows how great a flexible and unbound writing style is. The author manages to take the reader through multiple perspectives, from often overlooked details to deeper topics. I felt like I was on an unexpected, yet highly enjoyable, intellectual and emotional journey. Each section of the article took me further into the author’s mind, and by the end, I was richer in new insights and understanding. Thank you for sharing your diverse yet well-structured thought process. https://haliburtondogsledding.com/
I really appreciate how the writing gives the reader the freedom to interpret and think about each section based on their own personal experiences and perspectives. While there is no overarching theme that drives the discussion, the author manages to create a sense of intimacy and closeness through her touching word choices. I felt like I was being invited into a meaningful conversation, where each topic was discussed with a sincerity and honesty that is rare. This is the kind of writing that makes me want to come back for more, not just to reread, but to understand the layers that may have been missed on the first read. https://nachomentary.com/
Reading this piece was like going on an adventure full of surprises, with each anonymous piece leading me to topics and ideas I had not expected. I really enjoyed how the author was able to weave together various thoughts into a narrative that flowed so naturally. While there was no central theme, each section felt important and gave me something new to think about. The author has a knack for making simple things interesting and meaningful, and this is one of those articles that will stay with me for its uniqueness and richness. https://ctdyrqey23.com/
This article successfully demonstrates that writing that is not tied to a specific theme can still be interesting and relevant to readers. The author has an uncanny ability to explore a variety of topics in a way that makes each piece feel fresh and interesting. I love how each idea presented has depth and gives the reader space to reflect. This is the kind of writing that not only informs, but also challenges the reader to think further and see the world in a different way. It’s rare to find writing that has this kind of freedom and depth, and I really enjoyed it. https://yytdquuq23.com/
This article really shows how diverse ideas and perspectives can be combined in a piece of writing without a clear theme. Each paragraph feels like a piece of a larger puzzle, and I enjoyed how the pieces fit together to form a more complete picture. While there may not be one overriding theme, this piece managed to capture my attention in a very unique way. The author managed to touch on a variety of topics in a way that made me feel like I was being engaged in a warm and meaningful conversation. This is the kind of writing that makes me want to keep reading more from the same author. https://0187009.com/
I really enjoy reading this blog whenever I have free time. It feels like finding a treasure in the ocean of information on the internet. I have to admit that many blogs out there focus on a specific topic, and while that is interesting, sometimes I feel like I need something more diverse. On this blog, I feel like I get it all. From inspiring personal stories, to deep thoughts on the little things in life that we often overlook, it is all presented in a very natural and enjoyable way to read. https://tanhuangshiyanji.net/
What I love most about this blog is its ability to make any topic feel relevant and relatable. The author seems to have a knack for seeing the world from a unique perspective, and then writing down those thoughts in a very honest and fluid way. Every time I read a post, I feel like I’m having a conversation with a good friend who always has a different but interesting perspective. https://semangguo.com/
I also really appreciate the way the author blends life experiences with deep reflections. There are so many ‘aha’ moments I have had while reading this blog, where I feel like I’ve gained a new insight or seen something from a different perspective. Maybe that’s what keeps me coming back to this blog—the desire to continue learning and growing through other people’s experiences. https://638273.com/
ABU TOGEL is a lottery game site that has been proven to be very reliable in providing interesting and profitable games for lottery game fans. To be able to play on the ABU TOGEL site, of course you must be registered as a member on our site and our site is the most trusted site in Indonesia that has very easy wins and big maxwin jackpots https://dinamowin.com/
your blog is very good, there are many insights contained in your blog, I have a blog site that is similar to yours and can be said to be more interesting and very interesting for those of you who like to read, especially my blog discusses online games that can make money, namely discussing very good online slot games, if you want to read it you can visit our website here https://trikslot.id/
Top-tier Starlight Princess Pachi ONLINE SLOT RTP of 96.04% is slightly above the industry average, which according to our research and statistics, hovers around 95-96%. However, keep in mind that this game also has the possibility of setting an RTP of 95.04 or 94.04%, depending on the choice of kasino operator. If you are curious about the game you can check it on the website.
Wow, I am really impressed with how varied and in-depth the content on this blog is! Each article posted seems to offer a unique view and perspective, even though there doesn’t seem to be a particular theme that ties all of the content together. This is actually a great strength. The diversity of topics covered shows an openness and willingness to explore different areas, which is really refreshing. https://skl.smknegeri1stabat.sch.id/
I really appreciate how each piece is constructed with meticulous detail and sharp analysis. No matter the topic is light or heavy, you are able to present it in an interesting and informative way. This shows dedication and commitment to quality content. https://daftar.smansakakap.sch.id
The collection of articles on this blog is truly amazing! Each post offers something new and refreshing, demonstrating the wealth of knowledge and interests the author has. Despite the variety of topics, the quality of the writing remains consistent and insightful. I love how each article can stand on its own, yet together form a rich mosaic of thought. Thank you for consistently providing interesting and intriguing content! https://daftar.smansakakap.sch.id/
One thing I really appreciate about this blog is its courage to explore a variety of topics without strict boundaries. Each post invites the reader to think and see the world from a different perspective. It really makes for a refreshing and liberating reading experience. I look forward to your next post and how you will continue to explore new and exciting things! https://baronquevo.com/
This is a perfect example of how the power of diverse content can create a very satisfying experience. The lack of a binding theme makes each article feel like a new adventure. The quality of writing and depth of analysis presented in each post is truly captivating. Keep up the diverse content, it keeps me always curious about what’s coming next! https://kungfuchaonima.com/
Sangat mengesankan melihat bagaimana blog ini berhasil menyajikan topik-topik yang begitu beragam dengan cara yang selalu menarik dan relevan. Keterampilan penulis dalam menjelaskan ide-ide yang kompleks dengan bahasa yang mudah dipahami adalah sesuatu yang patut diapresiasi. Saya menghargai upaya untuk terus mengeksplorasi dan mempersembahkan konten yang fresh dan insightful. Blog ini benar-benar menjadi sumber inspirasi! https://cauldroncrows.com/
I really enjoy how this blog presents a variety of topics with a consistent and quality approach. Although there is no specific theme, each article has the power to captivate and provide valuable information. This is an amazing place to find new thoughts and different perspectives. Thank you for your hard work and dedication! https://ashcool.com/
The quality and variety of content on this blog is impressive! While there is no specific theme, each post offers valuable new insights and perspectives. The author’s ability to explain a variety of topics in a relevant and interesting way makes this blog very useful and enjoyable to follow. Keep up the good work and give readers something new every time! https://project951.org/
This blog really shows that rich content doesn’t always require a tied theme. Each post features deep thought and clear explanation, making it invaluable to the reader. I love how you tackle different topics in a way that’s always fresh and energetic. Thank you for this great contribution! https://labirindeath.com/
We have a site that discusses accurate lottery numbers and can make you win continuously. If you want to read it, you just need to click on our website here and read it. Guaranteed you will definitely get accurate lottery number tricks and guaranteed to win. https://ifac.me/
One thing that makes this blog stand out is the courage to explore a variety of topics without being tied to a specific theme. This gives the author the freedom to explore different ideas and present them in a creative and informative way. Every article is a new and interesting experience. I really appreciate the content and always look forward to new posts. https://dinamowin.com/
We have a site called PANENTOGEL which has a very large win of up to 10 million rupiah and will be paid immediately without further ado and our site is trusted by everyone especially in the online world because of its big prizes, you can play it without having to pay an entrance fee and can play it with a capital of only 10 thousand rupiah panentogel
your blog is very good i am impressed with your blog it is very good and there is insight in it and if you want to read it just visit our website here https://wdgameslot.id/
Trust, consistency of excellent service, data security, comfort in playing, distribution of bonuses on time, always paying in full on the spot, are advantages that have been experienced by our members, and with just 10k capital you can play via mobile applications or other media. desktop that you have. Check the game now.https://mezup88.com/
우리카지노 계열 로즈카지노 우리계열 로즈카지노 | 메리트카지노후속 – 온라인 바카라사이트 우리계열 메리트카지노의 신규브랜드 로즈카지노 입니다. 로즈카지노
If you want to know the exact lottery numbers, you can visit our website because our site is guaranteed to be written and you will definitely be interested in our site and also on our site there are various types of lottery that you can read. https://aztec007.com/
The characteristics of optimists and pessimists are that optimists always see opportunities in every difficulty, and pessimists always see difficulties in every opportunity.
Kunjungi Situs
https://tuneon99.com/
Online slot game recommendations provide IDNPLAY games such as live kasino, online lottery and slots, which you can play very easily to get the jackpot.
Thanks for sharing this information. I really like your blog post very much. You have really shared a informative and interesting blog post qq303asiabet
This discussion is very useful, I enjoyed reading it especially as I am a beginner. Thank you, I wish you a happy life akses fafa191bet
DORAHOKI is a platform and place to play online games that are always targeted and most played by members who want to feel the sensation of playing exciting and profitable online games. and on our site there are bonuses and promos that you will get a lot, if you play on this one site. Dorahoki also offers various bonuses and promos for its players. We will recommend the dorahoki online game site, if you are looking for a site that offers benefits and also the excitement of playing online games. https://pecahin.com/
CorelDRAW Graphics Suite 2022 Portable Free Download for Free
Maya is a type of slot game that offers a unique playing experience with a theme inspired by ancient Mayan culture. This game usually features symbols related to Mayan culture, such as pyramids, ancient gods and valuable artifacts, check out the game at website.https://scatterhitam888.id/
Thanks for sharing this information. I really like your blog post very much. You have really shared a informative and interesting blog post hoki qq303asiabet
This discussion is very useful, I enjoyed reading it especially as I am a beginner. Thank you, I wish you a happy life hoki fafa191bet
Just finished reading several articles here, and they all make me smile to myself. The writing style is light but there is still content, making me keep scrolling. There’s no need for a special theme, but that’s what makes this blog fun and not boring. So happy to find a blog like this! https://transport-haenni.com/
You often come across blogs that have various themes but don’t really know what to do, but here it’s different. Every piece of writing feels natural and just flows. It’s like listening to a friend’s cool story, and there’s always something interesting that comes up. I will often stop by again to read other posts. https://hlbxgty.com/
I love how this blog is not rigid and doesn’t have to follow a certain theme. Each article brings a new nuance and makes me want to read more. The author has a unique way of packaging a simple story into something interesting and relatable. This blog will be one of my favorites for casual reading. https://ifac.me/
It’s really nice to find a blog that feels like a collection of stories from everyday life. Without a special theme, each article still succeeded in making me interested in reading until the end. Nothing is too forced, everything flows naturally. Will definitely come back here to read the next articles. https://xingba102.com/
This is one of the blogs that makes me feel comfortable, like I’m chatting casually with an old friend. There doesn’t need to be a specific theme, but each post has its own charm. His writings are fun to read and there’s always something that makes you think or just smile. Thanks for this exciting content, I will definitely come back again. https://hpv-treatment.net/
Every time I visit this blog, I always find something new and interesting. The writing style is light, flowing, and makes me feel like I’m having a casual chat. Although there is no specific theme, each article has its own way to catch my attention. I’m so happy to find an exciting blog like this. https://lesptitsfouineurs.com/
This blog is like a treasure chest full of surprises. Every time I read a new article, there is always something that makes me think or laugh. The author has a way of writing that is light but still meaningful. I really like the vibe of this blog! https://trentain.com/
Visiting this blog is like listening to an exciting story from a friend who loves to tell stories. The topics are varied, but they all have their own way of making me want to read. I really enjoy every writing here. Thanks for making a fun place like this! https://hahazl.com/
There is something special about this blog. The writings just flow, they are not stiff, and there is always a topic that makes me curious. Even though there is no specific theme, I still feel like everything is connected in a unique way. This blog has become one of my favorites now. https://eslindabeauty.com/
I really like this blog because every article feels personal and natural. There is no theme that is followed, but that is what makes me curious about each new post. It feels like sitting back and listening to an old friend’s story. Keep up the good work! https://messith.com/
surefire lottery tricks and surefire numbers?, we have a site that discusses surefire tricks and surefire numbers and you can visit our site because on our site there is a complete discussion that is easy to understand for everyone who wants it. You just click on our site and read. https://irb-online.com/
Reading this blog is like opening a window to a world full of exciting stories. The topics may be random, but that’s what makes each article feel fresh and never boring. The author has a cool way of packaging each story. I always can’t wait to read the next posts! https://tm099.com/
This is a blog that always makes me want to read. Although there is no clear theme, each post has its own charm. The author can make simple things interesting and relatable. I will continue to visit here to read more articles. https://sexybaccaratclub.com/
It feels like I just found a hidden gem on the internet! This blog doesn’t have a specific theme, but that’s what makes me want to read it. Every article feels like a casual conversation but still full of meaning. Can’t wait to read more writings from this author. https://kg4dtgl.me/
It’s not often that I find a blog that I can relate to like this. Even though the topics are random, they all feel relevant and fun to read. I really like how the author tells her stories so naturally. Thank you for creating this fun blog! https://angelsforsale.com/
I really like this blog, there are always topics that make me interested even though there is no specific theme. It feels like chatting with a friend who always has new stories. Can’t wait to read more! slot qris
Excitement at the end of the month is the key to starting the new month strong with jawara88 official
https://rryrry.com/.
Recommendations for online lottery sites that are popular among the public which reflect people’s desire to seek luck and improve their financial situation, what are you waiting for, register immediately and win prizes of up to hundreds of millions of rupiah.
Very useful information and also makes it easier for us to search for games.
https://macaupools.id/
I really enjoy every time I visit this blog. Although there is no specific theme, I always feel like I find a treasure in every article. The writing style is light, not preachy, but still full of deep thoughts and often opens up new insights. It feels like chatting with a friend who has a broad view and always has something interesting to share. This blog has become one of my favorite places to relax while having coffee, enjoying different stories but still having a common thread in a natural and easy-to-understand way of conveying. Keep writing, because I will definitely keep coming back to read more! https://luohejy.com/
Every time I read this blog, it feels like I’ve found an oasis in the middle of the hustle and bustle of everyday life. There’s no specific theme, but that’s what makes each article feel fresh and never boring. The author has an incredible talent for capturing the essence of different topics and presenting them in a relaxed yet insightful way. I love how each article brings me into a warm conversation, like a casual chat with an old friend who always has something new and interesting to tell. This blog is truly a great place to think, laugh, or just escape from the routine for a while. Thank you for creating such a comfortable and inspiring space! https://ovvuide.com/
Reading this blog is like taking a walk in the park with lots of interesting surprises around every corner. Without any specific theme that binds it, each article feels like a new adventure that makes me want to keep reading further. The author has a very natural way of telling the story, as if we were sitting together, enjoying the conversation that just flows without pressure. Sometimes, I can find little things that turn out to be very meaningful after reading the writing here. I am happy to have found a blog that is full of warmth, depth, and also concise. I will definitely keep coming back to read more of these amazing writings. https://ihailey.com/
This blog feels like a little sanctuary in the digital world. Every time I stop by, I feel like I’ve found a cozy corner to reflect and enjoy the moment. While the topics are varied and there’s no particular theme, each article always manages to touch me in a unique way. The author has an uncanny ability to engage the reader in warm, meaningful conversations without feeling pushy or over the top. This is one of the few blogs that makes me feel at home, and I will definitely keep coming back for more of this beautiful and inspiring writing. https://webusa1.com/
This blog is truly a breath of fresh air in the midst of the information-filled cyberspace. Although there is no specific theme, each article always has its own charm that makes me want to read until the end. The writing is so natural and flowing, like listening to an old friend telling about their experiences and thoughts. It feels so comfortable to find a place that can provide various perspectives without feeling forced. This blog has successfully taken me on a different journey in each post, and I always leave this page with a fresher mind and a calmer feeling. I will definitely keep coming back to read more of this amazing writing! https://gigametr.com/
Visiting this blog feels like being in a cozy living room, where each article is like a story from a friend who comes without a specific agenda but is always full of surprises. There is no theme that is followed, but that is what makes each post feel fresh and unexpected. I love how the author can capture the essence of simple things and convey them in a way that is so relatable. Every time I read, it feels like I get a little slice of life that is often overlooked but turns out to be so meaningful. This blog is a kind of soothing relief from the daily routine, and I can’t wait to continue following the new stories that will come. https://sng04.com/
This blog is like a perfect blend of casual conversation and deep reflection. Although the topics are diverse and not tied to a particular theme, each article always manages to touch on another side of life that I may have not noticed before. I love how the author can package various experiences and thoughts into a flowing story that feels very close to our daily lives. It feels like chatting with an old friend who always has a new and interesting perspective. Every time I stop by here, I always get something that makes me think deeper or just smile to myself. This blog is really a fun place to spend time and get new inspiration. https://heritagerestoration.org/
There is something so calming about reading this blog. While there is no particular theme to follow, each article feels like a slice of life presented so naturally and candidly. The author has the ability to take simple things and turn them into rich, meaningful stories. It feels like sitting back, enjoying a cup of coffee, while listening to stories that touch the heart and mind. This blog is a little oasis in the midst of the hustle and bustle of everyday life, a place where I can pause, reflect, and gain new perspective. I will definitely be coming back here often to enjoy more of this wonderful writing. https://literary-business.com/
I am so glad I found this blog. There is no particular theme, but that is what makes every article feel fresh and interesting. The writing is so natural and flowing, as if we are sitting together and having a casual chat. Every article takes me into a different world, sometimes entertaining, sometimes making me reflect. This blog has succeeded in becoming the perfect refuge from the hustle and bustle of everyday life. It feels like finding a safe and comfortable place to stop for a moment and enjoy light but meaningful stories. Thank you for creating such a beautiful and inspiring space! https://80767tt.com/
There is something so captivating about this blog. While each article seems like a slice of everyday life, it is presented with a warmth and depth that makes it a pleasure to read. There is no overarching theme to follow, but that is what makes each post feel free and fresh. The author has a unique way of telling stories, as if we are sitting together in a cafe, enjoying a cup of coffee while sharing life experiences. Every time I read this blog, I always feel inspired, as if I get a new perspective on things I may have missed before. Thank you for creating such a calming and inspiring space, where I can forget about my busy life for a moment and enjoy the beautiful stories that just flow. https://02mni.com/
This blog is truly an oasis in the middle of a desert of information overload. While there is no specific theme, each article feels like a warm conversation with an old friend who always has an interesting story to share. The writing is very natural, not contrived, but still full of deep thought that often opens my eyes to new things. I enjoy the way the author views the world, how every little detail can be turned into a meaningful story. This blog has become my favorite place to sit, reflect, and enjoy the little moments that we often miss in the hustle and bustle of everyday life. I can’t wait to continue following the interesting stories that will come here. https://ribiav.cc/
Reading this blog is like finding a quiet little corner amidst the distractions of the digital world. Each article, even without a specific theme, always transports me to a different world—sometimes full of laughter, sometimes full of reflection. The writing style is so fluid, as if we are sitting together, sharing stories without any boundaries. I love how this blog gives readers the freedom to interpret each post in their own way, allowing everyone to find something meaningful from each article. This is one of the few places where I can feel connected to something bigger than just words on a screen. Thank you for creating such a special space. https://8110t.com/
There is a comforting feeling that I always feel every time I read this blog. There is no binding theme, but each article feels so relevant and touching. It feels like I am talking to a good friend who always has a new story to share. The author has an amazing talent for packaging simple things into interesting and meaningful stories. I often feel like I am sitting in a comfortable living room, listening to the stories that flow so naturally. This blog is truly a sanctuary from the hustle and bustle of everyday life, where I can reflect, laugh, or just enjoy the little moments that are often missed. I will definitely keep coming back for more of the beautiful and inspiring writing here. https://dostavljac.com/
I just read your blog, and I am very impressed with the content you provide. Your posts are not only informative, but they are written in an engaging and easy to understand style. I really appreciate how in-depth you cover the topics and how you present the information in a fresh and insightful way. Thank you for sharing your knowledge and inspiration through this blog. I look forward to your future posts https://directifindpolicy.com/
Every time I visit this blog, it feels like I’m opening a window into a world full of colors and stories. Although the topics are diverse and there is no specific theme, each article always feels so personal and close to everyday life. The author has an amazing way of telling stories, making each reader feel connected in a unique and deep way. I enjoy how each article brings me into a warm and meaningful conversation, as if I were talking to a long-time friend. This blog has become one of my favorite places to reflect, seek inspiration, or just enjoy a quiet moment in the midst of my busy life. Thank you for creating such a warm and inspiring space, where I always feel accepted and appreciated. https://sedaji8.com/
I really enjoy reading articles here. It felt like I was having a casual chat, not too serious but still something that made me think. This blog is really my favorite place to unwind. https://dustlandexpress.com/
There’s something comfortable about this blog. Maybe it’s the relaxed, unpretentious writing. Each article feels like part of a flowing conversation, so I keep reading. https://bonaulo.com/
Its like you read my mind! You appear to know a lot about this, like you wrote the book in it or something. Papa4d2 I think that you can do with some pics to drive the message home a bit, but instead of that, this is wonderful blog. A great read. I’ll definitely be back
The most popular online slot game agents always pay attention to the entertainment of online slot game players. Therefore, the developer has designed bonus prizes for your favorite slot games. Play now and win prizes of up to hundreds of millions of rupiah, check the game on the website.https://landingpaten.com/
Chrome Dino is a built-in offline game in Google Chrome that activates when there’s no internet connection. Players control a pixelated dinosaur running through a desert, jumping over cacti and dodging obstacles. It’s a simple yet addictive game that provides entertainment during internet outages or idle moments.
Visit Canon.com/ijsetup Select your region, printer name, and computer OS. In the Product Setup section, click Download.\
To install the software for your PIXMA G6020 from the Canon.com/ijsetup website, follow the steps below. Click here, then click Download.
Open downloaded Canon Printer Setup file from Canon.com/ijsetup Select install wireless printer with USB connection option. . It will show you list …
Simplify your Canon printer login with ij.start.canon. Visit ij.start.canon for seamless setup and efficient printing.ij.start is the manufacturer site for downloading Canon Canon printer drivers.
Install and set up Canon printers from ij.start.canon and get high quality …
Step-by-step guidance to install 123.hp.com/setup . Driver download, troubleshooting, installing process, mobile printing, wireless setup for all HP …
After downloading the HP printer driver on the device dvs. prin 123.hp.com/setup , install driverul de printer HP on device dvs.Launch the Disney+ app and select Log in.
Visit Disneyplus.com/begin on a computer or mobile device. Enter the 8-digit code you see on your TV.
Start using Disney+ on your device by entering the 8-digit code displayed on your TV at Disneyplus.com/begin Find out more
Disney Plus Free Trial offers new subscribers a free trial period, allowing users to explore the platform’s extensive library of content before subscribing. This trial typically lasts seven days, providing access to a wide range of movies, TV shows, and exclusive Disney Plus originals. During the trial, users can enjoy content from beloved franchises such as Disney, Pixar, Marvel, Star Wars, and National Geographic.
Norton.com/setup is the website for downloading and installing Norton security products. Users can visit this link to enter their product key, create or sign in to their account, and follow the instructions to set up their Norton antivirus and security software, ensuring comprehensive protection for their devices against online threats.
Amozon.caom/mytv is the link for activating Amazon Prime Video on smart TVs and streaming devices. Users can sign in with their Amazon account, enter the activation code displayed on their TV, and start streaming a vast library of movies, TV shows, and exclusive Prime content seamlessly on their big screens.
123.hp.com/setup is the portal for setting up HP printers. By visiting this link, users can download the necessary drivers and software, follow step-by-step instructions for printer installation, and connect their HP printer to a network. This ensures a smooth setup process for efficient printing from various devices.
a href=”https://cricut-com-setup.github.io/”>Cricut.com/setup is the link for setting up Cricut cutting machines. Users can visit this site to download the necessary software, follow the setup instructions, and register their device. This ensures that the Cricut machine is ready for use, enabling users to start creating custom designs and crafts seamlessly.
Cricut.com/setup is the link for setting up Cricut cutting machines. Users can visit this site to download the necessary software, follow the setup instructions, and register their device. This ensures that the Cricut machine is ready for use, enabling users to start creating custom designs and crafts seamlessly.
Overall, your blog is an excellent example of a blog site that is not only informative but also inspiring. I highly recommend you to visit this blog if you are looking for high quality content and a pleasant reading experience. https://eslindabeauty.com/
Canon.com/ijsetup is the link for setting up Canon printers. By visiting this site, users can download the necessary drivers and software, follow easy setup instructions, and connect their Canon printer to their devices. This ensures a smooth installation process, enabling efficient printing and scanning capabilities.
installturbotax.com is the link for downloading and installing TurboTax software. Users can visit this site to enter their license code, download the software, and follow the on-screen instructions for installation. This enables users to efficiently set up TurboTax for preparing and filing their tax returns accurately and securely.
Youtube TV Free Trial for new users, allowing them to explore its live TV streaming service. During the trial, users can access a wide range of channels, including sports, news, and entertainment, without any commitment. It’s a great way to test the service before subscribing.
Paramount Plus Free Trial for new subscribers, providing access to its extensive library of movies, TV shows, and exclusive originals. This trial allows users to explore content from CBS, MTV, Nickelodeon, and more. It’s an opportunity to test the service before committing to a subscription.
ESPN Free Trial for its streaming service, ESPN+. During this trial, users can access live sports events, original shows, and on-demand content. It’s a great way to explore ESPN’s extensive sports coverage and exclusive programming before deciding to subscribe to the service.
Paramount Plus Free Trial giving you access to a vast selection of movies, TV shows, and original content. Stream live sports, news, and entertainment from channels like CBS, MTV, and Nickelodeon. Enjoy ad-free viewing and on-demand content across multiple devices. Sign up now to explore diverse programming.
Course Hero FreeTrial for new users, providing access to its extensive library of study resources, including textbooks, practice problems, and expert tutors. During the trial, users can explore the platform’s educational materials and academic support tools, helping them decide if the subscription meets their needs.
IPTV Free Trial , allowing users to experience live TV streaming over the internet. During the trial, users can access a variety of channels, including sports, news, and entertainment, and explore the platform’s features. It’s a chance to test the service before committing to a subscription.
Kindle Unlimited Free Trial for new subscribers, granting access to a vast library of eBooks, audiobooks, and magazines. During the trial period, users can explore and borrow from thousands of titles across various genres. It’s a great way to experience the service’s extensive reading options before subscribing.
Discovery Plus Free Trial , giving you access to a vast library of shows and documentaries from networks like Discovery Channel, HGTV, Food Network, and more. Enjoy exclusive original content, ad-free streaming, and high-definition quality. Sign up now to explore diverse genres, including nature, science, and lifestyle.
Prime Video Free Trial , providing access to a vast library of movies, TV shows, and exclusive originals. Enjoy ad-free streaming and download options for offline viewing. Sign up now to explore diverse genres, including drama, comedy, action, and family-friendly content, all available in high-definition quality.
Photoshop Free Trial , allowing you to experience industry-leading photo editing and graphic design tools. Explore powerful features like layers, masks, and filters to enhance and transform your images. Sign up now to create stunning visuals, from simple edits to complex compositions, all with professional-grade precision.
Online slot game recommendations provide IDNPLAY games such as live kasino, online lottery and slots, which you can play very easily to get the jackpot.
Dont forget to check my website Paris88
a href=”https://showtimefreetrial.github.io/”>Showtime free trial , giving you access to a vast library of hit movies, original series, sports, and documentaries. Stream award-winning shows and exclusive content on demand, ad-free. Sign up now to enjoy high-quality entertainment across multiple devices, including smartphones, tablets, and smart TVs.
.Audible Free Trial , providing access to a vast library of audiobooks, podcasts, and exclusive originals. Enjoy captivating stories and insightful content across various genres. Sign up now to listen on the go, with offline downloads and seamless integration across multiple devices, enhancing your audio experience anytime, anywhere.
This is a great resource that you provide and that you provide for free. I’m glad to see a blog that understands the value of providing quality resources for free.thanks for sharing.https://252452.com/
Now our site has become one of the professional fair play slot game sites with an official license from Pagcor and proven to be a trusted agent who is ready to pay any amount. And our site is considered the best and safest site for those of you who want to bet minimally and get maximum profit. With a deposit of only 10,000 you can win tens to hundreds of millions. https://golget.com/
There is something so comforting every time I read this blog. Even though the topics are random, each post always has a flowing story and feels very close to life. The author seems to know how to bring the reader into a warm and honest conversation. This blog is like a refuge in the middle of an internet full of heavy information. Keep writing in a simple but always meaningful way. I, and probably many other readers, really appreciate it. https://satria150.com/
YourPackaging is a leading provider of custom packaging solutions, designed to meet the unique needs of businesses across various industries. Whether you need packaging for retail, e-commerce, or promotional purposes, YourPackaging offers a wide range of customizable options to help your products stand out. With a commitment to quality, sustainability, and customer satisfaction, we ensure that every package not only protects your products but also enhances your brand’s image. From eye-catching designs to eco-friendly materials, YourPackaging delivers packaging that speaks to your brand’s values and leaves a lasting impression on your customers.
What amazing content. I really enjoyed reading this wonderful article, please keep sharing the information,I won’t miss your next post.https://luohejy.com/
We provide several Providers which are one of the International Providers and certainly have very good and guaranteed quality. The providers we provide have very high quality games and have uniqueness in each game. Which is certainly very easy to understand and also very easy to win. This is one of the advantages of our site because our site provides providers that have the most complete games in each provider. Guaranteed many players feel the ease of playing on the Asentogel site which always provides happiness in every. Asentogel is an official slot site that certainly provides the best International providers, if you see a site that has providers like the ones listed below. Not all sites have providers like the ones we provide, therefore we provide providers that are so complete and certainly the best. The providers we provide are providers that provide games that have very good quality, especially with very attractive graphics. This is one of the advantages of our site which provides very complete providers. https://generasijp.com/
Trusted online slot agent sites offer various conveniences that will support the quality of the game, such as 24-hour member service support, mobile applications and other attractive bonuses. Two attractive bonus offers, namely a 10% new member bonus and a 3% referral bonus. Please register your account and play the game now.https://terpercaya2023.com/
We have one of the best online slot agent sites with the latest gacor slot leaks. Of course, it appears in the best and most famous online slot games that are very easy for you to win. The biggest win at an online slot agent with the best rtp leaks for the latest online slots will certainly create a lot of provisions to create victory. That way, online slot players will become the most popular members who are ready to reap many big profits. In this famous online slot game, you can get the convenience that has been provided so easily https://keripikbulu.com
新葡京娱乐场 巴士|
金沙娱乐集团|
澳门威尼斯人百家乐游戏|
Many people do not act because they are afraid of failure, even though not acting is a failure that has clearly already occurred.
Click here
新葡京在线|
申博太阳城官方代理|
澳门威尼斯人娱乐网址|
澳门拉斯维加斯如何代理|
威尼斯人试玩账号|
澳门金沙在线官网|
澳门新葡京真人在线游戏|
recommendations for the best online slot games, Rich graphics and dramatic background music create an intense and emotional atmosphere, depicting a narrative of passionate love and conflict. With a relatively high RTP and medium to high volatility, the Immortal Romance Slot offers the opportunity for big wins , play the game now on the website.https://83dqiao.com/
MEME4D As the Best & Most Trusted Online Toto Site Currently Presents Anti-Loss Online Togel Games Easy to Make Money Every Day, Guaranteed to Make You Addicted! and we also have several types of games, there are also slots and others, which will definitely make it easier for you to win, so it’s very easy to get a super maxwin jackpot for you, if you want to play it, just click on our website and play https://uangeasy.com/
Your blog has shown great excellence. With our service, you can maximize that potential with a strategy that is more focused on improving writing in the blog, and we also have a blog writing site that is a lottery number with the biggest jackpot, if you want to read it, you just visit our website here https://ekramit.net/
Asentogel is the most popular and most exciting online betting site in Indonesia that provides slot games and lottery. Where Asentogel is currently popular because it has become one of the international sites. We also provide providers and slot games that are very high quality and guaranteed. Asentogel is one of the sites that already has an official license and also has an operating permit, if you want to know more information, just visit this website. https://generasijp.com
I really enjoy reading all your weblogs. I really appreciate your content. Really great post, thanks for allowing me to comment.https://edti-1.com/
The Secret to Lucky Numbers with Effective Strategies to Get Big Wins in Online Togel Games, there are also the latest alternative links available for players or bettors so you don’t have difficulty accessing our site, check the games on the website.https://cuanpaus.com/
For those of you who like to play in the afternoon until evening, we will leak the slot game along with its gacor hours so that you can quickly get the jackpot because we have the best and most trusted gtatogel site number 1 which has presented many types of online game choices that are certainly very popular today. This site not only provides various types of games, but also provides or presents deposit transaction facilities that are quite cheap and also very complete which are indeed the site’s obligation to please its loyal members. And with various types of providers and other games embedded in this trusted and popular gtatogel site. so if you are curious, just register yourself on our site and play https://mejatelur.com
For those of you who like online games, you can read it or play it on our very popular site and it is guaranteed to be very interesting for those of you who read it, because on our site there are various kinds of game articles that are very diverse and varied and can make you know about what tricks are in the game, now if you want to read it you only need to click on our website and you can read it http://rgstudiodesign.nl/
This is one of the sites that provides slot games that are currently popular and profitable. Let’s just visit and play on this website. https://etours.tv/
This site provides the most top online betting games today, besides being interesting, this site is also guaranteed to be safe and reliable to play. for more complete information, just visit this website. https://lottosodlive.com
Very helpful guide! We also offer accurate tips on playing patterns for online slot games and online lottery on our website, please check the games.https://maingim.com/
Discover how to easily access your Orbi router settings with our Orbi Router Login guide. Manage your network, update settings, and optimize performance effortlessly. For more information, you can visit our site or contact our technical expert through live chat.
Discover how to set up your Canon printer using ij-start-canon. Our guide walks you through each step for a smooth installation process. For more information, you can visit our site or contact our technical expert through live chat.
Discover the steps for Nighthawk Netgear login to access your router settings quickly and efficiently. Ensure seamless connectivity by following our easy guide. For more information, you can visit our site or contact our technical expert through live chat.
Blogs that are frequently updated with new content regularly show the dedication of the owner, and this is often appreciated by loyal readers. And we have a very interesting lottery site and if you read it, you must be interested in our site because our site discusses accurate lottery numbers and easy jackpots in playing lottery, if you want to read it, you just click on our website here and you just read https://zgdsc.net/
Discover how to access your Lorex security system with ease using Lorex Login. Follow our guide to log in and manage your surveillance settings efficiently. For more information, you can visit our site or contact our technical expert through live chat.
I really like the writing style used in this blog, it feels very personal and close. Thank you for providing quality content that makes it easy for readers to understand the topics raised! http://sportkeren01.blogspot.com/
Always enjoy reading articles here. The unique perspective and in-depth analysis make me understand the sports world as a whole better. Keep up the good work! http://wisataterpopuler0.wordpress.com
Every time I read this blog, it feels like I found a safe haven in the middle of a crowd. The writing style is very natural and flowing, as if the author is sharing a story directly with the reader. Although the topics discussed are rather simple, there is always a depth that makes me ponder. Thank you for providing a space where I can pause and reflect on the little things in life. https://otomotif71.wordpress.com/
I really enjoy the way the author processes everyday themes into such interesting articles. Her relaxed and warm writing style makes every reading feel like a casual conversation with a friend. Although not always discussing big topics, these writings always have their own way of touching the heart. Keep writing in this way, because this blog is always a fun place to take a break from the routine. https://wisata72.livejournal.com/
This blog always manages to make me feel calmer after reading. The writing style is very simple and not over the top, but always has a way of touching the deepest part. Each article feels like a casual conversation with someone who really understands how to convey ideas honestly. Thank you for sharing your views and stories that make me feel more connected to the world around me. https://legitssparrow92.wordpress.com/
One of the things I love about this blog is its ability to turn everyday topics into something interesting and meaningful. The writing is very natural, like talking to an old friend. Each article brings a warm and reflective feeling, making me think deeper about the little things I often miss. Thank you for bringing a fresh perspective that is always refreshing. https://duniagaming88.blogspot.com/
The most popular online slot game agents always pay attention to the entertainment of online slot game players. Therefore, the developer has designed bonus prizes for your favorite slot games, please check the game now.https://usa-steroids.com/
Thank you for the excellent post. Are you worried about the purity of your relationship with your partner? In this case, you should perform a rice purity test with 100 thought-provoking questions on life experiences. It provides a rice purity test score which reveals whether the individual is innocent or not. Make sure to visit the linked site to learn more.
“Great tutorial! I love how detailed and easy-to-follow your steps are. The classic board game box design is simple yet timeless—perfect for giving any homemade game a professional look. Thanks for the tips on material selection too!”
Visit My Site
Interactive features like comments, discussion forums, and more really enhance the user experience. I feel involved and can participate easily and also have a broad insight into it, if you want to know more about the song you just need to click on our website here https://c365fx.com/
There is night and there is day, there is happiness and there is sadness, there is the sun and there is the moon, there are trials and there is patience, that’s what life is. It’s quite simple if you want to be happy, make it easy but meaningful.
Kunjungi Situs
Kunjungi Situs
Once you can breathe and get up, get up! Take a breath and say: I can do it!
No need to hold grudges, just smile, and let nature do its job. In silence because it hurts you will also be hurt in time.
Kunjungi Situs
Life is not as simple as it is said, but life is also not as complex as you think.
Kunjungi Situs
Sometimes we have to be wrong, in order to know what is right. You have to fall to know how to get up. You have to cry to be strong. You even have to regret it in order to know how to be better.
Kunjungi Situs
The more you understand more about the world around you, the more passionate and curious you become about the realities of your life.
Kunjungi Situs
Kunjungi Situs
Be strong. Life is too short, if you only use it to mourn it’s useless, your heart will get darker.
Kunjungi Situs
Never give up when life gives us a hundred reasons to be sad and cry, nor give up or complain about our current life situation. Because what we now consider lacking could be too much for other people whose fate is less fortunate than ours.
Sometimes you have to experience failure, so you know how to get up and stand tall again. Because if you hope for something beautiful, you really need a long process and struggle that is not instant.
Kunjungi Situs
The self is a reflection of life. The harder the ball is thrown against the wall, the harder it will bounce off your face, and vice versa, the slower and softer the ball is thrown, the softer the bounce of the ball will be.
Kunjungi Situs
Kunjungi Situs
It’s a waste to regret the past, it’s better to regret what you won’t be able to do in the future.
A problem is an uninvited guest in our lives, and we must treat it as best as possible, then we will also be treated well by it.
Kunjungi Situs
When you don’t find a solution to a problem, it may not be a problem to be solved, but rather a truth to be accepted.
Kunjungi Situs
Wow Thank you for this site I find it difficult to provide such amazing important info out there when it comes to the material presented here, thank you for allowing me to comment.https://petespestpatrol.com/
I always feel comfortable when reading the writing on this blog. The writing style is so relaxed, but still rich in meaning. Each article seems to invite us to pause for a moment and think about simple things that are often forgotten. I love how small stories can become deep reflections here. Keep writing in an honest and honest way, because that’s what makes this blog different. https://sayamenang.com
Finding this blog is like finding the perfect place to take a break from the hustle and bustle. The natural and unexaggerated writing style always gives a warm feeling after reading it. Sometimes I feel the topic is simple, but there is a depth that makes me think further. Thank you for sharing views that are always calming and bring positive energy. https://profitpaus.com
This blog gives a very different atmosphere. Every post feels so personal and honest, as if the author is telling a story directly from his own life experience. I love how each little story can touch my heart and make me think about things that often happen in life. Thank you for sharing stories that are not only informative, but also very inspiring. https://aryaguna.id/
One of the reasons I keep coming back to this blog is because the writing is so natural and straightforward. Every time I read it, I feel like I’m sitting back and listening to a story from a friend. Although the themes are sometimes light, there is always a lesson or reflection that can be taken. Keep sharing in this style, because that’s what makes this blog so special. https://buatterus.com/
I really enjoy every post on this blog. The writing style is not over the top, but has the power to make the reader connect emotionally. Each article has a way of evoking new feelings and thoughts, even from the simplest things. Thank you for sharing such touching and inspiring stories, I always look forward to the next one. https://menang500.com
MPOMM saat ini adalah salah situs gacor terbaik yang bisa anda temukan dan mainkan di tahun 2024. Pastikan diri anda bergabung bersama MPOMM dan klaim bonus anda sebagai member baru!
Slot Gacor MPOMM
Every time I visit this blog, I always feel like I have found a space to reflect. The writings are so simple yet have deep meaning. Although the topics are rather light, there is always a reflective side that makes me think. This blog is truly like a good friend who always has interesting stories to share. Keep sharing, because writings like this are very rare and valuable. https://81xzan.com/
There is something very appealing about this blog. Every article brings a warm feeling, like reading a letter from a friend. The writing is so natural and flowing, not trying to be too formal or stiff, and that is what makes it so relatable to the reader. I really enjoy the way this blog discusses everyday things with a unique perspective. Thank you for always providing a new perspective! https://uyhnd.com/
I love how this blog packages simple things into something so meaningful. The writing style feels like listening to someone who is being completely honest and genuine. Each article brings a sense of calm and often provides unexpected inspiration. Thank you for sharing in such a natural and down to earth way. https://halamanvip.org
Each article on this blog is like a little journey into the mind and heart of the author. I love that these writings always feel very personal and close, as if we are talking to a friend. Although the topics are sometimes light, there is always a meaning hidden in them. Thank you for always presenting honest and soulful writing. https://sapirusia.com/
Reading this blog is always a fun moment in between busyness. The writing style is light but deep makes every article meaningful. I love how the little things in everyday life can be discussed so interestingly here. Keep sharing stories, because this blog always inspires in a simple but very impressive way. https://85vyou.com/
Every time I read this blog, I always feel like I’m chatting with an old friend. The light and flowing writing style makes every topic feel so close to our daily lives. Although simple, there is always a deep message that we can take. Thank you for continuing to share honest and meaningful writing. I always look forward to the next article. https://whreactor.com/
There is something unique about this blog, every post feels very personal and natural. It is as if the author is telling a story directly to the reader without any distance. I like how simple things can be raised into deep reflections. Thank you for sharing stories that are so real, but always full of inspiration. https://championengraving.com/
Well, for all of you who like to play online slot games or lottery, then it is very appropriate if you join and register on this trusted site atas4d, because this trusted site has presented quite complete online games and is currently popular. Of course, the prediction numbers issued by this trusted site atas4d are very accurate, if you want to try it, you can visit our site here https://alternatifvip.com/
Exploring the science of the mind on this insightful blog made me think about how playing online games can also relieve excessive stress and the many daily activities. For those who are interested in seeing the best online games, just visit the website.https://ofcforex.co/
write articles that discuss accurate numbers and precise numbers with the most popular lottery in Asia. You can visit our website here and you can read it by clicking on our website here. https://gmpguide.com
Great tutorial for crafting custom board game boxes! It’s a detailed yet simple guide for creating durable, professional-looking boxes. For additional design tools and resources, check out this link.
surefire tricks to get a jackpot of millions of rupiah in gacor slots, please check on the website.https://assetmurah.id/
For those of you who want to get the biggest maxwin prize by playing online games, join our site which provides prizes and games on the most sensational site. A website that provides many games, which can be played by everyone. The games presented to the players not only provide the thrill of playing games, but also the benefits of super prizes, if you want to play it, you just need to click on our website here and play it easily https://metaterbaru.com/
For all of you who like to play various types of online games, then it is very fitting if you all join this trusted site atas4d. Because the site has presented many online games that can be played using one registration and using only one account. If you are all still confused or do not understand how to register on this trusted site, then don’t worry and don’t hesitate, because the trusted site atas4d has presented ways and steps for all of you who want to register, of course the registration given can be understood very easily or very easily https://maxwinkang.com
Its like you read my mind! You appear to know a lot about this, like you wrote the book in it or something. Bandar Togel I think that you can do with some pics to drive the message home a bit, but instead of that, this is wonderful blog. A great read. I’ll definitely be back
Very helpful in sports. Therefore, if you want to know more information, you can visit the website
https://whreactor.com/
a very interesting information that we can get on this blog. therefore, many people like it.
https://hexubio.com/
If you want to know more complete information, you can visit the website
https://haopangzisp.com
These premium cartridges provide big hits and are disposable yet rechargeable, minimizing wastage. Jungle boy vapes
Indowin99
I really like the blog site you created, and I admire it! It was absolutely amazing!
Great article! I really like the articles you write and I also often read them with my family. Thank you very much.
Raisa Shelbia
I have to thank you for the efforts you have put in writing this website. I hope to see the same high-grade content from you in the future as well. In fact, your creative writing skills have motivated me. Thank you for giving me the opportunity to comment.https://t0953.com/
Terima kasih GEMOY138 karena telah memberikan perspektif baru yang inovatif di dunia digital!
interesting and very unique sites are on our site because on our site there is a lottery writing site whose bets are official and if you want to visit it you only need to click on our website here https://antenistas.org
Creating a classic board game box is a fun and rewarding project, especially if you’re designing your own game or refurbishing an old one.
Very good information and also provides very good knowledge for us.
https://023hlj.com
The biggest jackpot slot champion is a site that provides online slot games that are very profitable because the games on this site are not only popular but also trustworthy and safe to play. https://t0953.com
slot game designed by Pragmatic Play which offers an exciting playing experience with a sweet and attractive theme. https://anxshz.com
Thanks for sharing this information. I really like your blog post very much. You have really shared a informative and interesting blog post resmi qq303asiabet
This discussion is very useful, I enjoyed reading it especially as I am a beginner. Thank you, I wish you a happy life resmi fafa191bet
This article really made me think more deeply about the topic at hand. You always manage to combine facts and opinions in a balanced and flowing manner. Your writing makes readers feel involved in every discussion, find other interesting information on my website too, thank you.https://goalinthnews.com/
To make a classic board game box, start by cutting the base and sides from sturdy cardboard or chipboard. The top of the box should be slightly larger than the bottom so that it fits snugly. Once you have your pieces, glue the sides to the base to form both the top and bottom sections of the box. After the glue dries, cover the outside with decorative or wrapping paper, folding it neatly over the edges. You can add custom artwork or designs by printing them out and gluing them onto the box. Optionally, reinforce the corners with tape for extra durability.
I really like this article. Sometimes the simple things that we take for granted have a deeper meaning, and this article managed to capture that. It feels light, but still touching. Thank you for making me think! https://6399appxz.com
This article seems to have a ‘vibe’ that makes it comfortable to read. It’s not heavy but still has content. The author has a unique way of conveying something simple so that it looks interesting. I really enjoyed every paragraph. https://antenistas.org
Sometimes we need to be reminded to stop and enjoy the little things in life. This article does a great job of conveying that message in a very subtle and enjoyable way. Thank you for writing something that warms the heart! https://sj856.cc
I didn t expect this article to make me feel calmer. The writing style is easy to read and flows naturally. This reading is suitable for those of you who need a little time to relax in the midst of your busy life. https://98090tg.net
This writing has a unique way of making the reader feel connected. The author managed to convey something simple but meaningful. Not too much information, but there is an impression that lasts after reading. Good job! https://hotphoto.co
Every time I read an article on this blog, it feels like I get a new perspective that I never thought of before. The writing style is relaxed but still has meaning. This article makes me want to come back to read more. https://eguolu.org
Reading this article feels like chatting casually with an old friend. Nothing too heavy, but still comfortable and makes you think. Light writing like this is perfect for filling your free time. Thanks for sharing! https://9456mm.com
I really like how this article is delivered in a simple yet to the point manner. Sometimes all we need is something light but meaningful, and this article does just that. Keep up the good work, articles like this are sure to be loved by many! https://yangyangxiaozhan.com
This article is perfect for reading when relaxing. There is a warm and comfortable feeling conveyed through the words. Not all writings can make me feel this relatable. Thank you for providing a meaningful read! https://10990.org
This article is perfect for relaxing. There is a warm and comfortable feeling conveyed through the words. Not all writings can make me feel this way. Thank you for providing a meaningful read! https://10990.org
Wow, I really like this article! The way it is delivered is simple but still makes me think after reading it. Sometimes we need writing that is not too heavy, but still gives something to take home. Keep up the great work! https://qyznsj.net
This is a really fun read to fill your free time. The writing style is relaxed but still has a message. I rarely find articles that are not boring but still interesting like this. Hopefully there will be more similar writings in the future! https://lywhhg.com
I didn’t expect this article to keep me drifting until the end. There is something that makes me want to keep reading until the end. The writing style is nice, like chatting casually but full of meaning. Thank you for sharing such an inspiring article! https://fulilai.cc
Don’t miss the opportunity to visit our blog, because each post offers a unique perspective that you shouldn’t miss, for those of you who want to visit it, you can visit our website https://lovelehuo.com/
I love how this article takes the reader into a topic that may be simple, but has a big impact. Sometimes we need to be reminded to look at the little things in life, and this article did a great job of reminding me of that. https://47id.com
This article really helped me, making it easier for me to get ideas for writing articles
Kunjungi Situs
This article really made me feel calmer. The light yet meaningful style of delivery makes this reading feel very fitting to accompany my relaxing time. Thank you for writing something so calming! https://goalinitiative.org/
TO IMPROVE STUDENTS’ MASTERY OF CONCEPTS AND LEARNING ACTIVITIES LINK
Kunjungi Situs
This research aims to determine the STEM Integrated Project Based Learning
Kunjungi Situs
a blog that covers online slot games that are most popular with Asian people.
https://zhongguofadongji.com
For more complete information you can visit the website
https://xcaizb.com
Funny Halloween t-shirts are a playful way to embrace the spooky season and bring some laughter into your celebrations. With clever puns, whimsical graphics, and humorous slogans, these shirts capture the fun spirit of Halloween, making them perfect for parties, family gatherings, or casual outings. Trending Funny Halloween T-Shirts of 2024 From cheeky references to classic monsters to lighthearted takes on trick-or-treating, there’s a design for everyone. These t-shirts allow wearers to showcase their personality and sense of humor while staying comfortable, inviting smiles and conversation wherever they go. Whether layered under a costume or worn on their own, funny Halloween t-shirts add a delightful twist to the holiday festivities.
situs aman dengan rentan kemenangan terbaik se indonesia, yang pastinya akan membantu kamu dalam bermain slot online dengan kesempatan menang yang besar dan mengseenkan
This blog is a never-ending source of inspiration, where each post brings new insights and deep thoughts, for those of you who want to read more, you can visit our website here https://theregencypublishers.us
This is one of the sites that provides the most popular jackpot slots today, let’s just play and feel the sensation of the most popular jackpot on this website. https://uzsem.com
Do you want to improve your skills? Visit our blog to find practical tips and guides that you can apply today https://38kefu.com/
yesterday I played here. It’s really exciting and also beneficial for me.
https://eguolu.org
Information about online lottery is very good and also very easy for the players to win.
https://yangyangxiaozhan.com
providing fantastic opportunities for big wins! Highly recommended for anyone who likes exciting games, come on, please visit the site and play now.https://tuangoumaifang.com/
This blog offers a variety of interesting topics. I always find something new every time I visit your site, and for those of you who are curious about the continuation, you can visit our website here https://92qsz.com
Recommendations for games that are interesting, exciting, entertaining and very profitable, check the games on the website.https://9992379.com/
There’s a lot of knowledge we can get here. therefore I really like it.
https://musosites.co
Easy fish shooting is one of the games that is very easy to win and can easily get money, so that you are not curious, just play and feel the victory easily on this website. https://utfoto.com
Wow, I didn’t expect this article to make me think about the little things that I often take for granted. Sometimes we need to be reminded to be more aware of what’s around us. Thank you
Very suitable reading in your spare time. Relaxed but still has content, doesn’t make you dizzy. It’s fun to read writing that is light but still makes us reflect a little
Sometimes simple writing like this is the most effective. It doesn’t need complicated language, but the message gets across. Thank you for sharing things that we often forget to appreciate
I really like this article, it’s simple but still on point, it feels like having a casual chat while drinking coffee, keep writing light but meaningful things
site with accurate numbers and super jackpots, you can visit our website, because our website is guaranteed to be reliable, for those of you who want to visit it, you only need to click on our website here https://dowrit.com/
very interesting and also very useful.
https://77230d.com
This blog is interesting because it tells very diverse stories about sex that can broaden our horizons. that’s why many people like it. https://hotsexsex.com
The best online lottery with spectacular numbers that can reveal the secrets of numbers hidden in online lottery, check out the games now on this website.https://myxy555.com/
Fantastic read! I recently discovered your blog and have thoroughly enjoyed the content you’ve shared. I’m definitely hitting that subscribe button to keep up with your updates and can’t wait to see what you post next. Thanks for providing such insightful information! https://www.americajackets.com/product/super-bowl-halftime-2023-rihanna-red-suit/
When reading your articles, I am always impressed by the way you present information creatively. Your unique approach makes each topic feel fresh and interesting. For those of you who want to read the rest, you can visit our website here https://www-404666.com
To use the coupon for an extra 50% off Walking Dead Jacket (navy), visit the website and find the jacket in the sale section. Add it to your cart, then apply the coupon code at checkout. Ensure the jacket qualifies for the discount. Enjoy your savings!
This online game is very exciting and very easy to provide benefits for the players. so many people like it.
http://blogtuha.com/
Great guide on crafting a classic board game box! Clear instructions, helpful visuals, and easy-to-follow steps. Perfect for any DIY enthusiast looking to enhance their game collection. Highly recommended.
Wow, it\’s really exciting to read this article, it really adds new insight, thank you for sharing this cool information https://publicitypaper.com
I really like the atmosphere brought by this blog, every post always makes it comfortable to read. https://sqmclub-news.com
It\’s rare to find writing that is simple but full of meaning like this. Thank you for writing https://thecryptoinsights.com
really cool explanation given really opened my eyes to things I never thought about before https://theeventsweekly.com
Thank you for creating informative and easy to understand content. It really helps me who is looking for information about this https://readarthrifty.com
I really like this blog, it\’s like a comfortable place to get knowledge and entertainment while keeping up the good work https://ceoweeklyuk.com
This blog always manages to attract my attention with its content. Every time I visit, there is always a relevant and interesting article to read, especially since the delivery never feels heavy but is still full of information https://devicaseseller.com
At first I wasn\’t really interested in this topic, but after reading the article here, I got a new, broader perspective. Thank you for making the explanation simple but still providing a deep understanding https://mywebranks.com
Your easygoing and entertaining writing style makes each article easy to read. I always feel entertained and gain valuable information from each article. And for those of you who want to read more, you can visit our website https://2900073.cc/
Every time I read a post on this blog, I always feel like I get new insights that I\’ve never thought about before. It really increases my knowledge. The way it\’s delivered is also easy to follow, so it doesn\’t feel like I\’m studying. https://goslot1.io
Your way of presenting information is both engaging and informative. I really appreciate how clear and well-researched your writing is.
This is my first time finding this blog but I really like it. Every article I read always makes me curious and increases my insight. Thank you for presenting useful content in a way that is easy to understand https://top10beast.com
I didn\’t expect that the information I was looking for would be here. The explanation is very detailed but still easy to understand. It feels like chatting with a friend who really understands the topic. I will often visit this blog again https://luxuryfas.com
I really like the writing style on this blog, it\’s very relaxed but still informative, it feels like reading a light chat but actually there are many new things that can be learned from each sentence. https://xcusemeboss.com
I often feel confused about this topic, but after reading this article, everything became clearer. The explanation is very helpful and goes straight to the heart of the matter. Thank you very much for sharing https://gaskan4gol.com/
his article is really cool, it presents a topic that is actually quite complex but is presented in simple language. I understand it even though at first I felt unfamiliar with this topic https://ligaspanyol.id/
I really like this blog, every article feels like it was written with great care and there is always value that I can take even from topics that I didn\’t pay much attention to before https://ligainggris.id/
This article really opened my eyes to many things that I previously considered trivial. It turns out that after reading more deeply, there are many other aspects that need to be considered. It\’s really insightful. https://ligaitalia.id/
very interesting information and also has the part that I like the most.
https://hockeychronist.com
A very good blog because it has experience about online slot games. that’s why many people like it.
https://traveladviserpro.com
Thanks for the bag of information. because it is very good and also easy for us to understand.
https://milk-asp.xyz
lottery articles with complete guides and accurate numbers, as well as articles that attract a lot of people’s attention, you can visit our website, if you visit it will benefit you and can make you win jackpots in a row https://spelunkyexplorersclub.com
Very good online game and also has the biggest prizes. therefore, many people like it.
http://betblissjunction.com/
For complete information, you can visit our website
http://idealtechy.com/
This site presents innovative and different products from others! Don’t miss the chance to get this latest product, for those of you who are curious, you just need to click on our website here https://levelgeek.net/
an online slot game that is very good and also easily gives jackpots. therefore, a lot of people play.
https://cookandcorks.com
En uygun fiyatlarla Sapanca bungalov otellerinde tatilinizi hemen ayırtın! Büyük indirimler ve fırsatlar sizi bekliyor.
A very good blog because it contains online games that are very easy to understand.
https://hockeychronist.com
For further information you can visit our website.
https://traveladviserpro.com
Find the latest information and in-depth analysis of your favorite sports on our site designed specifically for sports fans. For those of you who want to follow it, you can visit the site link on this page https://sportsnewsportal.net/
By becoming a member of our site, you will get direct notifications about matches, schedules and important highlights from your favorite team https://goal-win.com/
slot article site that really makes you interested with its fantasy theme, this site will also make you very lucky in playing slot games, a very effective guide to tricks and strategies to follow when playing so you can win the game. If you are curious about the game, just check this website.https://setupbaccarattable.com/
DeLuna4D tidak hanya menjual produk, tetapi juga aktif dalam memberikan edukasi kepada petani. Saya pernah mengikuti acara sosialisasi yang diadakan DeLuna4D dan mendapatkan banyak informasi berguna tentang cara menjaga kesehatan tanaman dan penggunaan insektisida yang tepat. Ini membuat saya merasa lebih terdidik dan siap menghadapi tantangan dalam pertanian.
The friendly and open attitude shown by the team is very pleasant, making the interaction more enjoyable, and for those of you who want to know more enjoyable articles, you can visit it here https://hourfolksvideos.com/
Absolutely loved this guide on making a classic board game box! The instructions are clear and inspiring. Can’t wait to personalize my own game with the Dark Knight jacket theme!
If you want to know more complete information, you can visit our website
https://sportsnewsportal.net/
Thank you for the information. It’s very good because it contains a lot of positive things, especially about sports.
https://sports4everyone.org/
joki55a.org
People who can let go of difficult trials in their life will always find a beautiful solution in their life.
Sometimes we have to be wrong, in order to know what is right. You have to fall to know how to get up. You have to cry to be strong. You even have to regret it in order to know how to be better.
joki55b.org
minterscan.net
The more you understand more about the world around you, the more passionate and curious you become about the realities of your life.
Join our community! Sign up now to get exclusive access to news, analysis and tips from sports experts that you can’t miss https://goalednetwork.com/
If you want to know more complete information, you can visit our website
http://brigittevarel.com/
very interesting and also easy to win. that’s why many people like it.
http://bql-management.com/
This is one of the trusted online betting game sites that is official and safe to play. https://bestofqueenscounty.com/
With these steps, you can create a classic board game box tailored to your game’s components and aesthetic. Enjoy the process, and don’t hesitate to add personal touches that reflect the https://urminigoldendoodle.com/ theme or spirit of your game! If you have any specific game in mind or further questions, feel free to ask!
Try our latest games for free! Experience unlimited fun before you decide to play them, because our site has abundant bonuses in all its games https://139.59.96.122/
the articles always succeed in making me think more deeply even though the discussion is light and easy to understand https://www.harekrishnagoteborg.com/
To make a classic board game box, follow these steps:
Materials Needed: Gather cardboard or sturdy cardstock, a ruler, scissors or a craft knife, glue or tape, and decorative paper or paint.
Measure and Cut: Decide the dimensions based on the game components. Cut out a rectangular piece for the base and a slightly smaller piece for the lid.
Create the Sides: Cut four strips of cardboard for the sides of the box, measuring the height you want. Attach them to the base using glue or tape, ensuring they’re straight.
Attach the Lid: Cut the lid slightly larger than the base to fit over the sides snugly. Decorate it with the game’s title and design.
Finish: Allow everything to dry completely, then add any additional decorations or dividers for game pieces.
This will give you a functional and attractive box for your classic board game!
Find a definitive in warmth and style with Drip Infinity assortment of the best winter coats for men. Our skillfully created coats mix state of the art plan with predominant protection, guaranteeing you stay comfortable and chic the entire season. Embrace winter’s chill with certainty and style in a Drip Infinity coat.
Thank you for the information. because it is very helpful and also easy to provide benefits for us.
https://goal-win.com/
Very interesting information because it is very helpful.
https://goalsaleov.com/
BANDAR TOGEL aviantogel which offers an extraordinary opportunity to realize the dreams of players with small capital. Avian Togel is known for its generosity, always providing maximum benefits for each of its loyal members. https://restaurantelachuleta.com/
The articles here always have a unique and interesting point of view so they are a good source of information. For those of you who want to read very interesting articles, I would be honored if you could visit our website here, thank you. https://www.thesweetandsavoryspot.com/
Your achievement is really amazing! You have shown great dedication and effort, and you also have great talent in drawing, your work is always amazing, for those of you who want to see the amazing site, you can visit the website here https://ag1024.me/
The best product selling on Amazon under Wished For includes a different scope of things, from tech devices to family basics, offering top-quality and consumer loyalty. These products are profoundly evaluated and trusted by customers, making them absolute necessities for any online truck. https://wished-for.com/
jamuslot MEnter Currently Maxwin’s No. 1 Light Server, an online game provider in this era continues to grow, along with the development of the online gaming world, Jamuslot is the number 8 site that doesn’t want to develop at all.https://nilesweb.com/
a very interesting piece of information that we can get. that’s why many people like it.
https://seek4fitness.net/
Thank you for doing thorough research before writing this article! Accurate and factual information is very helpful for readers, for those of you who want more interesting information, you can visit our website here https://amateurdsp.com/
a very interesting piece of information that we can get. therefore, many people like it.
https://ag1024.me/
I always look forward to new articles from this blog! Your consistency in providing quality content is highly appreciated, for those of you who want to know other interesting things, you can visit our website here https://1millionfollowers.net/
Analog games offer a nostalgic way to connect with friends and family, creating memorable experiences. Similarly, the Red One apparel reflects a unique style that stands out in any setting. Both celebrate creativity and camaraderie, making every gathering special, whether you’re rolling dice or showcasing your fashionable flair.
Fusototo has provided the latest, most accurate HK SGP SDY predictions and leaks that members need to get big jackpot wins. Fusototo lottery predictions are always the best for its members because they are always updated and accurate, so many members get big jackpot wins. https://angkahokifuso.me/
One of the most exciting and fastest gacor slots, 1 second QRIS deposit, accredited as the best virtual online slot game. Only at Dora Hoki. https://ainderbysteepleschool.org/
what an amazing site, it’s no wonder that so many people like this blog. https://memberpalu4d.org/
플러스카지노 | 갤럭시카지노 후속 – 온라인 바카라사이트 우리계열 33카지노의 신규브랜드 플러스카지노 입니다. 플러스카지노
Your interesting writing style makes the reader feel involved! Every sentence feels alive and interesting to follow, for those of you who want to know interesting sites, you can visit our website https://digadex.com/
For further information you can visit prediksi angka
a very good blog and also adds to our insight. Therefore, if you want to know more information, please visit waktogel
if you want to know information about lottery expenses. there can visit togel hk
The explanation is very clear and structured! You managed to explain a complicated topic in an easy to understand way, for those of you who want to see a very interesting blog site, you can visit the site next to this https://haitikitchen.com/
very good blog The quality is really better than seeing anyone explain in words the basics apart from readability for this the required place is generally easy to find thank you for sharing I would be honored if you could visit my website too.https://whatsgrouplinker.com/
Exciting Special Features: Enjoy various features such as Wild, Scatter, and bonus games that will make your game even more exciting! For complete information, visit our website https://lerjekz.wixsite.com/chitos88
a very interesting site with articles discussing slot games, lottery and so on that you can read and will benefit you if you read it, for those of you who are curious, you can visit it on the website next to this https://phototypenbi.info/
그의 표정을 읽은 흥선군은 진중한 표정으로 안필주를 바라보며 말을 재촉하듯 반문했다.
PANENTOGEL is the largest and most viral online lottery site in space number 1, everyone is sure to get a maxwin jackpot today. https://robpoz.com/
I am impressed with the quality and relevance of the articles on this site, as each topic is covered in depth and contains accurate information https://eventslike.com/
In How to Make a Classic Board Game Box, crafting the perfect storage for your favorite games is essential for preservation and presentation. Just like starlords jacket embodies a unique style in Guardians of the Galaxy, a well-made board game box can showcase your personality and love for gaming.
It\’s really cool that the author can explain a topic that is actually complicated in a language that is really easy to understand. It really motivates me to keep learning because everything here feels simpler cuputoto
so many people like it. because it provides an easy guessing game that I really like.
https://nexilonf.com/
what a great blog.https://thepatternstrilogy.com/
This site is the hottest new gacor server online toto togel dealer link in Indonesia. Small capital period can wede millions of rupiah in seconds. It will be a loss if you don’t try it. cuputoto link alternatif
This article really made me understand something that I previously thought was complicated. The writing style is simple but still detailed. I am more confident in understanding this topic now http://hzwanjiafu.com./
I really like how this blog always manages to present relevant and easy-to-digest information, even though the topic is quite heavy, the way it is presented makes it easier for me to absorb the information https://unfitmagazine.com/
“Special Lottery Event: Guess the number with a minimum bet and win the Grand Prize of Rp 500 million!” let’s visit our website here https://waktogel303.jimdofree.com/
The design of this site is very attractive, with the use of images and layouts that make it easy for me to explore the various articles available, for those of you who want to see a more interesting site, you can visit it on the site link next to https://surfingcabosanlucas.com/
This game is determined based on random drawing of numbers.
https://lotusawakejd.info/
an exciting innovation in the world of online gambling, which takes the gaming experience to a higher level.
https://kunoerpyo.info/
This site offers very informative and educational content, making me really appreciate every article published, for those of you who want to know more about this very interesting website, you can visit the link beside https://discountgayclosetmovies.com/
For more complete information you can visit our website.
https://afewtekshl.info/
ne harika bir site, bu kadar çok insanın bu blogu beğenmesi şaşırtıcı değil.
Bu site çok bilgilendirici ve eğitici içerikler sunuyor
online slot games with the biggest jackpots and maxwins are provided on this website. https://homerenewalz.com/
The design of this site is very attractive, with the use of images and layouts that make it easy for me to explore the various articles available, and for those of you who want to read articles about the most popular football today, you can visit our site https://footballastro.com/
I appreciate how you backed up your argument with facts. It makes the discussion much more credible.
This is one of the sites that combines online slot games and trusted online lottery that is official and safe to play, it would be a loss if online slot game lovers and online lottery do not try this trusted site. https://mjgadrian.com/
Join our site and get a free guide that will change the way you make money easily just by reading articles on our site https://niagarafallstravel.info/
This article really helped me, making it easier for me to get ideas for writing articles
Kunjungi Situs
Kunjungi Situs
TO IMPROVE STUDENTS’ MASTERY OF CONCEPTS AND LEARNING ACTIVITIES LINK
Kunjungi Situs
This research aims to determine the STEM Integrated Project Based Learning
Gacor Slot Site, the provider of gacor slot sites is very popular with Thai slot lovers because automaxwin with high rtp reaches 99.8% autojp only on the official gacor slot site today. Thank you for the information, you can immediately click on this information link BOSJOKO
Kunjungi Situs
I really like this article, it is very comfortable to read
online betting games on this site are now present with the biggest jackpot that is much sought after by players and has also been proven safe and reliable to play. for those who have not tried it will lose, so as not to be curious, just visit and play on this website. https://schokland.info/
Gacor slot is an official site that provides various easy-to-win games today which are guaranteed to provide maxwin this year for members who register now. This is because currently there are many gacor slots that provide various types of ball games provided by many providers, and one of the most popular games is online ball games. Thank you for the information, you can directly visit the website https://heylink.me/Aksesbosjoko26/
BOSJOKO is an official site that provides various easy-to-win games today that are guaranteed to provide maxwin this year for members who register now. This is because currently there are many gacor slots that provide various types of ball games provided by many providers, and one of the most popular games is online ball games. Thank you for the information, you can directly visit the website BOS JOKO
We will build a website that matches your image and expectations, ensuring an attractive and functional design. For those of you who want to see it, just click on the website here https://catoclothes.com
Proporcionar una plataforma de llançament per als comerciants internacionals https://instantfundingnow.com/ca/
Gacor Slot Site, the provider of gacor slot sites is very popular with Thai slot lovers because automaxwin with high rtp reaches 99.8% autojp only on the official gacor slot site today. Thank you for the information, you can immediately click on this information link AKSES BOSJOKO
Comprar pasaportes, permisos de conducir registrados y otros documentos https://originaldocumentproviders.com/es/ rt
HONG KONG TOGEL is a Hong Kong lottery that is favored by players from various circles because Hong Kong lottery has many fans in Indonesia and in Asia, Hong Kong lottery now waktogel provides leaks for tonight’s output numbers easily without medicine and also no cheating waktogel has prepared everything for its loyal players who want to get daily wins of up to hundreds of millions of rupiah, for more complete information, just visit this website. https://www.thesweetandsavoryspot.com/
This website will be customized to your specific needs, creating a unique experience for visitors. Well, for those of you who want to visit it, please click the link next to this https://siaknida.id/
Blog sites present a variety of informative and interesting content, thus providing access for readers to various knowledge. The content is usually arranged in an orderly and easily accessible manner, making it easier for readers to find the information they need, for those of you who want to visit a very interesting blog site, you can visit it on our website https://sedaptogelcun.com/
Blog site designs are often kept simple and easy to use, allowing visitors to navigate through articles with ease. A clean layout creates a pleasant reading experience and makes the information easier to understand. For those of you who want to try a very interesting site, you can visit it at the link on the side wak togel
Very interesting blog and can also broaden our insight.
https://jamuntung.com/
Join the community at Analog Games where traditional gaming is discussed and engaged through the lens of tabletop. Whether it’s board game or card games, there are many reviews, discussions and more on the world of analog gaming. Great for those who wish to take a break from the screens and play something classic.
Be a part of our community today and discover the exciting games we have prepared for you. Visit https://heylink.me/Abutogel.com/ and start exploring!
games that are easy to win and full of challenges only exist at gamingjitu
Tricks for playing games to become a pro player are only available at gamingjitu
is a very popular online gaming site. Therefore, if you want to try it, you can visit the website
https://puresensehealth.com/
which is popular with players from various circles because the Hong Kong lottery has many fans in Indonesia and Asia.
https://www.thesweetandsavoryspot.com/
For those of you who want a game site that has HD quality and is very clear, as well as a site that has a very interesting game with very frequent wins with very abundant jackpots, then you can visit it on our site. because the one that has very complete preparations is only on our site wak togel
Visit us and experience customer service that is ready to help you anytime. Your questions are our priority, for those of you who want to visit our website, you only need to click on the website on the side data hk 4d
TOTO SITE BESOK4D is a surprise for the latest online lottery players in 2024 and is certainly profitable. Online toto lottery has long been a place to make the best money that is practical to play and has very big prizes, for those of you who want to play it you only need to click on our website here besok4d
For further information you can visit our website.
https://www.thesweetandsavoryspot.com/
“Get the latest updates about the world of football only here! Latest news, player transfers, and match results from the world’s top leagues are in your hands.” let’s visit our website here israel national team squad for the 2024 Olympics
Register now and join our community of football lovers to get the latest news, match analysis and exclusive content, for those of you who want to know more about the world of football, please visit our website here jadwal argentina olimpiade 2024
Play lottery safely and comfortably on our trusted platform! Enjoy a variety of market choices and great opportunities to win attractive prizes every day. For complete information, visit our website here https://dasterbesar.com/
상무지구이마트와 상무지구 상무나이트 인근에 위치 상무지구안마
very good article. because it has a very good experience and is also easy to understand.
https://www.towereventcenter.com/
Your article helped me a lot, is there any more related content? Thanks!
Digital Meta Squad is a fundamentally digital office that has obliging thought with making imaginative electronic reactions for affiliations, considering everything. From web progress to digital appearance frameworks, we assist brands with winning in the digital scene. Raise your electronic presence with our master assembling and top tier development. https://digitalmetasquad.com/services/expert-digital-marketing-services-squad/
TRIBUNTOGEL is not just an ordinary online platform that provides online toto or lottery games. Playing winning and losing is a matter of luck. However, in Tribuntogel, victory is the absolute right of every player, because the goal of playing is to win and make a profit, so as not to be curious, just visit and play on this website. https://dailysearchinfo.com/
AVIANTOGEL is here as the main online toto lottery dealer of choice for local residents +62! With the most complete official markets such as Hong Kong, Sydney, and Singapore, we ensure a very exciting and profitable playing experience for all users. For lottery fans, this official site offers the fastest output and very accurate results, making it a favorite of many bettors throughout Indonesia. https://restaurantelachuleta.com/
Don’t miss out on important news from the field! We provide the latest football news, exclusive player interviews and match statistics you need. For more information visit our website here prediksi prancis vs amerika olimpiade 2024
We really appreciate your presence! Get early access to limited edition products only for our loyal customers, because on our website there is a super jackpot that is very maxwin, for those of you who want to try playing it, you can visit our website here https://dailysearchinfo.com/
Get a chance to win the top prize that keeps increasing with every bet! For complete information, visit our website here https://honeyandfigskitchen.com/
Hormone therapy cost: The cost of hormone therapy can vary widely depending on the sort of treatment clinic and individual health needs making it essential to consult with professionals hormone therapy cost
Very interesting information because it has very useful knowledge for me.
https://gosip-gtea168.com/
It is one of the Gacor slot link sites that offers easy opportunities to win with a guarantee of the best links in Gacor slots, easy wins up to maxwin every day in 2024. Get a big chance to win a tempting jackpot! Enjoy maximum wins and playing experience on the Gacor slot site today, boss! Don’t miss the fun with MENTAWAI4D on the Gacor Slot right now Thank you for the information, you can go directly to the website that is here https://successfortress.com/
Sign up to receive our newsletter and be the first to know about exclusive offers and discounts. Don’t miss out https://applyhotel.com/
For further information you can visit our website
https://bosolislothebat.blog/
Our website provides many games that have super big prizes that you can win by visiting our website here https://wakatobi168.com/
Smile Toothbrushing has been a great addition to my oral care routine. The brush is lightweight and comfortable, and it leaves my teeth feeling clean without causing any gum irritation. I’m really impressed!https://smiletoothbrush.com/collections/adult
Be a witness to the exciting battle on the pitch! Buy your Premier League match tickets now and enjoy an unforgettable experience straight from the stadium jadwal pildun malam ini
online games that have very satisfying results. therefore
https://emotbatudongs.com/
Very good because it has very accurate information about the area which can be very helpful hasil pildun
Discover the natural beauty of Indonesia in our latest article! From beaches to mountains, explore the must-visit destinations wisata indonesia timur
Choose your favorite market, from local to international and match it on our trusted site. For complete information, visit our website here https://www.drumdoc.net/
The peak is with us and enjoy the excitement of playing lottery with fantastic winning opportunities every day, come visit our website here https://vanharen-library.net/
Place your best numbers on our trusted website and win super big prizes that will surprise you, for complete information visit our website here https://thenewswaves.com/
Прочные запчасти для подвески грузовиков КАМАЗ. Гарантия надежности и плавности хода на любых дорогах.
Get live scores, statistics and results in real-time! Enjoy match updates every second for complete information visit our website here https://shotsgoal.com/
Be the first to try our new gaming site! Sign up today and get exclusive access before it’s released to the public https://zonaindonesia.id/
Get reliable and up-to-date information anytime, anywhere! Our portal presents national and international news curated by a team of experienced journalists, ready to provide you with a broad perspective and complete in-depth information visit our website here https://beritamantul.jimdosite.com/news/
very good information. Therefore, if you want to know more information, you can visit link gratis nonton pildun
The most complete football news that you are looking for, we provide with the latest news every day, come visit our website to get more complete information link gratis nonton piala dunia
Invite your friends to join and get attractive bonuses! Every friend who registers through you, and for those of you who want to try playing on our site, you only need to click on the website on the side here bandar toto
Trusted Lottery Number Leaks Today! Increase Your Chances of Winning let’s visit our website here sedaptogel
Grab Your Luck! Place Your Number Now and Claim the Best Discount for complete information visit our website here https://fusogacor.land/
Join our site for exclusive news and analysis of Premier League matches. Be the first to know about every development hasil liga inggris
We provide updated matches and schedules on our trusted website. Come visit our website now shotsgoal
This article really helped me, making it easier for me to get ideas for writing articles
Kunjungi Situs
Watch exciting matches from the best European leagues and watch them for free on our website. Come visit our website here. link alternatif shotsgoal
고객분들이 언제든지 찾기쉬운 장소에 있으며 광주안마
Watch the Excitement of the Live Match! Get Exclusive Tickets Today, let’s visit our website to get more complete information here link gratis nonton pildun
Enjoy all LaLiga matches live! Subscribe now and get exclusive access without ads jadwal liga spanyol
We provide the most complete and latest information about the World Cup for you for free by simply visiting our website here prediksi skor pildun
Our site provides many accurate number predictions from experts. Register and get a very big jackpot prize. Come visit our website here sedaptogel
Place your number now, bonus awaits, join and claim prizes immediately, come visit our website now here https://www.dermomedyourcare.com/
Who doesn’t want to know more about LaLiga? Subscribe to our magazine and get special editions about the best teams, players and moments jadwal pertandingan pildun 2026
Analog games bring people together, fostering social interaction and creativity. Whether playing board games or card games, a cozy setting enhances the experience. Wearing a men’s leather jackets adds a touch of style and comfort, allowing players to fully immerse themselves in the fun while staying warm during long game nights.
150% Welcome Bonus for new members, limited bonus only for this month, come visit our website here https://nosarawildlife.com/
Digital Meta Squad has some skill in digital promoting organizations expected to lift brands on the web. Through imaginative approaches, they help associations with aiding responsibility, detectable quality, and changes across various digital channels. https://digitalmetasquad.com/services/expert-digital-marketing-services-squad/
100% First Deposit Bonus: Double your first deposit and get more chances to play. Come visit our website now Dorahoki
Choose the right widow prediction numbers and place them on our trusted website to win the big prizes we provide bandartoto
Whether you’re looking for classic arcade games or the latest puzzle challenges, MyFrivGames offers an easy-to-navigate interface, allowing you to instantly start playing online. online friv games
Welcome to our site! Join now and enjoy this abundant prize with super maxwin jackpot for your first game obral4d
If you look for a trusted lottery and lottery site and we can visit our websites, we have a variety of gifts that you can get only on bandar toto</a
special discount for you new users, come visit our best website to get the super jackpot you want here https://meme4dreal.com/
Analogue games offer a unique experience that encourages social interaction and creativity. Much like a leather hooded coat which embodies a timeless style and durability, these games provide a lasting connection among players. Both evoke a sense of nostalgia and comfort, making them perfect for cozy gatherings and memorable moments.
The best slot game offers from our site, come on, register and experience the best service that we provide. For complete information, visit our website here https://downtownpizzakitchen.com/
Board games offer a fun way to connect with friends and family, much like the camaraderie found among those who wear biker jacket men. Both create a sense of community—board games foster teamwork and strategy, while biker jackets represent a shared love for adventure. What’s your favorite game to play?
you can visit klasemen la liga is a site that provides information about football matches, come visit it now to increase your insight if you like football.
Your insights are incredibly valuable. I hope this post reaches a wide audience!
big discount for you new users, come on, register now on our slot site with a super big jackpot offer that we provide especially for you, our best members, for complete information visit our website here obral4d
Our website provides fun gacor slot games and is definitely equipped with super big prizes especially for you, our best members. Come on, register now on our website here obral4d
Play Slots with Big Prizes! Claim 100% Deposit Bonus and Free Spins for Higher Chances of Winning for complete information visit our website here tahun hoki
We prioritize your data security! Our website here is equipped with the best privacy features to protect your personal information, well, for those of you who want to try playing on our website, you only need to click on the website link here and you just follow the instructions that have been displayed https://semuttoto.land/
Play Slots Anytime, Anywhere! Enjoy Daily Bonuses and Win Big Jackpots on our website here https://tecnogl.com/
The United States U23 is known for its dynamic style of play and high technical ability. Their coach has prepared a squad consisting of talented players who have shown outstanding performances in the domestic league and international competitions. Therefore, If you want to know more information, please visit our website jadwal amerika serikat u23 olimpiade 2024 Every match at the Olympics will be a challenge, but also an opportunity for the players to prove themselves and achieve proud achievements.
There’s Always a Chance! Play Togel Every Day with Attractive Discounts and Big Prizes, let’s visit our website here for more complete information https://waktogel.wtf/
AKSES BOSJOKO is the official site that provides
various easy games to win today that are guaranteed
to provide maxwin this year for members who register now.
This is because currently there are lots of slot access available
provides various types of ball games provided by many providers,
and one of the most popular games is online ball games.
Thank you for the information, you can visit it directly
websiteAKSES BOSJOKO
Feel the Sensation of Winning! Get Bonus and Play Your Favorite Slots Now on our trusted website here https://mainpaten.com/
Want to improve your game? Get access to training guides and tips from professional coaches on our site! Join now jadwal argentina u23 olimpiade 2024
The Sensation of Winning Every Day! Get Cashback and Free Spins for the Most Popular Slot Games Here for complete information visit our website here https://jplangit.com/
Creating a classic board game box can be a fun and rewarding DIY project! Here’s a step-by-step guide on how to make your own board game box, including materials, dimensions, and design ideas.
For lovers of online slot game sites, this site must be familiar, because this site provides a variety of easy-to-win gacor slot sites. Therefore, if you want to know more information, please visit our website https://mejakayu236.com/
check out the menu of militia apk on this site https://cheddarsmenu.com/
A Cookout menu
offers a wide variety of affordable, Southern-inspired fast food options,
including burgers, hot dogs, BBQ, and milkshakes. Known for its budget-friendly
pricing, the menu typically allows customers to mix and match items in combos,
often offering a main dish with two sides and a drink for under $10. Popular
choices include their signature Cookout Tray, where you can get a burger or BBQ
sandwich with choices like hush puppies, fries, or quesadillas as sides. Prices
for individual items like burgers and milkshakes vary but are generally
economical, making it a favorite for those seeking tasty, filling meals without
breaking the bank.
With regards to adding a hint of humor to adult social occasions Love Bound offers a superb choice of adult gag gifts that make certain to start chuckling and fun From nervy curiosity things to perky shocks these gifts are ideal for loosening things up and making paramount minutes at gatherings or festivities. https://shoplovebound.com/product-category/gift-bags/
SITUS SLOT DEMO MAHJONG 3 WAYS SCATTER HITAM PRAGMATIC TANPA DAFTAR
SLOT DEMO MAHJONG 3 WAYS SCATTER HITAM
IKN99 : SITUS SLOT PULSA TANPA POTONGAN GACOR RESMI DAN TERPERCAYA
IKN99
IKN99🙈SITUS SLOT BOLA DAN BANDAR TOGEL TERPERCAYA DI INDONESIA
SLOT BOLA
Place your accurate prediction numbers about the current English Premier League scores on our website and win big prizes that we have prepared especially for you. Come visit our website here prediksi liga inggris malam ini
Come on, who will be the champion of Serie A this year? Get access to live streaming of the matches with our special offer nobar shotsgoal
We present the Spanish league match results schedule on our website to make it easier for you to find out about La Liga developments. Come visit our website here for complete information hasil liga spanyol tadi malam
If you are looking for the most updated and complete information about football, you can visit our website here jadwal liga spanyol
Come watch the excitement of the Spanish match this season live on our trusted website. Come visit our website here link gratis nonton liga spanyol
Be part of Italian football history! Register now and get exclusive news and promotions about Serie A jadwal serie a
Prototyping is an essential step in bringing ideas to life, much like the jacket in jacket blade runner 2049 represents a blend of design and function. Just as K’s jacket was meticulously crafted for a specific environment, effective prototyping ensures that concepts are refined and ready for their intended purpose, enhancing overall experience.
To make a classic board game box:
Measure and Cut: Cut cardboard for the box top, bottom, and sides, with the top slightly larger for a snug fit.
Assemble: Glue the sides to the base and lid, reinforcing corners for stability.
Cover: Wrap with decorative paper, folding edges neatly over the sides.
Seal (Optional): Add a clear film or laminate for durability.
Add Inserts (Optional): Create compartments for organizing game pieces.
Let the glue dry, and your classic game box is ready!
More Than Just Playing! Get Loyalty Rewards, VIP Levels, and Additional Bonuses Every Day only on our website here https://daftarbang.com/
Place Togel More Economically with Big Discounts and Weekly Cashback! The Chance of Winning is Getting Higher, let’s visit our website here for more complete information https://ekwago.com/
Love the game? Follow news, fixtures and analysis of every LaLiga match only on our site klasemen la liga
Welcome to hasil pildun , the best place to get the latest news, in-depth analysis, and exciting reviews about the world of football! Join us to follow every game, see how your favorite teams are doing, and explore all things interesting about the sport we love. Be part of a passionate and knowledgeable community of football fans.
One of the most anticipated matches is the derby between AC Milan and Inter Milan. This match, known as the Derby della Madonnina, not only presents a fierce rivalry between two giant clubs, but also an event to show the pride of the city of Milan. Therefore, if you want to know more information, please visit our website jadwal serie a malam ini this match always presents drama and tense action, and this season is no different. With both teams having talented squads, the result of this match could be very decisive in the fight for the championship title.
For football fans, especially Serie A, finding a free link to watch the match is something that is highly anticipated. Therefore, if you want to know more information, please visit our website link gratis nonton serie a With so many exciting matches taking place, such as the duel between Juventus and AC Milan, easy access to watch is very important.
We offer accurate number predictions to help you achieve your dreams! Try it now and prove it yourself, complete information, lets visit our website here bbfstoto
Trusted and safe lottery site, we guarantee your safety when playing, come visit our website here https://tecnogl.com/
Thanks for your information, it was really very helpfull..
my website : Bandar Togel
discuss with our community and access the best number predictions, let’s visit our website here https://duboiscountysportsmen.org/
Join our website community and explore a variety of interesting topics, from travel to self-development, all presented in an engaging and informative style https://footytees.com/
Creating a classic board game box can be a fun project, much like crafting the perfect https://americasuits.com/blade-runner-2049-ryan-gosling-leather-jacket-and-coat Both require attention to detail and creativity. Just as you’d carefully select materials for a stylish jacket, choosing sturdy materials and vibrant designs for your board game box can enhance the gaming experience
One of the most anticipated matches is the meeting between Argentina and Chile. Argentina, led by superstar Lionel Messi, is looking to maintain their position at the top of the standings with a solid performance after winning the previous match. Therefore, if you want to know more information, please visit our website jadwal pildun malam ini
Join us for predictions of numbers that have been proven only on our trusted website here bbfstoto
Join our fan community and get exclusive merchandise with every registration link gratis nonton piala dunia
Is this your lucky number? Come on, see the predictions and try your luck on our trusted website here https://duboiscountysportsmen.org/
What are you waiting for, register now here with us
Slot Gacor
play with me on the most popular site in
slot gacor
register and play directly here, don’t hesitate anymore
slot gacor
Fabulous post. Are you new to Roblox and haven’t come across royale high? Well, This game is a hit among fans who love role-playing and dress-up. Robloxdex is the go-to source for Roblox players, offering codes, popular games, emotes, and useful tools. Discover more in the blog post about Roblox Royale High.
We provide information about the Spanish league in an updated manner for you La Liga fans, match results and La Liga match schedules, we provide them in full especially for you, come visit our website here jadwal liga spanyol
Watch your favorite football club via free streaming, we provide it especially for you La Liga fans, come visit our website now link gratis nonton la liga
Ace Property Service offers exhaustive Repairs and Maintenance Property Services, giving dependable answers for keep up with the respectability and worth of private and business properties. With a gifted group committed to guaranteeing each property stays in ideal condition, Ace Property Service handles everything from routine reviews and minor repairs to greater maintenance needs. Their services are custom-made to fulfill the particular needs of every property, guaranteeing life span, wellbeing, and upgraded incentive for property proprietors. Trust Ace Property Service to convey effective, top notch repairs and maintenance that shield your venture and give peace of psyche. Repairs Maintenance Property service
Support your favorite team and follow their journey to the trophy! Full World Cup updates are here hasil kualifikasi pildun 2026
All eyes are on the World Cup! Follow the latest news, scores and exciting moments here, visit our website here jadwal pertandingan pildun 2026
Don’t miss out on the latest news on all things gaming! Sign up now to get news delivered straight to your inbox waktogel
Get a special promo for new players: 50 free spins for every first deposit! Try all our featured slot games now and win super big prizes that we provide only on our trusted website here https://jonmortonphotography.com/
Visit our site to explore the amazing world of online slots, where you can enjoy a wide variety of slot games that are carefully designed to offer spectacular graphics, advanced features, and an immersive gaming experience, all on a platform that provides uncompromising security and convenience, so you can focus fully on the fun and strategy of the game without worrying about the technical aspects or the security of your personal data. Just visit the link that is already available here https://cipakban88.com/
Spin now, win anytime! Start from small bets, win big prizes in our various slot game choices and win super big jackpot prizes that we provide only on our trusted website here https://jamuslot.com/
Our Fauxjacket website offers unbeatable prices on all products, with the added benefit of free worldwide shipping on every purchase! So check our website now and buy the product of your choice. christmas jacket womens
CUN4D situs slot server thailand terbaru dan terpercaya se asia 2024
Is anyone else constantly battling between layering too much or too little? I’ve been trying to simplify things, and I just got this Buffalo Bills windbreaker that’s been perfect for that middle ground.
Visit: starter buffalo bills jacket
CUN4D situs slot togel terbaik 2024
Just got back from a weekend trip, and my new beth yellowstone black purse totally came in handy! I love how a good quality bag really adds to any outfit. Speaking of which, has anyone seen Beth Dutton’s purse on Yellowstone? It’s such a statement piece. Thinking of getting something similar to complete my wardrobe
See your favorite team’s match schedule and other exclusive broadcasts that we provide on our website here jadwal liga spanyol malam ini
Don’t miss out on information about your favorite football club and get complete, updated information on our trusted website here hasil la liga
Welcome to our football blog! Get in-depth analysis of every match and the latest news from the world of football hasil liga inggris
Pakistani Bridal Wear: Exquisite bridal wear in Pakistan, showcasing rich textures and definite weaving. pakistani bridal wear
The Italian League once again captivates football fans with exciting action and unexpected drama. Amidst the passionate atmosphere in the stadium, the top teams fight hard to gain valuable points, showing skills and strategies that captivate the hearts of the audience. Wherever you are, only on our website, lets visit our website here hasil serie a tadi malam On this cold but passionate night, this legendary match between clubs creates unforgettable moments. From spectacular goals to brilliant saves from goalkeepers, every second on the pitch is thrilling.
Monitor match results live with real-time scores and detailed statistics from every match, from the group stage to the final only on our trusted website here klasemen pildun 2026
For football lovers who want to find information about football, just visit which provides various kinds of football information and the information provided is very accurate, you can get various kinds of football information on this jadwal liga spanyol site.
This site has provided an official trusted online toto dealer, just play with small capital, guaranteed to make millions of rupiah in profit and will not disappoint, for more complete information so you are not curious, just visit this website. https://kaumjp.org/
For online toto game lovers who don’t know about this super jackpot site, just visit and play on the website. https://sultanslotmania.com/
This site has provided online slot games that provide many bonuses for its players. https://jonmortonphotography.com/
Candle boxes provide both protection and style, ensuring that delicate candles reach customers in perfect condition.
SEDAPTOGEL is a platform that is commonly called a site by gambling players, this site has been popular for a long time and currently the trusted site has officially entered Indonesia or can be said to be legal. for more complete information, just visit this website.https://jpmaxxx.com/
POLA4D SITUS SLOT ONLINE TERGACOR 2024
Lip gloss boxes are essential for presenting and protecting the product, enhancing its appeal on the shelf. These boxes are often designed with eye-catching colors, glossy finishes, and attractive fonts that reflect the brand’s style and identity.
Tailored for style and protection, socks packaging keeps your product neat, organized, and ready for retail. With customized designs and secure materials, it enhances the product’s visual appeal while ensuring durability for a high-end unboxing experience.
Get complete information about Italian football that you have been waiting for every day. Our website provides exclusive and in-depth news. Come visit our website here jadwal serie a
Be part of a community of football fans! Join to get exclusive information, including interviews with players and coaches nobar shotsgoal
We present information about English league matches and schedules in an updated and complete manner only on our trusted website here jadwal liga inggris
We proudly invite you to experience an unrivaled online slots gaming experience on our site, where a collection of stunning and innovative slot games are designed with the latest technology to provide a truly immersive gaming experience, combining high-quality graphics, captivating sound effects and lucrative bonus features, all in a safe and secure environment to ensure that every spin is filled with exciting winning opportunities and a truly entertaining gaming experience. Simply visit the link provided here https://hedgehogsandsugargliders.com/
GACOR777 is an official site that provides various easy-to-win games today that are guaranteed to provide maxwin this year GACOR777 for members who register now. This is because GACOR777 currently has many slot agents that provide various types of ball games provided by many providers, and one of the most popular games is online ball games. Thank you for the information, you can directly visit the site GACOR777 Viral Link Slot Gacor 777 Site
CUN4D SITUS ONLINE DEPOSIT PULSA TANPA POTONGAN
CUN4D situs slot tergacor dengan bet rendah paling mudah maxwin
Support your favorite team in the World Cup and watch the excitement throughout the match which you can watch via our live streaming here for free especially for you live pildun
the latest news on the results of the top European league matches that you are looking forward to, and we provide exclusive and in-depth news about football, come visit our website here hasil serie a
Get the latest news and live match results on our blog! We present everything you need to know about football hasil la liga
Our website provides news about football from the top European leagues and you can get it updated and free only on our website here shotsgoal
For lovers of online slot game sites, you must be familiar with this site, because this site provides a variety of choices of easy-to-win gacor slot sites. Therefore, if you want to know more information, please visit our website https://uangeasy.com/
CUN4D Situs Slot Togel Terbesar & Terpercaya 2024
SITUS SLOT PALING GACOR is an official site
that provides various easy-to-win games today
which are guaranteed to provide maxwin this year
GACOR for members who register now. This is because
GACOR currently has many slot agents who provide various
types of ball games provided by many providers, and one of
the most popular games is online ball games. Thank you for the
information, you can directly visit the site
https://khabartimestoday.com/
The fastest and most reliable football news, ready to satisfy the thirst of true fans, come visit our website here for the most complete information at hasil la liga tadi malam
Come join us! Every visit to our blog is a new experience, with topics designed to spark your curiosity https://cuanberkembang.com/
With so many games left, every point counts. Every game could be a decider, and fans are eager to see how this story will develop. So, if you want to know more, please visit our website klasemen liga spanyol
For those of you who are football lovers who want to find accurate football information, just visit the most popular site that provides various types of football information starting from match schedules, standings, to the final results of the match are already provided on this site, and not only football information, there is still a lot of other information that you can get on this site. hasil pildun
One of the sites that deserves attention, Therefore, If you want to know more information, please visit our website shotsgoal which is known for the latest news about the world of football, both local and international.
Are you looking for a way to improve your skills? We offer proven strategies and advice to help you succeed https://jadimarketing.com/
In this report, we will review the latest match results, analyze team performance, and highlight key players who contributed to the results. Therefore, if you want to know more information, please visit our website hasil serie a With an informative and engaging format, we hope to provide a deeper insight into the dynamics of this competition.
WD33 adalah Situs Slot Online Rate Kemenagan 98% Paling Gacor Hari Ini
BJOPLAY adalah Situs Slot Online Deposit 10 Ribu Jadi Jutaan Paling Gacor Hari Ini
Don’t miss out! Join our community and enjoy exclusive content that keeps you ahead of the latest trends and knowledge nobar shotsgoal
Our website provides free live streaming of football and match schedules that will be played. Our news is always updated and at the forefront. Come on, visit our website here jadwal liga spanyol malam ini
Slots are one of the most popular games for online game lovers. Online slot games that provide easy wins for their players. Therefore, if you want to know more information, please visit our website https://fusionbarofficial.com/
The results of the World Cup matches are very tense and full of drama. Let’s watch the World Cup match highlights on our website hasil pildun
Very interesting and informative article! I really enjoyed what you have presented here. If anyone is interested in online lottery games, I recommend visiting our site at versace 4d for a safe and enjoyable gaming experience. Thank you for the information!
This is one of the newest free link provider sites that provides information for predictions and World Cup match schedules and there is still a lot of other information that can be obtained on this site, for those of you who don’t know, just visit this site. situs nonton piala dunia 2026
Make every popcorn moment special with custom-designed boxes that are fun, functional, and perfectly tailored to your brand. Our popcorn boxes are designed to hold your product securely while adding a creative touch to your packaging, whether it’s for movie nights, parties, or events.
Custom coffee boxes are the perfect way to elevate your coffee brand while ensuring your product stays fresh and secure. Whether for retail or gifting, these boxes can be designed to showcase your brand’s unique personality, with options for colors, logos, and creative designs.
Food and beverage packaging plays a crucial role in preserving the quality and freshness of your products while reflecting your brand’s identity. Whether it’s a snack, drink, or gourmet treat, custom packaging can enhance the overall customer experience and attract attention on the shelf.
Get the latest news and live match results on our blog! We present everything you need to know about football. hasil serie a tadi malam
This season is filled with exciting matches that should not be missed. From emotional city derbies to fierce encounters between top teams, every week promises a thrilling battle. Therefore, if you want to know more information, please visit our website jadwal serie a Fans can look forward to historic moments when their favorite teams compete on the green field. Moreover, the atmosphere created in the stadium, with the roar of the supporters, adds to the enthusiasm for the players to give their best.
Complete and comprehensive information about the world of football in the form of scores and match schedules is available on our website. For those of you who want to see it, you only need to visit our website here hasil la liga
Watch the excitement of the 2026 World Cup with free live streaming on our website here situs nonton piala dunia 2026
We proudly invite you to experience an unrivaled online slot gaming experience on our site, where a collection of stunning and innovative slot games are designed with the latest technology to provide a truly immersive gaming experience, combining high-quality graphics, captivating sound effects and lucrative bonus features, all in a safe and secure environment to ensure that every spin is filled with exciting winning opportunities and a truly entertaining gaming experience. Just visit the link that is already available here https://car8less.com/
Selain itu, Balijitu juga memiliki sistem bali jitu keamanan yang sangat baik. Data pribadi dan transaksi para pemain akan terjaga dengan baik sehingga para pemain tidak perlu khawatir akan kebocoran data atau penipuan. Dengan demikian, para pemain bisa bermain dengan tenang dan fokus tanpa harus merasa was-was.
The standings also reflect how every point counts, especially towards the end of the season. With so many games left, every team has a chance to achieve success. Therefore, if you want to know more information, please visit our website klasemen liga inggris
Tonight, the Spanish League will present a highly anticipated match, and the prediction of the result is a hot topic among football fans. Therefore, if you want to know more information, please visit our website prediksi liga spanyol malam ini
In this article, we will explore various aspects related to soccer, from the underlying statistics, techniques used by players to improve shooting accuracy, to an analysis of how soccer can affect the final result of a match. Therefore, if you want to know more information, please visit our website shots goal
Your communication skills are amazing. You are able to convey messages clearly and confidently, for those of you who want to know a very interesting site, you just click the site here https://uangnaik.com/
In addition, the match between Napoli and Lazio is also interesting, considering that both teams are in good form. Napoli, with their sharp attacks, will try to maintain their position at the top, while Lazio is ambitious to break into the European zone. Therefore, if you want to know more information, please visit our website jadwal serie a
Gold99 provide customers with quality online entertainment even when they are at home. We offer a wide range of professional online slot games. gold99
To make a classic board game box, you’ll need materials such as thick cardboard, a box cutter, white glue, and labels for artwork. Start by creating thick cardboard by gluing several layers together. Then, construct the sides of the box and glue them together, securing with painter’s tape. For the artwork, print or laminate your design and attach it to the box’s exterior and interior surfaces. Add finishing touches by trimming excess paper and ensuring the design aligns neatly. This process results in a sturdy, custom board game box
Favorite teams like Argentina and France showed brilliant performances, fighting with high fighting spirit to win the title. Magical moments happened, such as spectacular goals that changed the course of the match in an instant. Therefore, if you want to know more information, please visit our website hasil pildun
Welcome to our site! Discover a variety of articles, tips, and practical guides designed to help you develop new skills and knowledge https://bahasgame.org/
Nice post thanks for sharing. Very Amazing login official site of briansclub cm !
Explore Eco Packaging Experts’ Disposable Aprons range, offers a selection of convenient and hygienic disposable aprons.
CPE Shoe covers
We also provide the latest news about players, coaches, and strategies used in each match. Get in-depth insights into team performance, match analysis, and hot transfer news. All of this information will bring you closer to every development in the world of Indonesian football. Therefore, if you want to know more information, please visit our website https://indoskorupdate.com/
Paito Sydney Lotto
The U.S. Department of Transportation (DOT) requires certain emergency equipment to be carried in commercial trucks to ensure safety on the road. Once everything is assembled, your classic board game box will be ready to hold the game pieces, cards, and board—customized just the way you want!
By visiting our site, you will get exclusive access to the latest and most popular online games designed to provide an immersive entertainment experience, complete with interactive features and a solid community, ensuring that every session of your play is always satisfying and challenging. Just visit the link that is already available here https://hobicuanslot.id
Your blog is a constant source of inspiration for me.it’s clear that you pour your heart and soul into every post. https://x.com/cup_held
Your site is a regular source of inspiration to me.It is apparent that you put your heart and soul into each post.
Making a classic board game box is a fun and creative project that allows you to customize something familiar while adding your personal touch. It’s similar to the process of choosing elux vape juice flavours—both require a bit of experimentation and creativity to find the perfect fit. Just like how a well-crafted board game box enhances the experience of playing the game, the right vape juice flavour enhances the overall vaping experience. Whether you’re crafting or vaping, it’s all about finding what makes your experience uniquely enjoyable.
플러스카지노는 특히 안전하고 빠른 거래 시스템을 통해 안심하고 입출금을 할 수 있도록 지원하며, 24시간 고객 지원 서비스를 제공해 언제든지 질문이나 문제가 발생했을 때 도움을 받을 수 있습니다. 플러스카지노
Online lottery games have become a very popular phenomenon among betting enthusiasts, combining aspects of traditional lotteries with the ease of digital access. Therefore, if you want to know more information, please visit our website https://pakevpn.org/
merupakan situs anti rungkad hari ini dalam bermain slot dengan modal receh saja
The League Schedule is not just a list of dates and times, it is part of a bigger story, where each team is fighting to achieve their dreams and make history. So if you want to know more information, please visit our website jadwal liga spanyol malam ini
Thanks for your information, it was really very helpfull.
my website : Papa4d
There are lots of world class football matches held in several countries, seeing the extraordinary actions of the players makes us even more enthusiastic about supporting our favorite team, therefore I suggest you look at this site which provides some of the most complete information that we have. Please visit this website. jadwal liga inggris malam ini
To make a classic board game box:
Materials Needed: Sturdy cardboard, glue, tape, scissors, and decorative paper.
Measure and Cut: Cut two pieces of cardboard for the base and lid, with the lid slightly larger.
Assemble Base: Add side panels to the base and secure them with glue or tape.
Assemble Lid: Repeat with the lid, ensuring it fits over the base snugly.
Decorate: Cover the box with paper or paint to match the game’s theme.
Finish: Let it dry and ensure all pieces fit neatly inside.
To make a classic board game box:
Materials Needed: Cardboard, glue, scissors, ruler, pencil, decorative paper or paint.
Cut the Cardboard: Measure and cut the cardboard into the desired box size, typically 12” x 12” for square boxes or 10” x 15” for rectangular.
Create Box Sides: Cut four pieces for the sides (height and width), and glue them to the bottom piece.
Reinforce Edges: Use additional strips of cardboard along the edges for extra durability.
Decorate: Cover the box with decorative paper or paint, and add the game’s logo, title, and any other designs.
Let Dry: Ensure everything is securely glued and dried before use.
This will give you a sturdy, personalized game box!
At Blynex Exchange, we redefine the boundaries of cryptocurrency trading with a commitment to security, speed, and user-centric design. Founded in 2024, Blynex is engineered to provide a seamless trading experience across a comprehensive range of digital assets. Our platform is crafted for traders of all levels, ensuring you have the tools and support needed to navigate the dynamic world of crypto with confidence.
We will also touch on the security and reliability aspects of choosing a Togel Online site, so that your playing experience is safe and comfortable. With so many options available, it is important to find a platform that is trusted and offers the best service. Therefore, if you want to know more information, please visit our website https://hkmalam.id
연락 주시고, 몸과 마음을 편안하게 쉬어갈 수 있는 최고의 출장안마 선택하세요
출장마사지 는 고객의 편안함과 건강을 최우선으로 생각하며 맞춤형 힐링 서비스를 제공합니다.
출장마사지 는 20대 미녀 테라피스트 와 함께하는 특별한 힐링 100%후불제 출장마사지
시간제한업는 출장안마 업체 바나나 출장안마 많이 찾아주세요
PKO PanaloKO Lucky draw, 100% get bonus! Players can deposit using GCASH or PAYMAYA instantly with the minimum amount of 100 PHP and maximum of 50,000 PHP per transaction. panaloko
We will also provide tips and tricks for finding safe and quality links, as well as how to enjoy the maximum viewing experience. Therefore, if you want to know more information, please visit our website. link gratis nonton serie a
The match between Barcelona and Sevilla was the highlight, where Barca won 1-0 thanks to an own goal from Sergio Ramos. This aoment was certainly a hot topic of conversation among fans, considering how dramatic the situation was. hasil liga spanyol tadi malam
fda
장기렌트
백링크 프로그램
강남 가라오케 추천
제주 룸싸롱
Nice weblog right here! Also your website lots up fast!
Thanks for information bro.
In recent weeks, we have seen the competition at the top of the standings getting tighter. Therefore, if you want to know more information, please visit our website https://ligaspanyol.id/
Nice post. Do you consider yourself a gaming enthusiast on the quest for the ideal mouse sensitivity? If so, sensitivity converterhelps gamers to achieve optimized eDPI value and adjust further settings accordingly. It’s playing a pivotal role in fine-tuning your gaming setup. For in-depth information, visit the website provided.
Great content. Lovely recepi. NFR 2024 Live Stream
Visit our site to explore the wonderful world of online slots, where you can enjoy a wide variety of slot games that are carefully designed to offer spectacular graphics, advanced features and an immersive gaming experience, all on a platform that provides uncompromising security and convenience, so you can focus fully on the fun and strategy of the game without worrying about the technical aspects or the security of your personal data. Therefore, if you want to know more information, please visit our website https://jamuslot.com/
I’ve been surfing the web for more than 3 hours today, yet I never found any stunning article like yours.
goth outfits
This is such a well-written and informative blog post! I appreciate the depth of research and the way you’ve presented the information in an engaging manner. It’s refreshing to read content that not only educates but also inspires. Looking forward to reading more from you! Mosconi Cup 2024 Live
Enjoyed reading the article above , really explains everything in detail, the article is very interesting and effective. Thank you and good luck in the upcoming articles
header cards for retail packaging
Great article. I really loved reading your insights. I look forward to more posts like this.
BEMOTOTO dengan bonus deposit setiap hari
We may try to put the pieces back together, but they won’t hold up like they did before. Similarly, when it comes to food, only the best quality and preparation can truly satisfy! If you’re craving fast food that never compromises on quality, Visit Cookout Menu Pricing check out Cookout Menu Pricing for a delicious experience.
Wow rally nice information i like it thank u so much: Mosconi Cup 2024 Live Stream
Indonesian National Team players in the 2026 World Cup are not just a list of names, but a reflection of the hopes, hard work, and spirit of millions of people who support them. Therefore, if you want to know more information, please visit our website susunan pemain indonesia piala dunia 2026
Explore this blog site and discover an unmatched wealth of information! Each article delivers in-depth insights and always fresh content, making you never want to miss a single update https://slot10rb.id
Good post. Are you curious about unleashing your system’s ultimate potential and obtaining an unprecedented performance boost in your favorite games? Discover the eDPI Calculator—an essential online utility for calculate edpi and optimizing sensitivity settings effortlessly. For in-depth information, visit the website provided.
CUN4D Situs Raja Slot Gacor 2024 Gampang Menang Hari Ini
This site has really changed my perspective! Each post provides a new and interesting perspective, keeping me coming back for more link gratis nonton piala dunia 2026
BEMOTOTO Situs Raja Slot Gacor 2024 Gampang Menang Hari Ini
I’m impressed by the details that you have on this site.You have a good point! I completely agree with what you said!!
Thanks for sharing your views…hopefully more people will check out
Visit us:
Villas for sale in Dubai
I’m impressed by the details that you have on this site.You have a good point! I completely agree with what you said!!
Thanks for sharing your views…hopefully more people will check out
Visit us:
Apartments for sale in Dubai
I’m impressed by the details that you have on this site.You have a good point! I completely agree with what you said!!
Thanks for sharing your views…hopefully more people will check out
Visit us:
Apartments for sale in Abudhabi
I’m impressed by the details that you have on this site.You have a good point! I completely agree with what you said!!
Thanks for sharing your views…hopefully more people will check out
Visit us:
Apartments for sale in Sharjah
Apartments for sale in Ras Al Khaima
Apartments for sale in JVC
Apartments for sale in JVC
Villas for sale in Abu Dhabi
Villas for sale in Sharjah
Villas for sale in Ras Al Khaima
Villas for sale in JVC
I’m impressed by the details that you have on this site.You have a good point! I completely agree with what you said!!
Thanks for sharing your views…hopefully more people will check out
Visit us:
Villas for sale in Dubai Creek Harbour
I’m impressed by the details that you have on this site.You have a good point! I completely agree with what you said!!
Thanks for sharing your views…hopefully more people will check out
Visit us:
Apartments for rent in Dubai
I’m impressed by the details that you have on this site.You have a good point! I completely agree with what you said!!
Thanks for sharing your views…hopefully more people will check out
Visit us:
Apartments for rent in Abu Dhabi
I’m impressed by the details that you have on this site.You have a good point! I completely agree with what you said!!
Thanks for sharing your views…hopefully more people will check out
Visit us:
Apartments for rent in Sharjah
I’m impressed by the details that you have on this site.You have a good point! I completely agree with what you said!!
Thanks for sharing your views…hopefully more people will check out
Visit us:
Apartments for rent in Ras Al Khaima
Apartments for rent in JVC
Apartments for rent in Dubai Creek Park
Villas for rent in Dubai
Villas for rent in Sharjah
Villas for rent in Abu Dhabi
Villas for rent in Ras Al Khaima
Villas for rent in JVC
Villas for rent in Dubai Creek Harbour
Property for sale in Palm Jumeirah
Property for sale in Dubai Marina
Property for sale in Jumeirah Village Circle
Property for sale in Business Bay
Property for sale in Dubai Hills Estate
Property for sale in Damac Hills
Property for sale in AL Frujan
Property for sale in Jumeirah lake Towers
I’m impressed by the details that you have on this site.You have a good point! I completely agree with what you said!!
Thanks for sharing your views…hopefully more people will check out
Visit us:
Property Management
This blog site has creative writing, easy to read, not boring, and according to the flow. And your site also has a very broad insight so that readers like to read it, for those of you who want to read a site that is no less different from the blog site above, you can visit our website https://archipelagofestival.id/
POLA4D Website Deposit Pulsa Tanpa Potongan Auto Maxwin
reputasi paling solid di industri Online Terpercaya Bandar Togel
DAFTAR SITUS GAME ONLINE TERBAIK DI DUNIA YANG SEDANG VIRAL DI GAME
SCATTER HITAM
rekomen tempat bermain game online paling nyaman di
SLOT777
Layanan terbaik game online hanya di sini
SLOT777
For lovers of online slot game sites, you must be familiar with this site, because this site provides a variety of choices of easy-to-win gacor slot sites. Therefore, if you want to know more information, please visit our website https://iprdirectory.com/
Very interesting and informative article! I really enjoy what you present here. If anyone is interested in online lottery games, I recommend visiting our site at berastogel for a safe and enjoyable gaming experience. Thank you for the information!
Your site has very good insight and appreciation so that readers really like it, now for all of you who want to see the exact same site as above, you can visit it on our website https://672139.com/
To make a classic board game box:
Gather Materials: Cardboard, decorative paper, glue, scissors, and a ruler.
Measure & Cut: Cut two pieces of cardboard for the base and lid, making the lid slightly larger.
Assemble: Score and fold edges to create sides, then glue the corners.
Decorate: Cover with paper or paint and label appropriately.
Finish: Let dry completely and check fit.
Fruit Super Nova 100, developed by Evoplay, injects a modern touch into the classic fruit slot formula. It doesn’t stop there, you can find all the most complete and trusted online slot games on this site. https://telemallbrand.com/
ANTIKTOTO Situs Raja Slot Gacor 2024 Gampang Menang Hari Ini
I was moved to read this article review that you wrote supraslot
I am impressed with the author of this blog jerukwin
The blog articles you have written are extraordinary jerukwin
이러한 고객 중심의 접근 방식은 플러스카지노를 신뢰할 수 있는 플랫폼으로 자리 잡게 했으며, 많은 사용자에게 긍정적인 평가를 받고 있습니다. 플러스카지노
Our site has the highest ranking with several unique features and themes that you can see on this site, we will show below https://yytdquuq23.com/
Such an excellent resource! Your step-by-step guide was so helpful. I can’t wait to implement these tips into my own routine. Men Cafe Racer Leather Jacket
I absolutely love the way you communicate complex ideas so clearly. This post has given me so much to think about. The Christmas Chronicles Santa Claus Costume
Togel game is one of the most popular forms of online games, this game is increasingly popular among online togel players. It has even become part of the local community tradition, For more information, you can visit our website https://caramain-togel4d.id
A site that has a super jackpot that is very easy to get and also has abundant bonuses, you can get it on our site because our site has complete features and also very friendly and good service https://bunkaijutsu.com/
Temukan pengalaman saat bermain slot yang luar biasa di Asiacuan303, which is a trustworthy website for the gacor slot game that has been extremely popular in recent years. Nikmati is a game with a large amount of gameplay and an alternate link that is difficult to use.
Since many websites defraud customers, I’m sure you’re hesitant to play again. However, I can recommend a reliable website for you, which is
Since many websites defraud customers, I’m sure you’re hesitant to play again. However, I can recommend a reliable website for you, which is
Temukan pengalaman saat bermain slot yang luar biasa di Asiacuan303, which is a trustworthy website for the gacor slot game that has been extremely popular in recent years. Nikmati is a game with a large amount of gameplay and an alternate link that is difficult to use.
Temukan pengalaman saat bermain slot yang luar biasa di Asiacuan303, which is a trustworthy website for gaming the most popular slot game this year. Nikmati offers a large number of game operations along with an alternate link that is difficult to use at all times.
blank is your ultimate companion for a smarter TV viewing experience. Track your favorite shows, discover personalized recommendations, and stay up-to-date with the latest content— all in one seamless platform. Elevate your entertainment and make TV watching more effortless and enjoyable than ever before.
tvmon
Nice post. Are you a Valorant player seeking guidance on calculating mouse DPI? To compute your mouse DPI accurately in Valorant, understanding the synergy between your mouse DPI setting and in-game sensitivity is essential. Elevate your aiming precision and movement control in Valorant with the edpi calculator Valorant, designed to enhance your gameplay. Dive deeper into this topic through out blog post.
This site is a provider of the most exciting slot game links that have been proven to be safe to play and can be trusted. For more complete information, just visit this website. https://semangguo.com/
By visiting our site, you will gain exclusive access to the newest and most popular online games designed to provide an immersive entertainment experience, complete with interactive features and a solid community, ensuring that every gaming session is always satisfying and challenging. If you would like to know more information, please visit our website https://t2ee.org/
A site that is very easy to attract people’s attention so that it is very popular with its readers, this site is only on our website because on our website there are several kinds of interesting articles https://deposlot.id
Experience all the action with features like custom headgear crafting, War of Emperium (WoE), and Guild vs. Guild (GvG) on our exciting mid-rate server. download rebirthro
This is the gacor slot site today, it’s very easy to win the biggest jackpot on the most viral official online slot today, Online Slot which is best known as one of the best gacor online slot sites that offers gacor opportunities today.
A blog site that is rich in complete and accurate sources of information and has various interesting features, which can make you earn money easily. Not only money can you get, you can also get the latest and hottest information today https://hpv-treatment.net/
Netflix Account Updates In 2024
Netflix Latest Account 2024 is planning to introduce an extra fee for people who share their accounts outside their households from early 2024.
일상에서 쌓인 피로와 스트레스를 빠르게 풀어줄 수 있는 가장 좋은 방법 중 하나가 바로 인천출장마사지 입니다. 시간이나 이동의 불편함 때문에 쉽게 이용하기 어려운 샵 마사지보다 출장 서비스가 더 완벽한 해결책이 됩니다.
We have information about the world of football and accurate score predictions and our predictions are rarely wrong. For those of you who are curious about the website that contains the words above, please visit the website link here link gratis nonton piala dunia 2026
Togel game is one of the most popular forms of online games, this game is increasingly popular among online togel players. It has even become part of the local community tradition, you want to know more information, please visit our website https://lesptitsfouineurs.com/
In a global market, consumers expect personalized experiences that cater to their individual preferences. Marketers are leveraging data analytics and artificial intelligence to gain insights into consumer behavior and tailor their offerings accordingly. Personalization can take BOY303 various forms, from targeted advertisements to customized product recommendations. By prioritizing customer experience and building meaningful relationships, brands can foster loyalty and encourage repeat business.
Creating a classic board game box involves a few essential steps to ensure the final product is both functional and aesthetically pleasing. You can create a durable and attractive box for your classic board game. For inspiration and more detailed guides, you can also refer to DIY board game box tutorials from creative communities like Pinterest or specialized crafting websites.
For lovers of online slot game sites, you must be familiar with this site, because this site provides a variety of choices of easy-to-win gacor slot sites. If you want to know more information, please visit our website https://dorahoki88.land/
For those of you who want to see a good website in writing and interesting discussions, we will recommend a website like the words above. And you only need to click on the website link on the side https://transport-haenni.com/
Creating a classic board game box involves careful planning and attention to detail. For a more professional look, you can also consider using pre-made box templates or box-making software, especially if you plan to mass-produce the boxes. Resources like Make Your Own Board Game Box offer ready-to-use templates and tips for adding high-quality artwork and designs.
NAGAGG provides a link to the gacor slot site today 24 hours non-stop which will make you addicted and enjoy the best slot playing experience you have ever had with various types of slot games to win big jackpots and maxwins that await you with small capital https://www.islandjuniorhockey.com/
NYONYA4D
a site that has predictions of numbers in the game and tips on how to play it, you can easily get it on our website and we have a website that has other discussions with very broad insights, for those of you who are curious about our website, please click the link below https://sawersketer.id
NYONYA4D
SLOT GACOR 2025
Wow! This is good idea and i just love it and thanks for sharing! Usyk vs Fury 2 Live Stream
Please visit our website here, because we have an article site that is very meaningful for all of you https://leaflang.org/
SLOT GACOR 2025
Popcorn boxes are fun, practical packaging solutions designed specifically for holding popcorn, whether at the movie theater, a fair, or in the comfort of your home. Typically made from lightweight, food-safe cardboard or paperboard, these boxes are designed to be sturdy enough to hold generous portions of popcorn while being easy to carry and handle.
Bakery boxes are essential for preserving the freshness and integrity of baked goods while also enhancing the customer experience. These boxes come in a variety of shapes and sizes, designed to securely hold everything from cakes and cupcakes to cookies and pastries.
Coffee boxes are an essential packaging solution for coffee beans or ground coffee, providing both protection and presentation in a way that enhances the overall coffee-drinking experience.
A website that has very complete articles and interesting discussions that can make you interested in its very detailed and complete writing. For those of you who want to see the site, you can visit it on the website link here https://caraspinslot.id
Various information about the Spanish League has been available on this website. https://ligaspanyol.id
I’m impressed by the details that you have on this site.You have a good point! I completely agree with what you said!!
Thanks for sharing your views…hopefully more people will check out
Visit us:
Villas for sale in Dubai1
the best and most trusted Hong Kong lottery provider site of all time, just by playing Hong Kong lottery you can make money easily. so you are not curious, just visit this website. https://macaupools.id
DASARTOTO has a viral toto lottery dealer link that you can use when playing at the toto base, guaranteed 5k capital can buy a luxury car. https://www.looier.com/
The best online lottery provider site and has been proven to be trusted, it is very safe to play, of course it will also be very easy to make a profit, for those who don’t know this site, just visit the website. https://macau5d.id
Zona Indonesia is a site for sharing updated information and knowledge about Indonesia and there is still a lot of other information that can be obtained on this website. https://zonaindonesia.id
is the number 1 most popular official lottery bookie in Asia, with this advantage you don’t need to be afraid of playing lottery because it has been recognized by Asian lottery players. avian togel
Minecraft is the ultimate sandbox game! The endless creativity, from building massive structures to exploring vast biomes, never gets old. Whether you’re surviving your first night or crafting intricate https://thecookieclickerunblocked.com/ redstone machines, there’s always something new to discover. Plus, the community and mods make it even more incredible. It’s a timeless classic that everyone can enjoy!
Very accurate information and discussing very interesting football match schedules only on our website link accompanied by score predictions that are guaranteed to be very accurate susunan pemain indonesia piala dunia 2026
online games that are very easy to get money and have very big prizes, you can see it only on this website link koko303
This site is a leading online betting game provider site with the best and most trusted facilities, safe to play, of course it is also very trustworthy and guaranteed to be profitable, not only that, this site also provides opportunities to achieve victory quite easily to its players. for those who do not know, just visit this website. https://timmyspizzari.com/
This site is a leading online betting game provider site with the best and most trusted facilities, safe to play, of course it is also very trustworthy and guaranteed to be profitable, not only that, this site also provides opportunities to achieve victory quite easily to its players. for those who do not know, just visit this website. https://heritagerealestatetx.com/
This site is a leading online betting game provider site with the best and most trusted facilities, safe to play, of course it is also very trustworthy and guaranteed to be profitable, not only that, this site also provides opportunities to achieve victory quite easily to its players. for those who do not know, just visit this website. berastogel
This is a HK lottery dealer site that provides the most accurate number predictions and has also been widely recognized by online lottery game lovers. For those who want to know more complete information, just visit this site aviantogel.
The official lottery dealer site that provides the HK toto game site and has long been a favorite of online lottery lovers, not only that, this site has been proven to be safe and reliable, of course you will be able to easily get money just by playing online lottery on this site.haitogel
This is an official lottery dealer site that provides accurate HK data which is a favorite of many online lottery lovers. For those who don’t know, just visit the site haitogel.
a site that provides games that can make money easily and has a big jackpot and abundant bonuses only on this site. Visit immediately yes https://beachhousebalmoral.com/
Slot Gacor terbaru di tahun 2025
Explore insightful discussions on Project Management under the Project hashtag on Owntweet. Find trending content, advice, and updates from experts in the field.
This blog was very nicely formatted; it maintained a flow from the first word to the last. Goku Sab Black Jacket
Dare to experience the benefits of our website directly? If you dare, try it now! With your best experience, only here https://reviewfilm.id
Allow Cosmics Publishers to make convincing substance for you through their master professional ghostwriting administrations custom-made to your remarkable voice. Professional Ghost Writing
Still often playing games that can’t make money? Oh, don’t do that, it’s just a waste of time! Please visit this site that can make money easily and it is guaranteed that you will definitely get the jackpot in a very short time https://beachhousebalmoral.com/
Hi there i still love to play these game online whAT THE best thing is this that you dont even need to download the game on your server https://thecookieclickerunblocked.com/
To make a classic board game box, measure the game components for the box’s size, then cut chipboard or sturdy cardboard for the base and sides. Assemble the box using glue or tape and ensure the lid is slightly larger than the base. Wrap it in decorative paper or fabric for a finished look, and label it with the game’s name or design. Test the fit to ensure it securely holds the game components.
Use this article website to get the latest information about everything in each article, immediately visit this website directly https://jatimland.id
Open our site today and get insight into this website, just by reading it you will definitely be guaranteed to be addicted https://auroompartners.com/
The khelo24bet is a trusted service providing lottery ticket sales and management, offering convenience and secure transactions for lottery enthusiasts.
Based on our observations, this article site has been increasingly advanced and developed in recent years. With developments that can make everyone very interested in each article, the article has a lot of insight. for those of you who have free time, please visit this website https://zeusjpmaksimal.id
ulasan singkat tentang ROBOPRAGMASLOT: Robopragma v4 Cheatslot Terbaru dan Terbaik di Indonesia Saat ini!
ROBOPRAGMA
Many companies offer private transfer services from Rize–Artvin Airport to various locations in Rize or surrounding areas. You can book these in advance online…Rize Havalimanı Transfer
To take advantage of this offer, please visit our website at https://menangbre.com/ and don’t miss this opportunity, because our website has some unique and interesting features for all of you.
Show your curiosity by visiting this website, because this website has various very unique and interesting discussions, and this site has some very great insights https://mlid.games/
Creating a classic board game box is a fun and rewarding DIY project that ensures your game pieces and board are securely stored. Use thicker materials (like chipboard) for heavier games. Consider adding magnetic clasps or ribbon ties for a sophisticated closure. Use a theme that matches the board game for a cohesive design.
Increase your insight by visiting each of our websites. Visit our website regularly and we guarantee that you will be able to increase your insight in just a short time https://money-book.net/
This is an amazing site for those looking to adopt teacup chihuahua, we have beautiful baby chihuahuas and we deliver all over US plus our pets are fully train and AKC registered.
teacup chihuahua puppies for sale
Thank you for the information you provide here, I get additional knowledge. If you are interested in getting teacup chihuahuas as pet, we recommend you contact this website get the best you ever wanted.
teacup chihuahuas for sale
This is one of the trusted online pet website that is safe to buy from and you can easily get your desired teacup chihuahua with ease. Check out our website and you wont regret it.
https://highlandchihuahua.com/
apple head chihuahua for sale
This is an amazing site for those looking to adopt teacup chihuahua, we have beautiful baby chihuahuas and we deliver all over US plus our pets are fully train and AKC registered.
teacup chihuahuas for sale near me
Thank you for the information you provide here, I get additional knowledge. If you are interested in getting teacup chihuahuas as pet, we recommend you contact this website get the best you ever wanted.
Want a website with more articles and games? I will show you a link that can take you to where you want to see it and you just have to click on the website that is there https://sneakerhyped.com/
The way this article was written is truly impressive. The author’s ability to simplify complex ideas while keeping them engaging is remarkable. The chosen theme resonates with current issues, and the title was perfect in capturing the essence of what was discussed. It’s both informative and thought-provoking.
I absolutely love how the author approached this topic. The article presents a fresh perspective and offers valuable insights. The way the writer breaks down the theme step by step makes it easy to understand, and the title alone draws you in with curiosity.
Making a classic board game box requires some creativity, basic crafting skills, and the right materials. se high-quality materials for longevity. Add foam padding for delicate pieces. Customize the design to reflect the theme of the game.
Get the best solution for your problem with us! because we have a website that can find the answer to the problem you want to find. Immediately visit the link on the side https://dustlandexpress.com/
Only on our trusted website, play slots with High RTP + Daily Cashback and get other benefits just by registering on our website here https://nixon.asia/
I got know your article’s Content and your article skill both are always good. Thanks for sharing this article this content is very significant for me I really appreciate you
https://packagingmines.com/custom-soap-wrapping-paper
Tim customer service kami siap membantu Anda kapan saja untuk memastikan pengalaman bermain tanpa hambatan`
IKN99
Feel the sensation of extraordinary taste with our website. With games that have very big wins and abundant bonuses, you can only get it on our site and visit it directly here https://ky-08.com/
Have a favorite number, lets install it and prove whether your favorite number will bring unexpected luck, lets register and visit our website here for free https://betsfifa13.com/
play casino games and get your luck with us with super big jackpots that you can get on our website here https://6430106.cc/
Don’t miss this opportunity! Because we provide an opportunity for those of you who want an article that can discuss anything and various games that can make you easy to get money in an instant, please visit directly on this description link https://carajpbos.com/
출장마사지 는 고객의 편안함과 건강을 최우선으로 생각하며 맞춤형 힐링 서비스를 제공합니다.
시간제한업는 출장안마 업체 바나나 출장안마 많이 찾아주세요
To make a classic board game box:
Gather sturdy cardboard, glue, ruler, scissors, and decorative paper. Cut a rectangular piece for the bottom and four sides, then glue them together. Repeat for the lid, making it slightly larger for a snug fit. Decorate with printed or hand-drawn designs for a classic look. Let it dry completely before use.
Today’s number predictions, come on, don’t miss the latest news about numbers that can increase your luck. Complete information, come on, visit our website here https://188.166.215.155/
Good news for all of you! There is a site that can show you. This site can show you how to make money and various interesting articles that can make you all interested in this website https://6430106.cc/
Join now and enjoy an exciting slot playing experience with unlimited winning opportunities. For complete information, visit our website here https://159.65.135.10/
Trusted lottery dealer site in Asia, come join us to increase your winning ratio, complete information only here https://trick2deals.com/
Todays best prediction is ready! Don’t hesitate to try your luck with us. Who knows, today is your turn to win big, let’s visit our website here https://flotationphilly.com/
A article masterpiece that deeply inspires, sparks boundless creativity, and establishes a new standard for innovation and excellence.
An article masterpiece that profoundly inspires, fuels limitless creativity, and sets a groundbreaking benchmark for innovation and excellence.
Discover top ENT doctors in Gurgaon at Miracles Apollo Cradle/Spectra, providing expert care for ear, nose, and throat conditions. Over 10K successful surgeries since 2002.
The number 1 lottery dealer site in Asia with many benefits that you can get just by joining our website here https://viagracia.com/
There’s something new on our website! With interesting writing, discussions about anything. You can get it only on this website link, and visit immediately https://zonaindonesia.id/
Deposit now, get an additional 50% bonus for all slot games and enjoy the excitement of playing with a minimum deposit and can win maximum prizes only on our best website here https://c365fx.com/
The latest destinations and luxury vacation spots, we present news that you can find on our website here https://zonaindonesia.id/
An article masterpiece that inspires deeply, sparks boundless creativity, and sets a transformative standard for innovation and excellence.
I offer independent vehicle inspections to help people all across Melbourne make smarter, safer, and more informed choices when buying a new car. pre purchase car inspection
A article masterpiece that profoundly inspires, fuels limitless creativity, and establishes a transformative benchmark for innovation and excellence.
An article masterpiece that profoundly inspires, sparks unlimited creativity, and sets a groundbreaking benchmark for innovation and excellence.
Now there is an article site about the best online slot games in Asia with a game percentage of up to 100%. Register now and win big with us https://tulicovirtual.co/
free spins every day for our loyal members, come on, try your luck with us and win the super big jackpot that we provide especially for you, for complete information, visit our website here https://qilinqq.info/
play our best online slots with lots of prizes that we provide especially for you, come visit our website here https://c365fx.com/
Hi! This is my first visit to your blog! We are a group of volunteers and are starting a new project in the community in the same field. Your blog gives us useful information to work on. You have done a great job! Please visit my site https://land-scape.id
nagasaon Your blog gives us useful information to work on.
If you are looking for information about expertise on any topic on the blog site, you can find all the information on my blog about games, news and all kinds of information we have. Please visit here soon https://lauramontes.com/
The most trusted and safest lottery dealer site number 1 in Asia. Come on, register and win super big prizes that you can win with our website here https://fusogacor.land/
Our lottery dealer site is a trusted site that is guaranteed to be safe and win. Come join us for the victory you want only here https://jillduncaninsurance.com/
A article masterpiece that deeply inspires, ignites boundless creativity, and establishes a groundbreaking standard for innovation and excellence
An article creation that profoundly inspires, fuels limitless creativity, and sets a transformative benchmark for innovation and excellence.
An article creation that inspires deeply, ignites limitless creativity, and sets a new benchmark for innovation and excellence.
Our website provides online casino games that can produce super big jackpot prizes that you can win on our website here https://haopangzisp.com/
try the exciting experience in our slot world that will bring you big wins that you will get only on our trusted website here https://bar-bartackle.com/
Your insight on how blog articles can benefit curious people is invaluable! I found another website that also has great files, discussing very interesting and easy to win slot games along with very accurate lottery values https://myreview.id/
Our website provides many choices of accurate prediction numbers that will bring you the big win you want. For complete information, come visit our website here https://black-label01.com/
Our website provides the best slots in Asia which are guaranteed to be safe and definitely gacor, there are also many other bonuses that you can get on our website here https://olislot-maxclub.com/
To create a classic board game box start with sturdy materials for durability and design a captivating cover that reflects the games theme. Just as simone ashley coat captures attention with elegance your box should entice players inviting them to explore the fun inside. A memorable presentation enhances the gaming experience.
Netflix Account Updates In 2025
Netflix Latest Account 2025 is planning to introduce an extra fee for people who share their accounts outside their households from early 2025. https://lalalori01.tumblr.com/
online lottery site guaranteed safe and reliable, come on, place your best numbers and win big prizes that we have prepared especially for you https://gmpguide.com/
Do you want to try a site that provides games and is easy to win? We have a site that provides this slot game that can easily get a jackpot with a very high chance of winning https://bjsbarpizzaflorissant.com/
Come on, follow our accurate number predictions every day for you and place your chosen numbers on our website to win big prizes available only here https://1787tz.com/
I just wanted to mention that I am new to blogging and really enjoy your blog. I might plan to bookmark your blog posts. You really have great posts. Thanks for introducing your blog, we will also introduce online game sites that have slot games and also easy jackpot lottery and have lots of super maxwin prizes and bonuses versace 4d
Our website provides online slot games that can produce big prizes with lots of bonuses available and you can get them just by visiting our website here https://olislotvietnam.blog/
Our best slots provide special discounts and big prizes for you today, no matter how much you deposit, you will definitely make a profit on our website here https://bosolislothebat.blog/
Our website provides online slot and lottery games that can produce super big prizes that you can only win by visiting our website here https://fusoagacor.org/
online games that already provide various types of games such as slots and also lottery, we have a site that has been programmed for all of you to make it easy to get victory and also abundant bonuses you can get here. And this site also has a very unique and interesting feature that will make you interested in this site https://nngwyx.com
The most trusted HK lottery dealer site number 1 in Asia, dont miss information about us only here https://www.ourfinehouse.com/
lottery dealer site with accurate number predictions every day for your victory, come visit our website here https://doublewak.id/
Our website provides many games that can produce real prizes in very large amounts especially for you, come on, register here https://homesdesign.ca/
These chocolate chip cookies are absolutely heavenly and irresistible. Soft and chewy in the middle, with a slight crisp Cheddars Nutritional Information Menu on the edges. Each bite is loaded with gooey, melty chocolate chips!
The information you provide has a lot of insight that can be obtained so that everyone is interested in your blog. And a site that can give you money with only a small capital, you get money and abundant bonuses because this site has games in the form of slots and lottery, for those of you who want to try it, please visit here directly https://psychedelicrepository.com
online slot site with super big jackpot prizes that we provide especially for you players who want to try a new experience in our slots only here https://hnenpu.com/
Get in-depth football news about player transfers and developments of football clubs around the world with our website here https://footballformguide.net/
Thanks on your marvelous posting! I seriously enjoyed reading it, you may be a great author Papa4d bandar togel will be sure to bookmark your blog and definitely will come back from now on.
Play todays gacor slots and feel the sensation of winning big easily on our trusted website here https://ersatzcoin.com/
Some slot games and also lotteries have surefire tricks to win, where each prize can tempt you with its prize, this site has tips and tricks to win. Please visit the direct description link on the side https://perfectreplica.me
Play the best online slots on our website with lots of attractive bonuses for your convenience in playing and feel the sensation of winning big just by playing on our website here https://sponsordirectory.info/
This post is phenomenal! The clarity of your explanations and the practicality of your advice make it an incredible resource. The actionable steps you’ve outlined are easy to follow and highly effective. Thank you for creating such a well-written and engaging piece of content. Your blog is a must-read, and I’ll be recommending it to my friends and colleagues. Keep up the amazing work—you’re doing a phenomenal job, and your writing is consistently top-notch!
Measure your board game components and cut sturdy cardboard or chipboard to create the base and lid. Fold and glue the sides to form a rectangular box for both the base and the lid. Use tape or extra layers of cardboard for added durability. Cover the box with decorative paper or print a custom design. Seal with a protective coating (optional).
Limousine service in Miami and at MIA with Privyer ride. Premium vehicles & professional drivers. $90 per hour special offer on hourly bookings limo services near me
Cookout’s menu offers a wide variety of affordable and customizable options, making it a popular choice for quick, satisfying meals. The inclusion of Southern favorites like hush puppies and barbecue sandwiches adds a unique regional touch. With its extensive milkshake selection and value-packed trays, Cookout stands out as a fast-food destination that caters to diverse tastes.
Play the spectacular match slots that we hold with super big jackpots that you can win just by registering on our website here https://t0953.com/
This is the right site for anyone who really wants to read or play this site. You can find out so many things that it is almost difficult to leave this site, because this site has articles and slot games along with lotteries too that almost all players get big prizes. Well!, for those of you who want to try it, please visit the website next to this https://newyorkstrippersforyou.com
Odds805 Slot Gacor Hari Ini Terpercaya Mudah Maxwin No.1 diindonesia.
AGEN77 : Link Resmi Daftar Slot Gacor Gampang Maxwin Terbaru 2025
AGEN77 RESMI
GARUDA76 : Link Resmi Daftar Situs Slot Gacor Gampang Maxwin di Indonesia
GARUDA76
OURASTORE : Gameshop Topup Pulsa Resmi Tanpa Potongan Gacor dan Terpercaya
OURASTORE
IKN99 : Situs Slot Gacor Terpercaya Hari ini
IKN99
IKN99 : Situs Slot Gacor spaceman
IKN99 SLOT
GARUDA76 : Link Resmi Daftar Situs Slot Gacor Gampang Maxwin di Indonesia
GARUDA76
your article is greatfull and thanks for sharing this article in my family. your article is very happy more aticle is share.
https://www.bestinformationresults.com/
For those of you who like slot game sites and also lottery, you can visit this website link, and our website has several features and has been designed with very good quality https://hotelcityparkpokhara.com/
RTP SLOT GACOR AKURAT TERPERCAYA DI INDONESIA GAMPANG MAXWIN
RTP SLOT GACOR
IKN99 : SITUS SLOT GACOR MENANG HARI INI
IKN99
As you embark on your journey through the enchanting world of Ragnarok Online, download rebirthro
Looking to add some fun to your wardrobe? Our collection of Funny T-Shirts has something for everyone! With witty phrases and quirky designs, these shirts are perfect for expressing your sense of humor. Available for both men and women, they’re great for casual wear, gifting, or just adding a touch of personality to your day. Whether you’re out with friends or just lounging at home, our funny t-shirts are sure to bring some laughs!
Love Bound lingerie store offers a large number of sumptuous and sleek underwear to lift your certainty. Lingerie Store
Our flagship game is a game that has various features and also various games in it with big prizes and big bonuses. With slot games and lotteries along with others, you can get it on the website link on the side https://2115s.com/
Thanks to sharing this helpful topic, If you need Custom Boxes can significantly improve product sustainability by utilizing Eco-friendly materials, cutting waste, boosting reusability and recycling, extending product shelf life, and increasing supply chain effectiveness. https://custompackagingpro.com/
play your favorite slots on our trusted website here with lots of discounts and attractive prizes especially for you, come visit our website here now https://wonderlandnation.com/
SIPBOS168 : Situs Slot Online Terpercaya Se Indonesia
SIPBOS168
SLOTINDO : Situs Slot Online Terpercaya Se-Indonesia
SLOTINDO
하이카지노와 플러스카지노는 모두 사용자들에게 최상의 엔터테인먼트를 제공하기 위해 노력하며, 한국 시장에서도 많은 인기를 끌고 있습니다. 플러스카지노
Making a classic board game box requires creativity and attention to detail, much like choosing a womens yellow jackets to complete a bold, stylish look. Both projects require thoughtful design whether crafting a memorable game experience or creating an eye catching outfit, each one adds a touch of personality and flair.
Our website provides accurate and complete lottery number predictions that can bring you the victory you want with us here https://6399appxz.com/
win the lottery jackpot easily just by visiting our website as your reference to get the big prize you want with our website https://musosites.co/
Some sites have articles that will definitely make you interested in this site because this site has discussions about slot games and also lottery that will definitely interest you, and this site also provides games that have abundant prizes. Please visit directly on the link on the side https://700900.net
Get the latest news about the World Cup in full and in depth which we present exclusively on our website klasemen pildun 2026
To make a classic board game box:
Materials: Gather sturdy cardboard, craft paper, glue, scissors, and tape.
Measurements: Measure your board and components to determine box dimensions.
Base: Cut cardboard pieces for the bottom and four sides; assemble and secure with glue or tape.
Your game box is ready!
TOP99BET : RTP SLOT GACOR TERPERCAYA GAMPANG MAXWIN DI INDONESIA<
RTP SLOT GACOR
Nice post. Are you new to the world of gaming and wanting to understand what is unblocked games version ? If so, unblocked version takes the fun a step further by allowing you to play the game anytime, even in restricted environments like school or work. For in-depth information, visit the website provided.
mp4moviez offers real-time coverage and updates on various sports events, bringing live sports action directly to viewers.
GONBET Situs Slot Gacor Maxwin Gampang Menang Resmi Hari ini
join us to win slot games with big jackpots that you can easily get on our trusted website here https://lovelehuo.com/
MARKAS388 : Link Daftar Resmi Gameshop Terbaik di Indonesia Terbaru 2025
MARKAS388
Making a classic board game box is a fun and creative project. A well-designed box not only stores the game components securely but also enhances the overall presentation and durability of your board game.
BORNEO388 : Link Gameshop Alternatif Resmi Terbaik dan Terbaru di Indonesia 2025
BORNEO388
BOS388 : Link Alternatif Anti Nawala Resmi dan Terbaru 2025 di Indonesia
BOS388
Play our gacor slots with big wins that you can easily get. Come on, register immediately on our trusted website here https://seouzmans.com/
chase your dream jackpot with us with lots of bonuses that will bring you the victory you want with us here https://bloginspira.com/
surefire tricks and tips to win in slot games and also lottery and others. We have a site that has these tricks and we also provide slot and lottery games that can make you win easily because we have provided a very complete site about everything https://88557778.com/
Come on, register on our online slot site with lots of prizes that you can easily win on our trusted website here https://putarspin.id/
IKN99 : SITUS SLOT GACOR GAMPANG MAXWIN RTP AKURAT
IKN99
MEGAWIN188 : Link Resmi Gameshop Terbaik dan Terlengkap di Indonesia Terbaru 2025
MEGAWIN188
A true article that inspires deeply, sparks boundless creativity, and sets a remarkable standard for innovation and excellence.
Play casino with many interesting features that you can enjoy for your luck and win the big jackpot prize that you have been waiting for with us here https://ddrwduo02.net/
achieve victory in slot games and also lottery easily. We will recommend a site that provides slot games and also lottery that is very easy to win, please visit directly on the website link on the side of this https://visausaexpert.com/
play your favorite slot games on our trusted website and enjoy daily deposit bonuses and free spins with us on our best website here https://netdealroomwv.info/
Come on, always update with the latest football news with our website, complete and exclusive, starting from scores to match highlights, only here.https://footballify.net/
Creating a classic board game box involves several steps, from designing the box itself to ensuring that it’s both functional and visually appealing. Here’s a detailed guide on how to make a board game box, whether you’re crafting one for a custom game or designing a new version of an existing game.
Thank you for your wonderful blog site! I really enjoy every single one of your posts. This blog site has very interesting posts and games with easy wins. You can check it out on the website link I will show here https://homerenewalz.com/
play online casino games get more benefits by just registering on our website and get the super big jackpot prize that we provide on our website https://brilliantproductservices.com/
Play Your Favorite Casino Games! Roulette, blackjack, baccarat and many more are waiting for you with special bonuses every day with us here https://autosustad.com/
RTP AKURAT 2025 TERBARU DAN TERPERCAYA DI INDONESIA!
RTP AKURAT 2025
Gameshop Deposit Pulsa Tanpa Potongan Terbaru dan Terpercaya di Indonesia
Deposit Pulsa Tanpa Potongan
Link Alternatif Resmi Slot88 Gameshop Terbaik dan Terpercaya di Indonesia
SLOT88
TOP99BET : Link Alternatif Resmi Top99bet Gameshop Terbaik dan Terpercaya di Indonesia Terbaru 2025
TOP99BET
TUBETOTO88 : Link Resmi Gamehsop Terbaik dan Terpercaya di Indonesia 2025
TUBETOTO88
GAMESHOP DEPOSIT PULSA TANPA POTONGAN RESMI DAN TERPERCAYA DI INDONESIA TERBARU 2025
DEPOSIT PULSA TANPA POTONGAN
SLOT77 : Link Resmi Gameshop Terbaik dan Terpercaya di Indonesia Terbaru 2025
SLOT77
We provide a site that you can visit on the website link that I will display here, because the site that we provide has information about the world of football that can become your hobby https://footballsliver.com
ID777 : Link Login Resmi Situs Gameshop Terbaik dan Terpercaya di Indonesia Terbaru 2025
ID777
JITU777 : Link Login Resmi Gameshop Terbaik danTerbaru 2025
JITU777
TOP99BET : SLOT88 RESMI DAN TERPERCAYA DENGAN DEPOSIT PULSA TANPA POTONGAN TERBARU 2025
SLOT88
SLOT88 : Link Resmi Daftar Situs Slot Gacor Gampang Maxwin di Indonesia Terbaru 2025
SLOT88
A true article that profoundly inspires, ignites limitless creativity, and sets an exceptional benchmark for innovation and excellence.
An article masterpiece that deeply inspires, fuels boundless creativity, and sets a new standard for innovation and excellence.
A article masterpiece that profoundly inspires, sparks limitless creativity, and establishes a new benchmark for innovation and excellence.
Our website provides a complete match schedule and the latest news about match results which we present exclusively only here https://footballify.net/
You should visit our blog site again because we have the latest updates on every site, and on this site we have very interesting games with slot games and also lotteries that you can play anytime with very big prizes https://lggyz.com
Are you bored and there are no games that interest you? There is a game that can make you interested in the game and of course you will continue to want to play it, and this game also has a very big prize with abundant bonuses. Visit our website directly with slot games and also lottery games that await you all haitogel
online casino sites with high winning rates that you can get just by visiting our website here https://autosustad.com/
Feels perfect when you are aching all over. nice blog and great information. https://www.facebook.com/groups/1125176235145270/
Why do people still play slot games and also lottery on sites that do not guarantee victory? We have a game site that you can play easily with big prizes and abundant bonuses so that you will all be interested in the prizes that will be displayed later https://okisealq.com
A truly article masterpiece that deeply inspires, ignites boundless creativity, and sets a new standard for innovation and excellence.
An article masterpiece that profoundly inspires, fuels limitless creativity, and redefines the standards of innovation and excellence.
A article masterpiece that inspires deeply, sparks boundless creativity, and sets new benchmarks for innovation and excellence.
play casino online on our website with many casino games that you can play, come on, get a big jackpot that you can get just by registering on our website https://bastimentosalive.com/
Play online slots without fear of loss and win big prizes that you can get by knowing the right tricks with our website https://thecryptoinsights.com/
The most complete online slot and lottery site this year with complete providers along with abundant maxwin prizes and bonuses. We provide this site especially for all of you, with games that are very easy to win and play immediately https://9992379.com
Play online slots without fear of loss by knowing the special secrets of the slot game that you will play. Our website always provides surefire tricks to win slots easily and achieve the big win that you want with us here https://i0578cn.com/
Making a classic board game box can be a fun and rewarding DIY project. Use chipboard for a premium, sturdy feel. Seal the paper with Mod Podge or a similar finish for durability. Add compartments inside the box for game components using cardboard dividers.
An article creation that deeply inspires, ignites boundless creativity, and establishes unparalleled standards of innovation and excellence.
علاج أورام الكبد بالأشعة التداخلية
A article masterpiece that profoundly inspires, sparks limitless creativity, and sets unmatched benchmarks for innovation and excellence.
play our online slots with lots of prizes and bonuses that you can enjoy just by visiting our website and register to win the big jackpot with us here https://47id.com/
Our website provides accurate prediction numbers from experts that will increase your winnings. Come visit our website here and get the big prize you want with us here https://usmedicus.com/
Every day we always make new updates with games that are very easy to play and big prizes, our site also has a very interesting and unique theme so you will definitely be interested in our website https://cdftzs.com
Checkout
Cookout
Our website provides online games that you can play on our website and also enjoy many prizes and bonuses that you can get just by registering on our website https://arazblog.com/
I know this is beyond the topic you are talking about, but I would like to offer a topic that discusses football matches with very complete and detailed information, including match results and other news. We have provided news related to football https://juventusfcpro.com
win online slot games easily just by following our surefire tricks to get the super big jackpot prize that you have been waiting for. Come on, get your luck with us by visiting this website https://telemallbrand.com/
The audience has also liked their work Bondage Valley.
I really like writing that makes people think to understand the writing, with broad insight and also neat and good writing, we have a blog site that contains writing and also contains online games that are very popular with everyone, namely slots and also lottery along with others with various unique features situs toto online
play online casino on our website with higher chances of winning that you can get only by playing on our trusted website and get a welcome bonus for you with us here https://autosustad.com/
My suggestion is very helpful for those of you who want to get money easily, you can get it directly on the website link that will be displayed here, and this site has very elegant and attractive features along with abundant prizes and bonuses, visit here immediately https://dailygisthub.com/
Analog games bring people together with their timeless charm and interactive fun While enjoying a game night, why not channel your inner champion by sporting a rocky balboa jacket Perfect for creating a bold statement it adds a touch of classic style to any casual gathering. Play in style
Your insights never fail to amaze me! Looking forward to your next game-changing idea. Keep up the great Keyword!
a trusted source and has a very high quality so that you like to see it, this source is a site that has games as well as articles about slots and also lottery along with others and the game has prizes that will make you all surprised with the prizes that will be displayed directly visit herehttps://slotsjpfantastis.id
Play online casino with us with many of the best graphic casino games that we present for your convenience in playing. Come on, register now and win big jackpot prizes that you can win only on our website https://whitneymathers.com/
As a t-shirts graphic designer, I specialize in creating funny and eye-catching designs that stand out. My collection of funny t-shirts for sale combines humor with style, offering something for everyone who loves to make a statement with their wardrobe. Whether it’s clever wordplay or quirky graphics, these shirts are perfect for adding a touch of fun to everyday wear.
Great post! Thanks for sharing this Keywordinformation. Looking forward to more insights like this!
Get complete and updated news about the world of football that you can get for free just by visiting our website here https://sports-vulkanstavka.com/
play online download games that are already available on the website that I will show you, on this site there are several online games such as slots and also lottery that you can play anytime and in the same way and have been designed for players to make it easy to get very big wins https://businessblazee.com/
Play online slots without fear of loss and defeat by following our secret tricks that will bring you big wins. Come on, join us on this website https://blooket.biz/
k11bet login refers to accessing your account on the K11BET platform, an online betting site offering a variety of sports betting options and casino games.
Wow, what an incredible post! The Keywordshared are truly eye-opening and packed with value. Can’t wait to see more of your amazing content!
makasih atas artikel nyaa
my website : Papa4d
live streaming apps are platforms that allow users to broadcast or watch content in real time over the internet. These apps are widely used for various purposes, including entertainment, education, gaming, business, and social interaction.
The information shared is Keywordhelpful and informative. Keep up the great work – looking forward to more content like this!
Such a great tutorial! The step-by-step process made it easy to follow, and I love how you showed the details for creating a professional-looking board game box. Can’t wait to try this out myself!
Click here to visit our site for buy online leather jackets worldwide.
BUY Sweeter High thc syrup 1000MG THC CANNABIS INFUSED SYRUP|Buy Sweeter high thc syrup
Sweeter High Cannabis Infused Smooth Syrup can be added to your favorite juice, soda, , or drinksimply great by itself. Just be careful because the small bottle contains 1000mg of THC!
1000MG THC CANNABIS-INFUSED SYRUP
Sweeter High Cannabis Infused Smooth Syrup can be added to your favorite juice, soda, drink, or simply great by itself. Just be careful because the small bottle contains 1000mg of THC.
Jeeter Juice Vapes
Jeeter Juice Vapes are available exclusively at the legal bud and vape store. This specific flavor of gelato is packaged in very adorable juice box packaging, which makes the unboxing process quite enjoyable. Jeeter juice flavor carts come in a variety of flavors and provide an enjoyable taste with each puff. Jeeter Juice Vapes Gelato Hybrid are best-selling products at One Stop Vape Store that refresh your mood with their pleasing aroma and also make you feel relaxed. http://www.ultravapemint.co.uk
Our commitment is to provide uncompromising cannabis products to those in desperate need. Our success started when a small group of committed experts became dissatisfied with the industry’s lack of honesty, transparency, and experience, dominated by people who saw this as yet another exciting new trend or hobby.
Instead, we set out to elevate the industry through innovative engineering, technological exploration, and manufacturing perfection, enlisting the help of a talented group of scientists and engineers.
Countless hours of research have led us to create a flavor profile exceeding all standards set before;
We are proud to provide high-quality cannabis oil goods. We are redefining cannabis through innovation, unity, and culture but, above all, facilitating a lifestyle of excellence, quality, luxury, and taste. http://www.ultravapemint.co.uk
Are you looking to Buy Petra cannabis Infused Mints? Please place your order On our website & get a massive discount on our running offers with discreet shipping. http://www.ultravapemint.co.uk
Our site provides slot games with big prizes that you can get just by visiting our website and you can play many interesting slot games with us here https://xjjhq.com/
I have tried to visit a site that contains a lot of discussions and also with neat writing and is very easy to understand for all of us as visitors, for those of you who are curious, you only need to visit the link on the side here https://chatgptopai.com/
Come on, follow our strategy in playing lottery on all sites that guarantee big jackpot prizes will soon greet you. Visit our website and find your luck now here https://nomorkeluaran.id/
Thank you for your sharing. I am worried that I lack creative ideas. It is your article that makes me full of hope. Thank you. But, I have a question, can you help me? SEO Agency in Gurgaon
Play online lottery with us with lots of tips and tricks to win online lottery that you play on your favorite site. By visiting our website, you will win a super big jackpot prize that is only available on this site https://caramaintogel3d.id/
PREDIKSI HK LOTTO
To make a classic board game box, start by measuring the dimensions of your board and components. Cut cardboard to size, reinforce with glue, and customize the design. Add sections inside for organizing pieces.
https://www.unisayogya.id/
Pantau link resmi kami di https://kelas11.sman11-jkt.sch.id/
Your article helped me a lot, is there any more related content? Thanks!
I don’t think the title of your article matches the content lol. Just kidding, mainly because I had some doubts after reading the article.
Your point of view caught my eye and was very interesting. Thanks. I have a question for you.
Thank you for your sharing. I am worried that I lack creative ideas. It is your article that makes me full of hope. Thank you. But, I have a question, can you help me? https://www.binance.info/uk-UA/register-person?ref=W0BCQMF1
Can you be more specific about the content of your article? After reading it, I still have some doubts. Hope you can help me.